
Good day everyone,
I hope you are all well and having a great day, welcome to CryptoGod-1's blog on all things gaming and literature. Following on from a post I did titled "Elementary my dear Watson" where I brought up the topic of the latest game which will be released in the Sherlock Holmes series by Frogwares, I have since decided to do a post on each of the individual games to give readers a better idea of one of my favourite gaming series ever created. Today I will be looking at the seventh game in the series, called Sherlock Holmes: Crimes & Punishment.
The first post in the game series was Sherlock Holmes: The Mystery of the Mummy
The second post in the game series was Sherlock Holmes: The Case of the Silver Earring
The third post in the game series was Sherlock Holmes: The Awakened
The fourth post in the game series was Sherlock Holmes Versus Arsène Lupin (aka Nemesis)
The fifth post in the game series was Sherlock Holmes Versus Jack the Ripper
The sixth post in the game series was The Testament of Sherlock Holmes
Sherlock Holmes: Crimes & Punishment
The seventh game in the series, Sherlock Holmes: Crimes & Punishment, takes place in London and its suburbs in 1894 and 1895 with gameplay focused on finding the right culprit and making the moral choice of absolving or condemning them, and was released from 2014 to 2019 for Microsoft Windows, PlayStation 3, PlayStation 4, Xbox 360, and Xbox One. There are six thrilling and varied cases for the detective to solve, including murders, missing persons, spectacular thefts and numerous investigations. The evolvement of this game means players now get to choose their avenues of enquiry, interrogate suspects, name the guilty parties and even determine their fate. The cases are self contained and do not relate to each other in the game bar the moral choice Sherlock makes.
This game starts off in 1894 and spans into 1895 to cross paths with the testament of Sherlock Holmes, where a group of terrorists named the Merry Men are attempting to overthrow the government to free the citizens of the United Kingdom from debt.
The Fate of Black Peter
The first case Holmes is dealt is called "The Fate of Black Peter" which begins when Holmes is at 221b Baker Street blindfolded and shooting at vases to cure his boredom. Along with Watson, Holmes is engaged by Inspector Lastrade to investigate the murder of a man known as Peter Carey or Black Peter. He was an ill tempered captain and was found impaled onto the wall of his garden cabin with a whaling harpoon. The captain was a former whaler and sealer in the waters off Scandinavia who had made himself a small fortune in the industry. Lastrade has to visit Scotland Yard first as there has been a disturbance by a group known as the "Merry Men."
Sherlock arrives at the Captain's home and engages his wife, Judith, in conversation to question her. She informs Sherlock that her husband had been drunk the night before when he was killed and had been locked in his cabin. She found him the following morning. Holmes investigates the cabin, and discovers scratches around the lock. This hints at an attempted break in, and Lestrade informs Holmes that the scratches were not present the previous day. Holmes finds the body inside the cabin, pinned to the wall by a harpoon, along with a tobacco pouch bearing the initials P.C., and two drinking glasses. Holmes notices the way Mr. Carey was dressed would indicated he had expected company. Holmes notices a small box has been removed from a shelf, and finds a notebook with the initials J.H.N. on the cover. It is full of abbreviations and numbers. Holmes suggested waiting outside the cabin at night as the suspect was likely to return, and that night they catch John Hopley Neligan who is taken to Scotland Yard by Lestrade.
Neligan is interrogated at Scotland Yard and his possessions searched. He is the son of the disgraced Joshua Neligan, who disappeared with a box of valuable securities after his firm went bankrupt. Neligan says his father was only buying time when he ran, so he could recoup the required money to pay off his creditors, but he was never seen again after setting sail for Scandinavia. Young Neligan tracked some of his fathers missing securities to Peter Carey, and believed Carey may have murdered his father. Neligan is a slight young man and after Holmes does a harpoon with a dead pig experiment, believes it would take someone much stronger to kill Carey the way he died.
Holmes sends Wiggins, as part of his secret investigators group, to find the names of the crew who were aboard the ship captained by Carey in 1883, the Sea Unicorn. Meanwhile, Lestrade calls Holmes to Scotland Yard to reveal they found another suspicious man hovering around Woodman's Lee. This man, Hurtley, refuses to talk, but after investigating the garden and tool shed, Holmes deduces this man is a gardener and Mrs. Carey had been having an affair with him. She thinks he may have even gone as far as murdering her husband because she refused to be with Hurtley.
Wiggins returns with the list of possible suspects, and Holmes goes with the best lead, Patrick Cairns, PC. He was a harpoonist on the ship with Captain Carey, and has been out of work for some time. Holmes learns that Cairns he was the only witness to what happened to Joshua Neligan, who was indeed picked up by the Sea Unicorn but who was thrown overboard during the night on Carey's orders; the captain then stole the securities for himself. Holmes figures out the tobacco pouch he found belongs to Cairns, and that he was indeed at the scene of the crime.
Holmes now has to make his deductions and figure out what happened. Holmes can choose Neligan as the murderer, and wither condemn or absolve him. Either way he is off to prison, but will proclaim his innocence. Hurtley may also be chosen as the murderer in his stead, and even though Hurtley will claim a drunk Carey invited him into the cabin, he will continue to claim his innocence. Holmes can also decide these two men worked together to kill Captain Carey, as it was too much for one man to pin Carey to the wall with the harpoon alone. Holmes can choose which man was the instigator, and Hurtley will allege that Neligan threatened him, and Neligan that he is innocent, but Hurtley will confess if Holmes determines it was Neligan's plot.
Finally, Cairns can also be chosen as the murderer, and again Holmes can choose to condemn or absolve him. Cairns will arrive at 221B Baker Street the following day, expecting to meet a Captain Ahab Holmes mentioned when they met. Lestrade will attempt to arrest him if Holmes condemned Cairns, but the sailor will react by punching Lestrade. Holmes then spars with him, eventually subduing the man. If Holmes alvolves Cairns, he will meet him alone and Cairns will confess. He attempted to blackmail Captain CArey over the murder for money, but Carey attacked him and he was forced to defend himself with the harpoon. Holmes will allow Cairns to flee the country and report to Lestrade that the murderer was Pablo Coventrao, another of Carey's shipmates who had died the previous week.
Riddle on the Rails
The success of the first case is not long lived, as soon after Sherlock and Watson are visited by Mycroft. He requests the pair to investigate a case regarding the Merry Men. Holmes immediately refuses, he has plans to go on vacation with Watson to Staffordshire. A week later and once their holidays are finished, the pair are waiting at Evesham Station for their train back home to London. They are confounded when they can see the approaching headlight and hearing the train whistle, but for some reason the train never reaches them at the station. They decided to investigate, but due to the fog and dark they give up for the night. They return the following day, but to their surprise, the train has vanished with no trace left behind. After a quick investigation where they last spotted the train shows no results, the pair decide to look for a map from the station master, Everett.
After a brief discussion with Everett, Holmes and Watson take the railway map from the waiting area and also the train details from the station masters office. The train had been a special order, which included a special car, for a Mr. Robinson. A recent telegram informs them that Mr. Robinson is waiting at Bridlington Station. Another brief chat with Everett inform them that the train had been delayed the previous night due to an issue with passengers, but he did not know what sort of issue. He also explains to Holmes and Watson that the special car would have been iron clad without any windows, as it was generally required to transport something of value. Finally, he lets Holmes know that they can easily get a cab to Bridlington Station, and the pair head on their way.
At Bridlington Station they encounter an angry passenger, and also Mr. Robinson. He is a wealthy man, and claims to have had a priceless invention on within the special carriage, which he had planned on selling for a modest price. The invention would change the world, according to Mr. Robinson. He had been aboard the train with his prototype when in Bridlington Station was requested to leave the train to meet a Mr. Bromsbey. who was interested in the invention. Mr. Robinson claimed he will sue the train company for their incompetence. The Barcazas, a group of Chileans, were the only ones left onboard. They speak with the young station master next, a Mr. Bertram. He has information regarding the train, in the form of a strange telegram. It was sent from Chesterfield Station, but is full of errors and very vague which makes it unclear if the train even passed that station. Holmes finds the insurance policy of Mr. Robinson hidden beneath a floorboard, and it is for a considerable sum. Upon talking to Mr. Robinson again they discover he had lost the document when trying to make a telegram. Holmes instructs the Station Master to put Mr. Robinsons language in the luggage room, as is protocol. The detective and Watson then break into his case, where they discover Mr. Robinson had created multiple "exclusive sales contracts" with a variety of different customers prior to the prototypes disappearance.
They make haste to Chesterfield station where they encounter the Station Master, who is fast asleep at his desk. After waking him up and questioning him, they discover he has a binge drinking habit which means he was unable to send a clear telegram the previous night, and his testimony is not reliable due to that. They head to the station luggage storage room, where they find expensive French wine and Scotch whiskey, which have clearly been looted from parcels expected for the trains. In the next room they discover a handcar base, and Holmes deducts they did not see the actual train, just the headlight. They recreate the handcar along with a headlamp and whistle, showing that the train at Evesham was faked. Making use of a map from Sherlocks achieves, which he brought with him, they discover that there is a railway switch between Bridlington and Chesterfield and one by the station that is between Evesham and Chesterfield. They question the station master once more, and he explains how the dirty shovels in the storage area are from foreign workers, although not from the company, used the tools to keep water from the tracks, and they gave him good hooch to brighten up his day.
At the railway switch between Bridlington and Chesterfield, where they discover the switch is rusted but still working, and leads to some mines. Holmes deduces it would be simple enough to redirect a train in that direction. They go to the mines next, where the mine has collapsed and they finds screws where some railway track has been removed. There is a document in the guards station which indicates both the Chileans and the Mexicans are trying to purchase the mine, and in his discoveries Holmes and Watson find dynamite was used to collapse the mine, which is part of the WEA Coal Company.
They go to a train station and send a telegram to Mycroft, seeing if he can help in figuring this all out. He replies, informing them that the Mexican Caracal had an initial deal but the Chilean Barcazas Company managed to snatch the concluding deal aided by their influential connections. They head to Doncaster, the station between Chesterfield and Evesham. Here the pair encounter an anxious foreign man leaving the hall. His dropped cigar tells them he is Mexican. A piece of paper half burnt in the ashtray also hints at a disagreement between the Mexicans and Chileans. They examine the side railway and discover a flooded field, meaning the quarry near the station is flooded. The rail leading to the quarry is also missing a section of track. Back at the station the pair question the station master, Mr. Duff, about the flooded quarry. He is only in the area a few months and knows nothing about it. He also delivered his telegram the previous night after seeing the train pass by, but accounted no passengers getting off. Holmes finds the Mexican man and questions him, the man is waiting there for the recovery of his friends but will not disclose his name or the name of his company.
The pair make their way to the nearby beach area, where they find heavy type tracks measuring the same as those at Evesham Station. The water level has also sunk at the lake, indicating a dam has burst which led to the flooded quarry. They find a metal plate with the words Las Zarpa, which after searching through his achieves, indicates a Mexican barge company.
Holmes now has to make his conclusion on what happened to the train. The first conclusion is that Mr. Robinson planned all of this as he is a swindler, getting assistance in having the train sealed in the mine along with his fake machine so he could make millions off the insurance and multiple contracts he already signed. If Holmes condemns Robinson, Lestrade and the police will take him away. If Holmes decides to absolve Robinson, he will allow Mycroft to intervene and resolve the matter without proper justice.
The next option is for the Chileans to have stolen the prototype, having sealed the train in the collapsed mine to hide their crime. Condemning them will see Holmes contact Lestrade and have the police perform loud and swift justice, even with the potential on an international conflict. Absolving them will see Mycroft intervene and ensure the Chileans are not able to do similar again, although it will be to Mycrofts advantage and see him get the prototype.
The next option is that the Mexicans are to blame, and they planned the murder of the Chileans by trapping them in the train before destroying the mine. To condemn the Mexicans will mean Lestrade is called up and brings justice on the Mexicans, and this will lead to a stand off with the Mexican and Holmes will need to be swift with his shooting to resolve the matter. While Mycroft will intervene once again if the absolve option is chosen.
Finally, the other option is that the Mexicans drowned the Chileans within the train. Once again the Mexicans have gotten rid of their competition, sinking the train in the flooded quarry with the Chileans trapped on board. They made use of the barges to move the train out into the water before sinking it and removing the train tracks. Condemning them will see Lestrade called, and once again the standoff happens. Absolving them will see Mycroft contacted, giving him the chance to resolve the matter.
Blood Bath
Holmes is feeling unwell, having tested out a poison on himself, when Lestrade arrives to inform them that two men were discovered tied up naked and stranded in a rowing boat on the Thames. They were bankers, and the Merry Men signed the RMS Oceanic banner which was found in the boat. There are rumours of corruption. Sherlock is disinterested, until Lastrade informs them there has been a murder at a Roman Bath House at Strand Lane. Sherlock and Watson make haste to Strand Lane. The chief archaeologist of the baths, Sir Rodney Bentcliffe, was murdered in the steam room, where he had been locked in alongside three others. Sir Gregory Pitkin, the bath's owner; Tristram Garrow, a district councillor; and Percival Blinkhorn, Sir Rodney's assistant in the excavations. No murder weapon was found and the police had to pick the lock to get the surviving men out. One other witness was present, a Mr. Phillips, he arrived at 6:30am to open the baths, and the four men had held a meeting in the steam room for about twenty minutes before Phillips heard shouting. The doors make a loud bang when opened so nobody could have entered, and Phillips ran outside to call the police when he couldn't get the door open. Within the changing area Holmes sees the men's clothing, and an unopened bottle of champagne. Into the steam room and the corpse is laying in a horrific bloody manner. He had been punctured through the right eye and through to his brain, but a lot more blood was produced than expected. Sherlock also finds dirt under the victims finger nails, along with a blood sample and a key found in the blood. The brazier at the back of the steam room contains some melted metal, but its too hot to pick up. Holmes presses the steam room switch next, which fills the room and makes it almost impossible to see. Finally he questions the other men, but none want to talk due to the horror and shock. Holmes also inspects a grid at the end wall, but it is not removable. Lestrade takes the suspects to Scotland Yard, where Holms can question them properly. Mr. Phillips informs Sherlock there was only one key and it is missing. Sherlock heads towards the Frigidarium but the route has a cave in on the way and he cannot proceed. He then makes for Bentacliffe's office, where Holmes discovers a strange shield like item, some newspaper articles, and a missing glass negative. Back at the Brazier Holmes uses a pair of tongs he picked up to remove the metal, and both he and Watson make their way back to Baker Street.
At 221B Baker Street Holmes begins to analyse the blood, dirt, and metal he discovered. The dirt is white clay, from the London district of St. Albans. The blood seem strangely liquid, and further inspection shows it has been heavily diluted with water. Finally, the metal turns out to be silver, of Britannia quality..
At Scotland Yard, Holmes speaks to each of the three men after he has gone through their belongings. After looking over the corpse and autopsy, Holmes beings the interrogations. The manager of the baths, Sir Gregory Pitkin, explains how he did not get on the best with Sir Rodney Bentcliffe but respected the mans ambitions, and they had planned to open the baths to the public once all the archaeological work was complete. He didn't see the murder due to the thick steam. Tristram Garrow, the councillor, clearly feels the effects of his strong medication, but claims the ring Sir Rodney had was cursed, and to have seen a gold knife flying through the air which killed the man. Percival Blinkhorn is an archaeologist specializing in Roman periods, and before Sir Rodney arrived the manager, Sir Gregory, wanted to put an end to his work. None of them brought the champagne to the bath house, nor can they explain the presence of the silver.
Holmes needs to figure out what discovery Sir Rodney Bentcliffe had made, and back at 221B Baker Street combines the map from the Sir Rodney Bentcliffe's belongings with his own. From here it is off to St. Albans dig site. When they arrive they discover the site is closed and abandoned. Holmes discovers its an old Roman City, and to ward themselves from the evil eye, Romans would melt valuables in the fire - like silver or tin. There are five areas within the dig site which Sherlock explores. Once he finds a trowel, there is a picture on a wall covered in mud which he uncovers, the same picture drawn in Sir Rodney's notebook. It depicts the Frigidarium.
Holmes goes to interrogate the suspects once more before heading to the Roman Baths. They all believe the golden key, as part of the cult of Mithras, is hidden somewhere within the bathhouse. Only the worthy one can bear it power of immortality, the rest will be cursed with death. Back at the Strand Lane Mr. Phillips informs Holmes that the route to the Frigidarium has been cleared and he can enter that location now. Within, there are five statues, and one missing. Each has a flagstones with an icon that can be pushed in-out at their base which are a spider, helmet, ship, one eyed face, wreath, scorpion, caduceus, trident and jug. Three referring to the dig site need to be pushed. These are pushed in any order, one eyed face of Cyclops, helmet (worn by Minerva) and trident (held by Neptune). Use of imagination reveals a hidden tunnel, which Holmes enters and leads to catacombs. Here Holmes will inspect some pillars, and end up needing to create a shadow on the floor by using the perforated plate taken from Sir Rodney's office. It shows the way to Mithras, after Neptune, the Bull, and the Bridge.
Back at 221B Baker Street, Holmes needs to make use of his analysis table. Holmes needs to assemble the cubes at his disposal to great a mould of the weapon used. After gathering the required ingredients for the plaster cast, Holmes creates the mould. Its shape fits the profile of the murder weapon, and it was made to be a replica of the Golden Knife of Mithras. Next Sherlock inspects the broken glass he found, and reveals an image of the Pyramids of Giza where Sir Rodney and another man are eating Ice-cream in the desert. Next Holmes figures out he needs to check if an ice knife or a silver knife can be created with the materials they discovered. Once Holmes has created both a Silver Knife and an Ice Knife from the clues found at the crime scene, it proves either weapon could have been used to kill Sir Rodney.
Back at St. Albans Holmes must find the way into Mithras. First Holmes must stand by Neptune with the trident. Then he goes to the bull. See that a line can be formed to the left broken pillar of the bridge that is in the water. Using the rope and the hooks found on the dig site, along with the crossbow found in the cabin, Holmes fires the ropes at the bridge and crosses the water using them, thus entering the hidden temple. Holmes needs to make use of the 7 Grades of Initiation document he found to direct them through the temple. They eventually a rock scale puzzle where Holmes balances rocks for them to proceed, and ascending the remaining levels eventually they reach the location of the Golden Knife. Once the pair navigate through the gates and retrieve the Golden Knife, they manage to exit the temple and must conclude who killed Sir Rodney, and with which weapon. Either the ice knife or the silver knife was used to kill Sir Rodney Bentcliffe, and it was clearly one of the three men locked in with him.
Pitkin can be claimed as the murderer, having been angry at Sir Rodney for postponing the opening of the baths. He would also have lost the site of the baths for a major excavation if Sir Rodney's discovery had been made public, putting paid to his idea of opening his own business. Condemning him will indicate that he either allowed the ice knife to melt by dropping it, or hid the silver one in the brazier. He denies the accusation, but Sherlock warns him he will face the gallows. If Sherlock absolves him, it is because Pitkin merely had no choice in the matter. He tried to reason and compromise with Sir Rodney but it was to no avail, and Sir Rodney had been about to take over the rights to the baths.
Garrow can be claimed as the murderer, having been tortured by his obsession with the Mithras curse. He was living in fear and his paranoia caused him to perform a ritual killing of Sir Rodney. Condemn him to send him to hang for his crime. Absolving him means Holmes will understand the man needs treatment, and Watson will ensure he gets it. Either situation sees Garrow as surprised that he could have killed Sir Rodney.
Blinkhorn can be claimed as the murderer, as he was humiliated that his work was being supervised by a specialist. He knew Sir Rodney would take all the credit for the work he had done, and therefore he needed to eliminate his rival and get him all the fame for his work. Blinkhorn denies the accusation when he is condemned by Holmes. If absolved, he will still deny the murder but Holmes ensures that the discovery will be made in Blinkhorn's name for all the work he had done.
The Abbey Grange Affair
Watson is awoken abruptly by Homes on a rainy night in November 1894. He has just received a letter from Lestrade, who claims to have a case in the suburbs for him and quite an unusual case at that. The pair make their way to Abbey Grange. Lady Brackenstall has informed inspector Lestrade that it was the Lewisham gang who committed the crime, and he feels the case is solved. Holmes is not so certain, and goes to question the Lady while Watson inspects the body of Lord Eustace Brackenstall which was smashed in the head with his own poker. Talking to Lady Brackenstall reveals theirs was not a happy marriage, and that three men had broken into the home and attacked her, tying her to a chair. She was unconscious and only woke to see her husband try rescuse her, only to be killed with his own weapon. It was three men, described by Lady Brackenstall and her maid Theresa in a very similar fashion as the Randall gang mentioned in the newspaper. Holmes discovers Lord Brackenstall's safe behind a picture, and must open it. Within he finds a medical report and lots of money.
In the dining room, Holmes and Watson inspect the crime scene. He inspects the body, which has a bashed in head and is laying by the fireplace. The bell rope near to it was cut by someone taller than Holmes. There are three glass, while one has beeswing, indicating there may have been three people drinking. The chair Lady Brackenstall was bound to is inspected, which has a rope attached to it, and also the silverware case where the items were stolen. Interestingly, an expensive candlestick nearby was not taken. Holmes decides he requires Toby the dog to do some more investigating.
Holmes collects Toby from Baker Street before returning to Abbey Grange. Toby sniffs around and eventually ends up at a well, leading to a wall. Within the well Holmes discovers a glittering object, which upon further inspection turns out to be a package containing the "stolen" silverware. After talking to Lestrade again, it is discovered that Lord Brackenstall had a drinking problem. Further to that, Lady Brackenstall informs Holmes that it was the thieves who drank from the wine glasses. Finally, Theresa tells Holmes how Lady Brackenstall does not have many friends in the area.
Sherlock and Watson return to Baker Street, where Holmes does some analysis on the rope he found. Cutting it reveals to original cut was made with a knife, which could indicate it was cut by someone with a sailors background. Looking through his archives, Sherlock discovers that Lady Brackenstall is acquainted with someone from the Rock of Gibraltar crew from the ship she arrived on from Australia. Making use of the "secret police" Holmes gets Wiggins to gather info on the crew. Examining the list, Holmes identifies a Captain Jack Crocker as the only viable candidate as someone who was in London on the date of the murder and was also aboard the Rock of Gibraltar ship.
Wiggins brings Captain Crocker to 221B Baker Street for Holmes to confront, but the sailor has an alabi. He was on board the Sharp the night of the murder, and regardless of Holmes claiming that Crocker tied Lady Brackenstall to the chair with a sailors knot, there are many sailors in London. It is now up to Holmes to make his decision regarding what happened to Lord Brackenstall.
Holmes can deduce the Randall's are guilty, and killed Lord Brackenstall with a poker. To condemn means all glory goes to Lestrade, who figured this out from the off. You can also take all the glory for yourself having solved this case so quickly.
Alternatively, you can lay the blame on Lady Brackenstall and Theresa. They killed Lord Brackenstall to protect Lady Brackenstall from his drunken rages, and staged the robbery to make it look like the gang from the local newspaper committed the crime. To condemn means the pair of women are placed behind bars. To absolve means Holmes understands they did not intent to kill him and it was an accident, therefore he misleads inspector Lestrade into believing its a gang of three men who committed the crime, but Sherlock cannot solve it.
Finally, Captain Crocker can be blamed for the murder. Condemning him means he is sent to jail for his crime of murder, while absolving him means Holmes decides the man committed his actions in defending a woman and does not deserve to suffer for the crime.
The Kew Gardens Drama
Holmes and Watson are at Baker Street, where Holmes has gotten the help of Bees in an experiment of his. They are off to the Royal Botanic Gardens to investigate a case of stolen rare plants from an exhibition. Holmes meets with the Deputy Director of the Gardens, Martyn Hamish. He is berating Albert Dunne, the son of the former Director Montague Dunne. Montague had died two days earlier from a heart attack and was found dead by the colonial collection in the gardens. Holmes examines the area where the rare plants were stolen, the "Plants from the East and the Land of the Rising Sun" display. Afterwards he searches where Montague Dunne died.
Holmes examines the broken signs, blood stains, and a set of footprints. The door is also broken and breached, From here Holmes considers whether or not it is indeed an accident, or if he died from a murder. Holmes looks around the Colonial Collection, and notices that a lot of the display is missing, while the area is quite clean. Looking around Holmes notices the ventilation grid up above which can be opened. Holmes decides his best option is to perform an autopsy on the deceased Montague Dunne. He goes to Scotland Yard and examines the corpse, along with the mans belongings. A letter addressed to a Mr. Wayne shows Mr. Dunne only wanted his name on the exhibition poster. Checking the body, Holmes discovers that Mr. Dunne died from inhaling a virulent vegetal poison which was done to ensure he died.
Back at Kew gardens, Holmes needs to gather more information on Montague Dunne. He gets the map of the area and discusses the recent events with Hamish and Albert. Holmes discovers Hamish did not like Montague as he felt the director did little work and took all the credit. Albert reveals that Hamish is currently the longest serving member of the garden, but never had the title of Deputy Director. His father would not have allowed it. Albert now feels responsible for the gardens and intends to take over the management role. After getting the keys to the directors office from Albert, Holmes searches it to find some newspaper articles on Key Gardens and a safe. Within the safe Holmes discovers more letters, including one which highlights a debt by Miss Margaret White to Dunne, and some regarding a complaint from the Divine Syndicate that Dunne has taken some of their plants.
Next door in the lab Holmes discovers some chemical, a phonograph with recording regarding communication within plant life, hazmat suits, and traces of a spilt liquid from a bottle. They need a strong nose. Toby will be needed for this one, but first Holmes searches the cloakroom. Albert did not give him the keys for it, so Holmes must pick the lock. Within Holmes searches their locks and find Montague was giving money to Margaret. Their is also a letter pointing to Hamish being eager to become director, while it is also discovered that Albert had his acceptance to the Royal Navy College blocked by his father, Montague.
Afterwards Sherlock investigates the seed room, the nursery, and the back area of the gardens. He encounters Margaret White on his journey, she informs Holmes that she has never been in the Colonial Collection room, and she considered Montague Dunne as her spiritual father. After inspecting the remaining areas, Holmes decides its time to get Toby. He finds a secret place in the bushes which contains a bottle and a chemical solution. Back at Baker Street Holmes searches the archives to figure out what the rare plants and symbols he found are, along with who the Divine Syndicate are. After this Holmes uses his workstation to analyse the chemical liquid.
After this Holmes decides he needs to figure out what the Divine Syndicate are up to. After talking to the Guru, Sherlock checks out their temple. Looking around Holmes finds garden pots with labels from Kew Gardens, along with an area where they have cocaine. More investigating reveals a den and plant where opium balls, along with three of the deadly plants. They are in cages with plants and caterpillars, and Sherlock examines all of them. After speaking with the Guru once again, it is discovered that five days ago the Divine Syndicate stole the plants at Kew Gardens. The had leant plants to Dunne for his exhibition and he never returned them, so in return they stole three plants back, although could not find the ones Dunne had taken. Therefore they took other plants from the exhibition.
Back at Baker Street Holmes does some experiments on the plants along with caterpillars. After discovering how each plant reacts, along with the caterpillars, under certain conditions, Holmes goes back to Kew Gardens to talk to the trio once more. Hamish denies having ever heard of the Divine Syndicate, and that Albert had been humiliated by his father in his presentation. Miss White also denies any knowledge of the Divine Syndicate, and gives Holmes her recording as proof of her alibi, which Sherlock uses on the phonograph to prove her whereabouts at the time of Dunne's death. Next Holmes talks to Albert, who also denies knowing the Divine Syndicate, and reveals how his father stopped him joining the Royal Navy. All three inform Sherlock of their whereabouts around the time of Dunne's death.
From here, once everyone has gone home, Holmes decides to simulate the death in the room with the Colonial Collection. Going off the research on the deadly plants, Holmes deduces that a caterpillar placed in the ventilation system along with the spore from the deadly plant is how Dunne could have died. Only from where Hamish was working would he have had a clear view of where Montague Dunne was at the time of death, and both Albert and Hamish's vents would need to be opened to ensure the caterpillars and spores were the cause of death. Neither of their work stations had a view of the Colonial Collection, so it must have been someone in Montague Dunne's office who could see when Dunne was at the plants. From here Holmes must choose who murdered Montague, and can choose an accomplice who assisted in the murder.
The Divine Syndicate can be chosen as the murderers, having been involved in a dispute with Dunne over stolen plants. After the murder, they stole the plants to cover their crime. The Guru of the syndicate can either be arrested and taken to Scotland Yard, or Holmes will decide because of the mans opium addiction he needs to be sheltered and treated accordingly.
Albert Dunne can be selected as the murderer, having killed his father after years of humiliation and frustration at his father blocking his entry to the Royal Navy. Holmes can either get him arrested and placed behind bars for the murder, or accept Albert acted to save himself from the tyranny of his father, and spend the remainder of his days with the guilt on his conscience.
Miss Margaret White is another option as the murderer, having been a victim of society and unable to make any further monetary gain from Montague Dunne, she murdered him. and made advances on his son, Albert. This will leave her with little pity from a judge if Holmes decides to get her arrested. He may decide that when Dunne cast her aside it stripped her of her life and she acted in desperation, allowing her to continue in her bleak life.
Finally, if Holmes decides Hamish conducted the murder, they will inform Lestrade, only to discover Hamish hung himself at Kew Gardens having been aware Sherlock was onto him. After examining the corpse and the regret letter on it, Holmes must decide if Hamish acted alone due to his club foot. Creating a timeline of the events, Holmes is left with three options.
Hamish worked alone in killing Montague, loathing him for the treatment of his father. Hamish had the time to lock Dunne in the Colonial room and activate the ventilation system to kill the man. Case closed.
Secondly, Albert assisted Hamish in killing Montague, for the same reasons as above regarding the humiliation. He locked the Colonial room and allowed Hamish to activate the ventilation system. He murdered Hamish to cover his tracks, and therefore should be put behind bars. Alternatively, Hamish killed himself from guilt, and Albert can live free but with the same guilt.
The third and final option is that Miss White helped Hamish to kill Montague. Similar to her reasons above, Holmes can condemn her for locking the Colonial room after Hamish released the caterpillars. She pushed Hamish to kill himself to cover her tracks, and therefore should be locked up. Alternatively, she can be left free to live her sorrowful and miserable life. Either way she will try to commit suicide, which Sherlock can either try and prevent or allow to happen via a bottle of poison she obtained.
A Half Moon Walk
Holmes and Watson are invited to the annual dinner from Sherlock's irregulars, and Watson is not impressed by the menu. Mrs. Hudson allows Wiggins into 221B Baker Street, where he informs the duo that his brother, Leighton, has been arrested and placed in jail for two murders of Brian Vercotti and Kenneth Butler. He is at Scotland Yard and Wiggins needs Sherlock to help clear his brothers name and find the real killer.
Holmes arrives at Scotland Yard to the surprise of Lestrade, and informs Sherlock that Leighton was attested while in the possession of a revolver. Sherlock inspects the item in the evidence room, and discovers the revolver Leighton was caught with had two shots fired, similar to the one used in the crime on Half Moon Street. He had nothing else of real value on him when he was caught. Holmes proceeds to interrogate Leighton, who pleads his innocence. He claims to have entered Half Moon street on a shortcut to see the fireworks after work, and there he discovered two bodies on the ground, with a third person leaning over them. The third person dashed away when he spotted Leighton. The two bodies had been shot and he took a gun off one of them, and as Leighton proceeded forward there was a flash of light, and suddenly the police had him and he was arrested.
Holmes decides to investigate the crime scene, and goes to Half Moon Street. They encounter a constable, Marrow, who identifies the victims as Vercotti who is a known ruffian, and Butler who is a local jeweller. The constable along with two others, Ryan Turner and Polly Powell, are witnesses. After learning from Marrow that he Butler and Vercotti enter the street, after the fireworks started he heard a woman cry and scream, and soon after some police whistles. He also stated he did not see anybody at the windows in the nearby houses. Holmes checks the bodies, seeing the wounds and a prison tattoo similar to that of Leighton. He also finds a key on the body of Butler.
Holmes proceeds to talk to the witnesses. Tuner claims to have been awoken by a loud noise, and soon after heard another noise although louder. He saw too bodies when he rushed to his window but nobody else, and remained near his window while the police caught Leighton. This contradicts what Marrow claimed. Next Holmes speaks to Powell, who is a flower saleswoman on the nearby street. She saw a man with a gun run from Half Moon Street, and was covered in blood before being caught by the policemen. She did not hear any gun shots due to the fireworks.
Back at Scotland Yard Holmes talks to Leighton about his connection to Vercotti. They were old acquaintances and imprisoned while young, but had gone on separate paths since then. Holmes decides to investigate further, and gains access to Turner's flat. Here Holmes discovers that the old man had in fact gone down and searched the bodies after he heard the gunshots, and found a bracelet. It is part of the Hellenistic Treasures Collection, which is the two rams Greek collection, which has been missing for years. There are three pieces overall, a bracelet, a ring, and a necklace.
Holmes heads to Butlers pawn shop, where he gains access with the key he found. When searching around Holmes discovers the necklace from the collection, and a letter from Vercotti outlining he has a buyer for the collection and wants a fair share of the money. There is no sign of the ring. Back at Half Moon Street Holmes investigates his thoughts on multiple shots being fired at once. By searching the walls at either end of the street, Holmes discovers a bullet hole. This confirms there were three shots fired, which is why Turner heard a louder noise on the second shot. It also confirms there were two guns, and that the second one is missing. From here Holmes gets assistance from constable Marrow, who "searches" for Holmes with his lamp while Holmes hides in the dark alleyway. This confirms to Holmes the other person in the alleyway could not have hidden, and must have climbed upwards.
Holmes decides his next step is to recreate the fireworks flash that Leighton described. He gets the flare gun from the pawn shop, and along with the help of Marrow and Watson he recreates the scenario and tries to escape. Entering a building with roof access, Holmes finds a broken window and a torn jacket at the top. Holmes examines the threads from the jacket back at Baker Street, and had hairs from an exotic animal within the jacket. This leads Holmes to believe that Leighton is innocent and the third person, who stole the second gun, was a skilled acrobat. Making use of Wiggins and his gang, Holmes has him track down the circus with large exotic animals, which turns out to be Duval Bros Circus.
Sherlock disguises himself as an artistic lockpicker to gain access to the circus as they are looking to recruit. The boss, Charles Farley, will see Holmes, who is going by the alias Nigel. Holmes overhears a conversation between a man named Simon Beckett and Charles Farley as he is exploring the area, hearing that supplies will be collected at midnight. Looking around, Holmes finds barrels hastily arranged which contain gunpowder. Foley arrives and talks to Holmes, getting him to demonstrate his lockpicking skills. Holmes notices that Foley is wearing the ring, the missing piece of the collection, while he also has a revolver. He is the missing man from Half Moon Street. Holmes breaks the lock to prove his worth, and while discussing Holmes wins his trust by revealing he met his brother in jail (in Sherlock Holmes Versus Jack the Ripper) and they arrange to meet at midnight near the abandoned house at Notting Hill.
Holmes unlocks the manor door and inside he discovers the hidden safe he needs to crack. Beyond the first lock, Holmes finds another which can only be opened with the necklace. Holmes needs to set a trap within the manor to capture Foley's troupe. Holmes uses necklaces, a cupboard, a chair, a chandelier, and a carpet to block windows and doors, set traps, and cover a hatch in the kitchen. The thieves will not be able to escape. All the thieves are captured, and Moycroft arrives. He informs Holmes that he used his younger brother to help catch the Merry Men. Holmes explains the Hellenistic Treasures Collection, and upon opening the safe, he shows them to Mycroft. Abandoned in Notting Hill was the supposedly lost treasures of Hellenistic Treasures, which is not pleasing new to Mycroft. Now Holmes needs to choose what to do with his suspects.
There are multiple opportunities to chose Leighton as the killer during the investigation. He can be chosen to have done it due to a personal motive, due to an old and mutual enmity between himself and Brian Vercotti. Another motive for the murders could be that Leighton committed them for theft. He wanted the rare collection for himself, and killed the men to obtain it. If Holmes absolves Leighton, he will get a shorter sentence due to the fact he has a younger brother in Wiggins to care for. If you condemn him for the murders, he will be in prison for life.
Foley can be chosen if you play through till the end, and he is responsible for the murders as he organised the theft of the Hellenistic Treasures Collection. This was related to the double murder at Half Moon Street, and it was his band who were hired by the Merry Men to commit this crime in the name of revolution. To absolve him would mean a shorter sentence, while to condemn him would mean he is hung for his treason against the British Empire.
Confrontation with the Merry Men
Holmes informs Watson he has one final piece of unfinished business. He returns to the circus to confront the Merry Men, who discover Holmes perched on a table and smoking a cigarette. They had been collecting the barrels of gun power to use in bombing the London Stock Exchange. Beckett explains to Holmes their cause, how they plan on destroying the records at the Stock Exchange to show people they are free, and in the process spark an uprising against the ruling class. He attempts to get Holmes onboard with their cause is in vain, even arguing that the corruption of the British government against the working man had placed real justice out of reach of the poor. He assures Holmes nobody will get injured, that the cause is just. Here the player has their final choice in the game. Stop the Merry Men by detonating the gunpowder scattered below them and running as quick as he can, or turning a blind eye and allowing them to attack the London Stock Exchange.
Back at 221B Baker Street, Mycroft is telling Holmes about the book Crime and Punishment by Dostoyevsky, regarding deep love and justice. "We serve the truth, not justice." As the game comes to a close, Watson informs Holmes that Mrs. Hudson has been asked by the new female neightbour if she can store her boxes in the empty spare room. This is a prelude to the next game in the series.
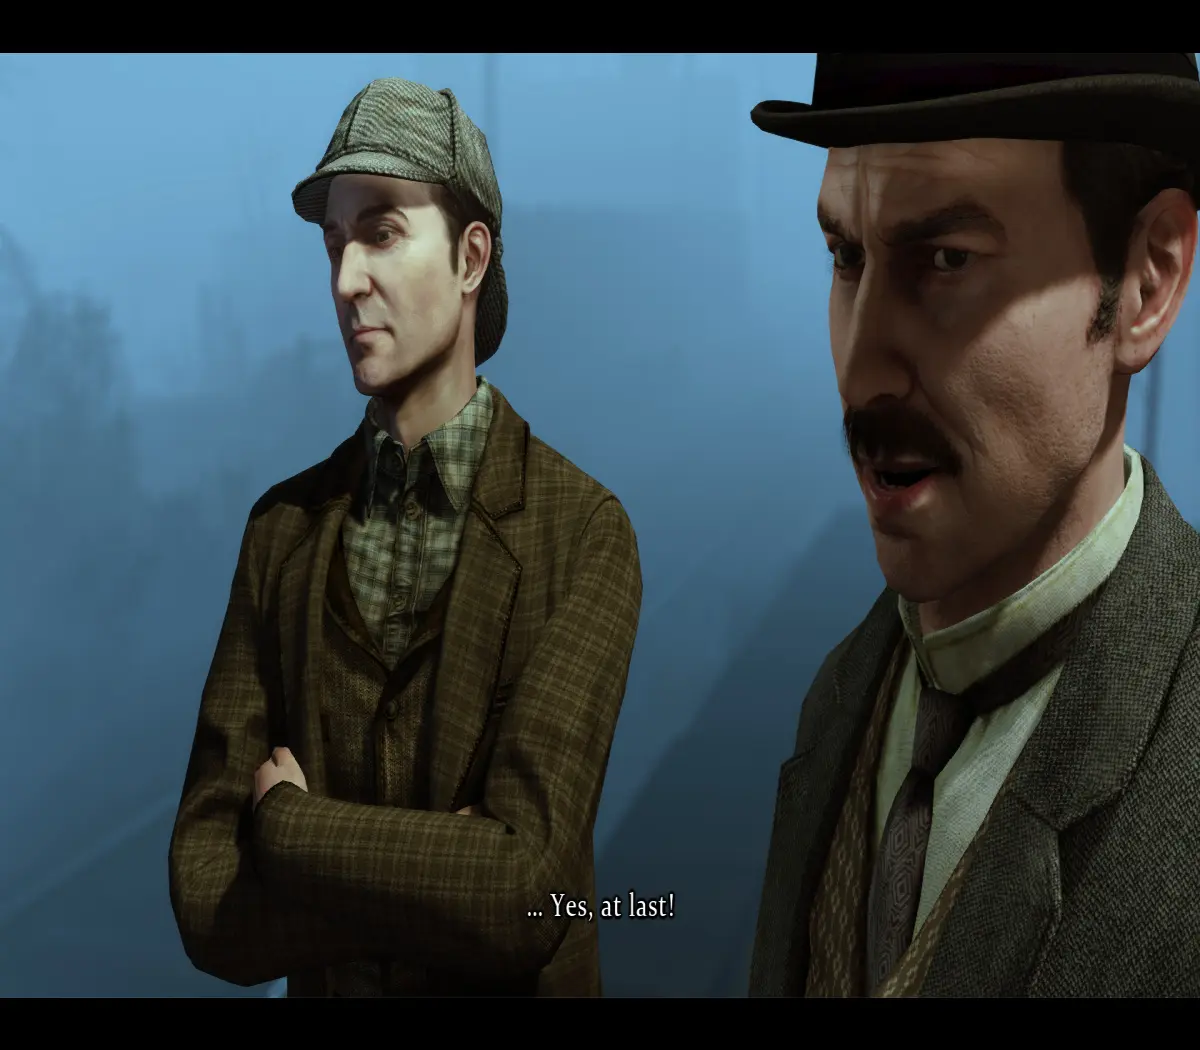
An example of the game is shown in the image below of Sherlock and Watson.
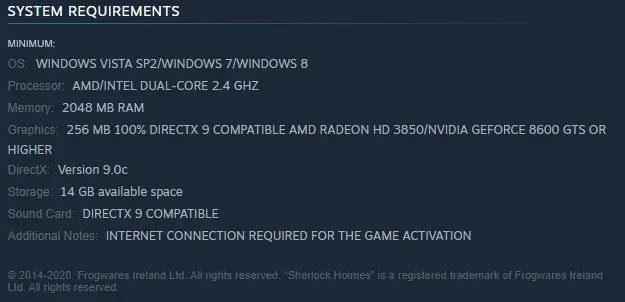
System Requirements
To run this game on your PC it will require a minimum of the following as per Steam:
As a little piece of trivia, the second Sherlock Holmes novel came about after a dinner party with Oscar Wilde, the same dinner party where Wilde agreed to write his one and only novel, The Picture of Dorian Gray, which appeared in 1890, the same year as The Sign of the Four, Doyle’s novel. Both were written at the request of Joseph Stoddart, who edited Lippincott’s Monthly Magazine.
Have a great day,
Peace. CryptoGod-1.
Referral links:
Publish0x - https://www.publish0x.com/?a=olejZqrzej
Splinterlands - https://splinterlands.com?ref=rnabc1
Upland - r.upland.me/NQAH
Binance - https://accounts.binance.com/en/register?ref=143611368
NFT Market Sales
OpenSea - https://opensea.io/RNabc
Follow Me :)
Twitter - @RNabc123






