
I can still remember the aroma in the kitchen when my Mother made those delicious date squares when I was a child. She loved to bake and when she did, the whole family would get excited, knowing we'd have a tasty dessert with our Sunday dinner. She got so good at it that whenever there was a wedding in the family, it was she who baked and decorated the wedding cake. Her double and triple tier wedding cakes are legendary in my family.
Probably my favorite of all her treats was her date squares. I had never made date squares myself until recently. I always believed it was a very difficult task to make. When the lockdowns came last year, everything changed. I had enjoyed baking things here and there beforehand but with all the extra free time, I found myself baking for the first time apple pies, strawberry / rhubarb pies and muffins, peach pound cakes, banana cakes, peanut butter and chocolate chip cookies and whole wheat bread infused with cranberries. One treat I had never tried until last month were date squares.
I finally gave it a go for the first time in November and found out for myself just how easy it is to make. I just made a second batch yesterday afternoon and they turned out perfect. The first bite literally melted in my mouth. This ultra simple recipe takes very little time and is relatively inexpensive to make. The prep time is about 1/2 hour and cook time is 45 to 55 minutes. In this case, I used a 9 X 14 inch glass pan lined with parchment paper. Preheat the oven to 350 degrees.
Ingredients:
4 cups pitted dates
2 1/2 cups quick or rolled oats
1 cup organic all-purpose flour
1 cup organic dark or light brown sugar
1 cup soft butter - salted or unsalted - room temperature
1 tsp vanilla
1/2 tsp salt
(optional 1 tsp cinnamon)
Please read through the instructions before beginning.
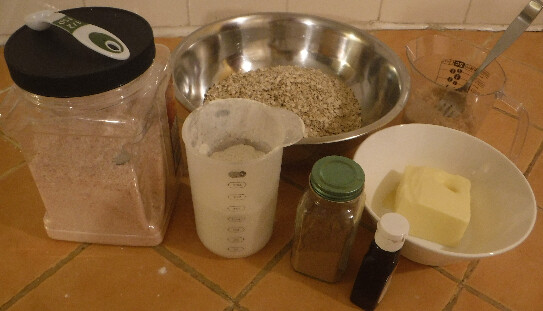
In this case, I used Organic oats and flour, Himalayan pink salt, salted butter and organic cinnamon. I purchased my organic dates from Costco. They came in two large bags and as it turned out, each bag measured exactly 4 cups. Before prepping the oats, the first thing to do is to place the dates (4 cups) in a pot with water and bring to a boil. Filtered water is recommended.
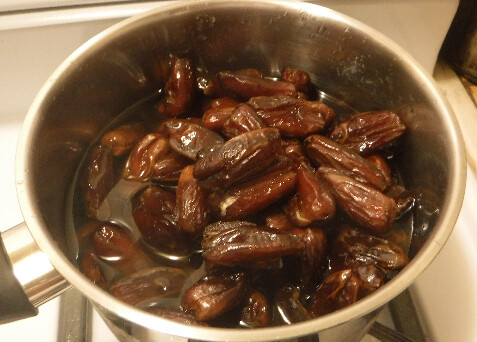
Once the water comes to a boil, bring the heat down to simmer and stir every few minutes, for the next 20 minutes or so. While simmering, you can begin prepping the flour (1 cup), oats (2 1/2 cups) and brown sugar (1 cup). In a large bowl, mix the oats, flour, sugar and salt together. Here is where the cinnamon is optional. In this case, I added 1 tsp cinnamon to give the dough a little kick and I think blends well with the sweetness of the dates.
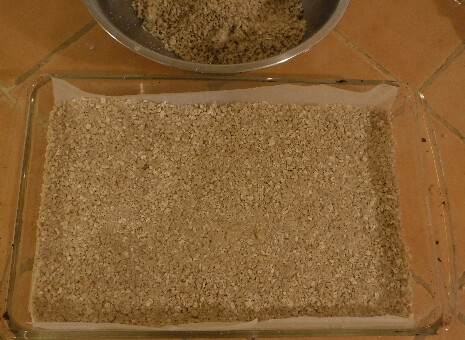
Chop the butter (at room temperature) into small cubes and mix them into the dough using your hands and fingers. I recommend using disposable gloves for this task as it will get a bit sticky. Once the dough has been thoroughly mixed, take HALF the dough and spread it evenly across the pan. A 9 X 14 inch pan is recommended for this recipe. Once evenly spread, press down hard to flatten the dough. This will give the dough its 'crunchiness'. I've placed parchment paper at the bottom and overlapping the sides which makes it much easier to remove the dates squares later.
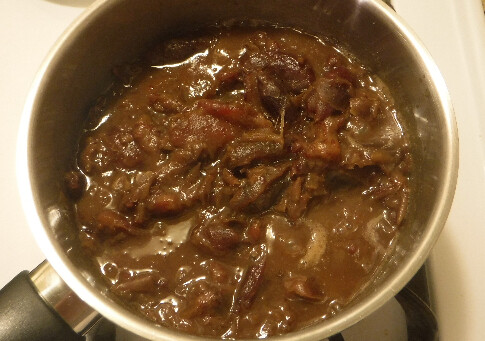
Now it's time to get the date filling ready. The dates should have broken down and absorbed most of the water. After 20 to 25 minutes of simmering and stirring, they should be ready to be made into a filling. In this case, I used a handheld mixer. Add the vanilla and mix the filling until nice and creamy. You can also use a food processor for this step. This should only take a minute or two and then it's ready to be spread into the pan.
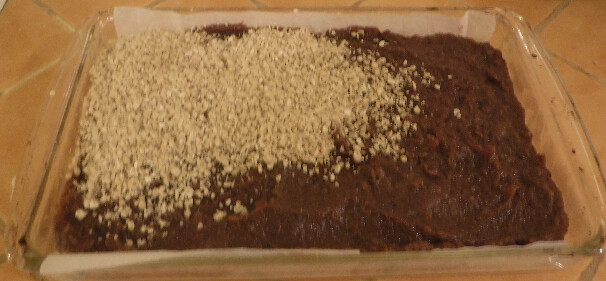
Spread the filling over the dough evenly until the entire first layer is covered. Finally, the last step in the prep process is to place the remaining oat mix evenly on top of the date filling followed by a gentle padding using your gloved hand on the top layer into the middle layer. This helps the top layer of oats absorb into the date filling during the baking process. Be gentle though, don't press too hard.
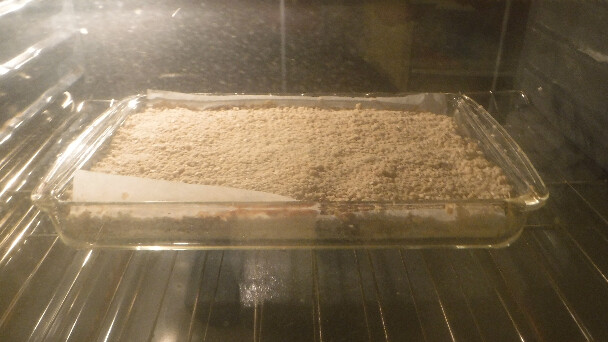
Now, the pan is ready to go in the oven which should be preheated to 350 degrees. Let bake for 45 to 55 minutes. Set the timer for 45 minutes and keep an eye on the top layer. It should be golden brown. I left my date squares in the oven for 55 minutes.
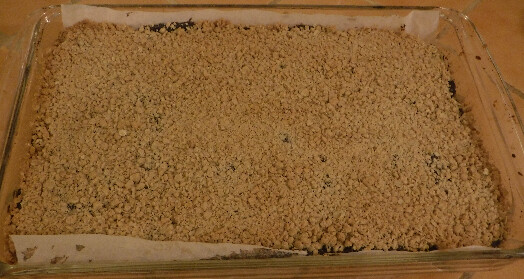
After taking out of the oven, I set the pan down on top of a bread board on the counter and let cool for half an hour. I couldn't contain myself and I just had to have a piece. I can say it turned out as I'd hoped and it was delicious. The buttery taste of the dough combined with the sweetness of the dates truly made for a perfect dessert. Straight out of the oven and still warm.
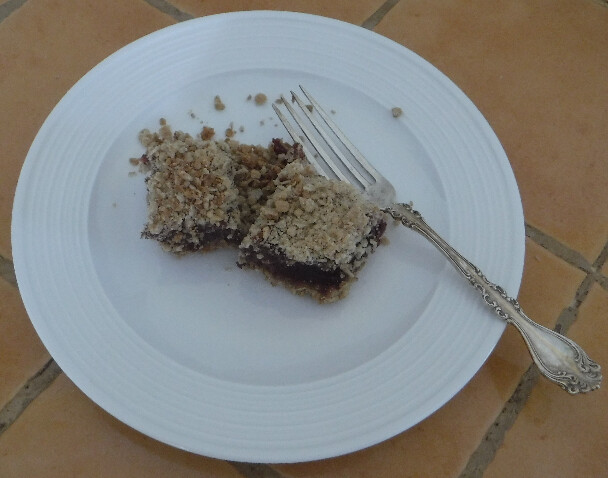
Cut them into any size squares to your liking and serve. A scoop of vanilla ice cream is optional. Your guests are sure to be impressed. You can place a few squares in a container and put in the refrigerator which hardens the filling a bit. MMmm MMmm... They can also be frozen. Just place in a freezer bag and remove most of the air inside, close the seal and place in the freezer. When ready for consumption, just defrost a few minutes in the microwave oven.
Also, you can adjust the quantity of the ingredients to your liking. In this case, I reduced the amount of sugar from the original recipe by a 1/4 cup.
Give this recipe a try and let me know how it turned out in the comments section. I hope it turns out as tasty for you as it did for me. Enjoy!
Subscribe to my blog and hit the 'like' button if you enjoyed this post. Tips are always appreciated.
Earn free Bitcoin Satoshis using CryptoTab Browser.
Check out some of my previous posts.
Just in time for the holidays, Apple Cinnamon Crumble!
Bread machine banana bread with olive oil.
Festive cranberry whole wheat bread with your bread machine.
Melt in your mouth double chocolate cupcakes
Making your own vanilla extract is easy but takes patience.
Himalayan Pink Salt - the purest salt on Earth!
Join OwnX today to start accumulating precious metals: 
Earn bonus 300 SwagBucks when you earn 300 SwagBucks in the first 30 days.
Earn TFuel tokens at Theta.tv just for watching TV and livestreams.
Making videos online is easier than ever. Get up to 20% your first year subscription at WeVideo.


