
Best SBC for your StorJ node
Welcome back to this series of articles on how to build your own super efficient StorJ node, the summary of this series can be found here.
When I was looking for the best Single Board Computer (SBC) I had very clear objective. It had to be a small board in a nice package and good community support, fan-less and therefore silent, able to host a small 2.5 inch HD, have a real SATA port to provide good performance, have a good 4 or 8 cores CPU with top frequency at 1.8 GHz, 2 GB of memory with a cost of less than £80 (or about $100)
I’m sure you all know Raspberry Pi, many will know Arduino, other will know Banana Pi, some will know LattePanda, other Rock64, Pine64 and Odroid.
I looked at them all and some more, Raspberry Pi could have been an obvious choice due to the enormous community and accessories but in terms of CPU power and SATA port was not great.
Rock 64 and Pine 64 were very interesting as well as the LattePanda, specs were very good indeed.
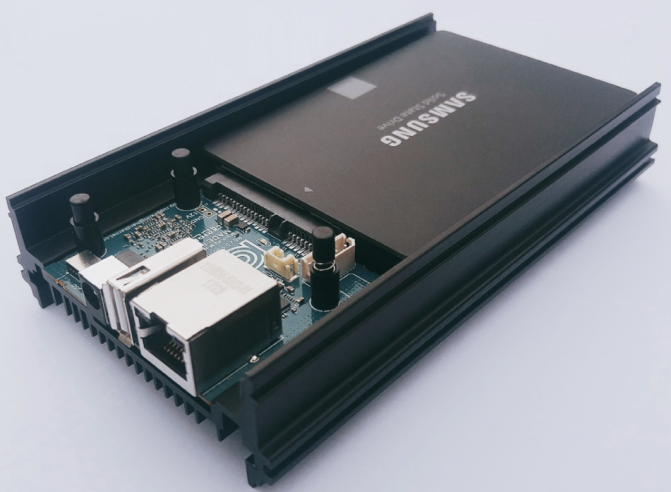
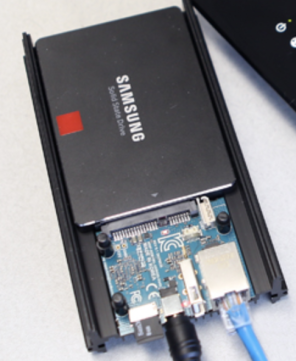
But eventually I went for the Odroid HC1 produced by HardKernel, this particular model is based on the XU4 board and is purpose-built to be a home NAS.
https://www.hardkernel.com/shop/odroid-hc1-home-cloud-one/
Specs
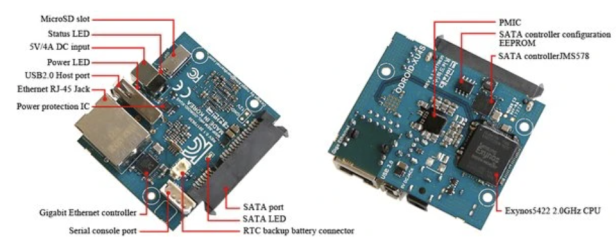
The board features an 8 Cores CPU, specifically a Samsung Exynos5422 Cortex-A15 2Ghz and Cortex-A7
It comes with 2 GB LPDDR3 RAM, SATA-3 port for 2.5inch HDD/SSD storage up to 15mm thickness, a single Gigabit Ethernet port, a UHS-1 capable micro-SD card slot for boot media and all in a small and fan-less package of 147 x 85 x 29 mm approx. (including Aluminium cooling frame)
What’s the cost? Just about $54 including a 5V/4A power supply, you could even get a case for $2.50 but I wouldn’t recommend it since it can decrease heat dissipation from the HDD.
The board doesn’t have onboard Wifi but you can buy a decent and small USB module with IEEE 802.11ac/a/b/g/n WLAN chipset for $9 https://www.hardkernel.com/shop/wifi-module-5a/
I haven’t tested this module with my configuration so not sure about compatibility or performance, in the future I’m planning to buy it and do some test and I will update this article with my findings when I do.
It’s interesting to note that the Exynos5422 is a mobile CPU released in 2014 and was actually used in the Samsung smartphone lineup back then, I believe in the Galaxy S5.
The HDD SATA Interface uses a JMicron JMS578 USB 3.0 to SATA Bridge with UAS capability to archive near ~300MB/sec transfer speed.
Since we will be using this board to store a large quantity of data, we want good performance.
HardKernel performed storage speed test with the same Seagate 5TB HDD I recommended in this series of articles and the performance are very good clocking at about 110 MB/s in download and about 95 MB/s in upload over the Gigabit Ethernet port.
If you read my previous articles, you should now have all hardware components you need to build your node, just plug in the SD card with the Arbiam OS burned into it and the HDD where all the StorJ data will be stored and boot your node!
Connect to your node
Once the system is booted, you will need to connect to it so you can start configuring everything and to do that you need the IP assigned to your device by the home router.
There are multiple ways to do it but the simplest one is to login to your router and look for the most recent device connected and look for the assigned IP.
Now that you have the IP you can finally SSH to it using a Terminal on MacOS / Linux or Putty on Windows.
If you are on Windows 10 version 1709 or newer you can connect natively via command prompt by installing OpenSSH Client: https://www.liquidweb.com/kb/using-ssh-client-windows-10/
I will assume your node IP is 192.168.1.10 for the command below.
Now you should be able to SSH via this command: ssh [email protected]
It should ask for the password, the default Armbian password for the root user is 1234
You should now be connected to your node and see a welcome screen similar to the one below.
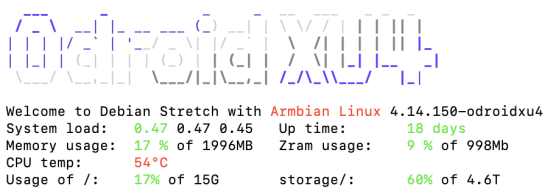
Keep reading and go to the next article of this series:


