
The thing that really made me fall in love with Splinterlands is how you never really know what to expect when approaching your next battle. You are just as likely to find the battlefield covered poisonous fog as you are to find that magic attacks and flat out banned. While you can, and should, build strategies to deal with these Rule Set my single favorite part of Splinterlands is how if forces you to throw the entire idea of a deck out the window and show up to the table with your whole collection. The freedom this produces is unparalleled, random draws are removed from the game, and skill is rewarded in a way that is impossible in most TCGS.
Amazing, but complex.
First you have to determine your Splinter (let’s not get into the extra complexity DRAGON causes), Next choose your Summoner, then ideally determine what kind of team the Rule Set and Mana Cap require, then the best deployment. All with a nice big timer counting down in your face and Rule Sets constantly removing Monsters and Monster combinations from your pool.
It’s a lot to deal with and as soon as you find your first battle it’s there for you to navigate. Thankfully we’re here to help each other and there are plenty of tricks to ease you along.
One of the best ways to invest in your collection right away is to find some strong reliable Neutral Monsters who you can use in most fights. In my estimation, small sized Neutral Monsters get more mileage and use than maybe whatever you consider to be your most reliable staples for each Splinter. This makes every Monster on this list not only a great addition to your army but a great way to have some easy points to round out any other loadout.
Lets get it going!
FURIOUS CHICKEN
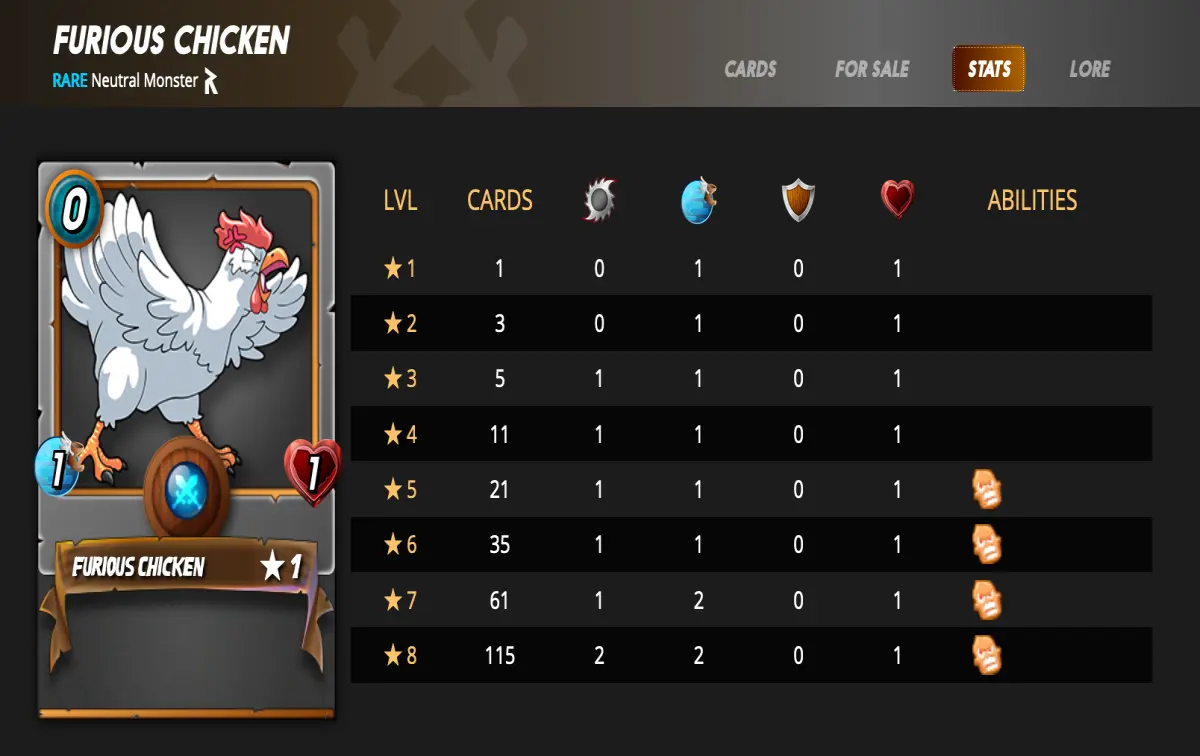
LORD OF VALUE
We can’t start a conversation about cheap neutral cards without immediately mentioning the chicken. The chicken is free. That’s all you need to know. Free creatures are a great deal in nearly any game but in one with Rule Sets like Equalizer the chicken really shines. Speaking of shine, GOLD Furious Chickens will be over $100 soon and is, IMHO, the safest bet in all of Splinterlands when it comes to card appreciation. But look for a new article on that soon.
For now, just go buy a chicken before they price out.
CREEPING OOZE
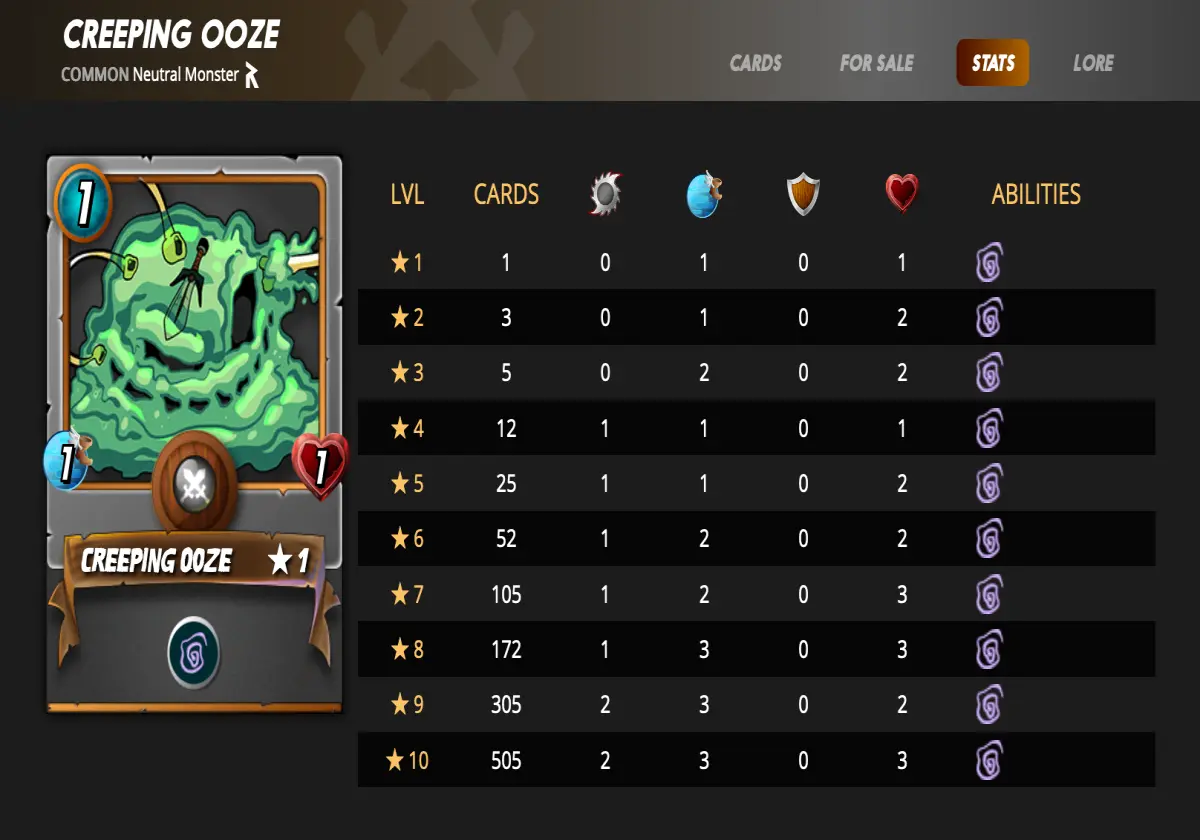
SPEED BUMP
There is very little to say about Creeping Ooze that is not covered in all the conversations out there about Furious Chickens. Like the Chicken the Ooze is a very small very cheap creature useful in rulesets like Equalizer and a great addition to Gelatinous Cube based defensive strategies. For the price of 1 mana you also get Slow which should help land an extra hit or two in those key first exchanges. This is another great option to snatch up in GOLD due to Creeping Ooze being one of the most highly circulated cards in the game.
COCATRICE
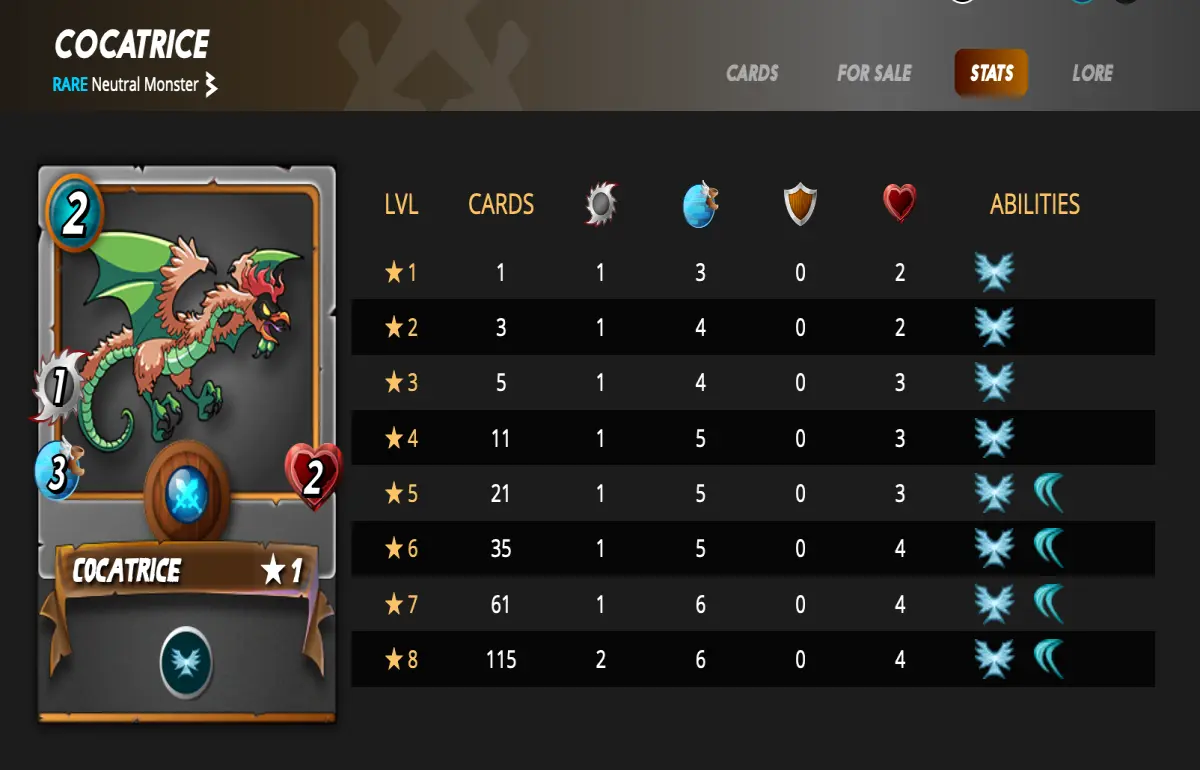
AGAINST THE WIND
Cocatrice is one of those creatures you’ll find yourself often using to fill holes in otherwise tight low Mana Cap loadouts. With 4HP Dodge AND Flying the Cocatrice makes a fantastic backline mini tank. How I’ll often do this is by dropping a lineup like
Haunted Spirit – Grim Reaper – Cocatrice – Highland Archer – Undead Priest – Shadowy Presence – Furious Chicken
Here, for less than 20 points, you have one of my most reliable lineups. Haunted Spirit can make an amazing frontline tank if it can use Heal and Magic Reflect to stay alive. Shadowy Presence, which is an absolute bomb for 1 mana, really helps the Spirit stay alive here by boosting it’s HP and helping it avoid getting burst down to high attack monsters like Rexx.
But let’s say the worst does happen and some Monster with high attack IS able to burst the Haunted Spirit down. Cocatrice provides a very strong, if unreliable, RNG based tank that can shrug off multiple attacks between Flying and Dodge giving the ranged creatures in the backline key extra turns that sometimes can turn the battle around. For 2 mana this is extremely powerful.
HIGHLAND ARCHER
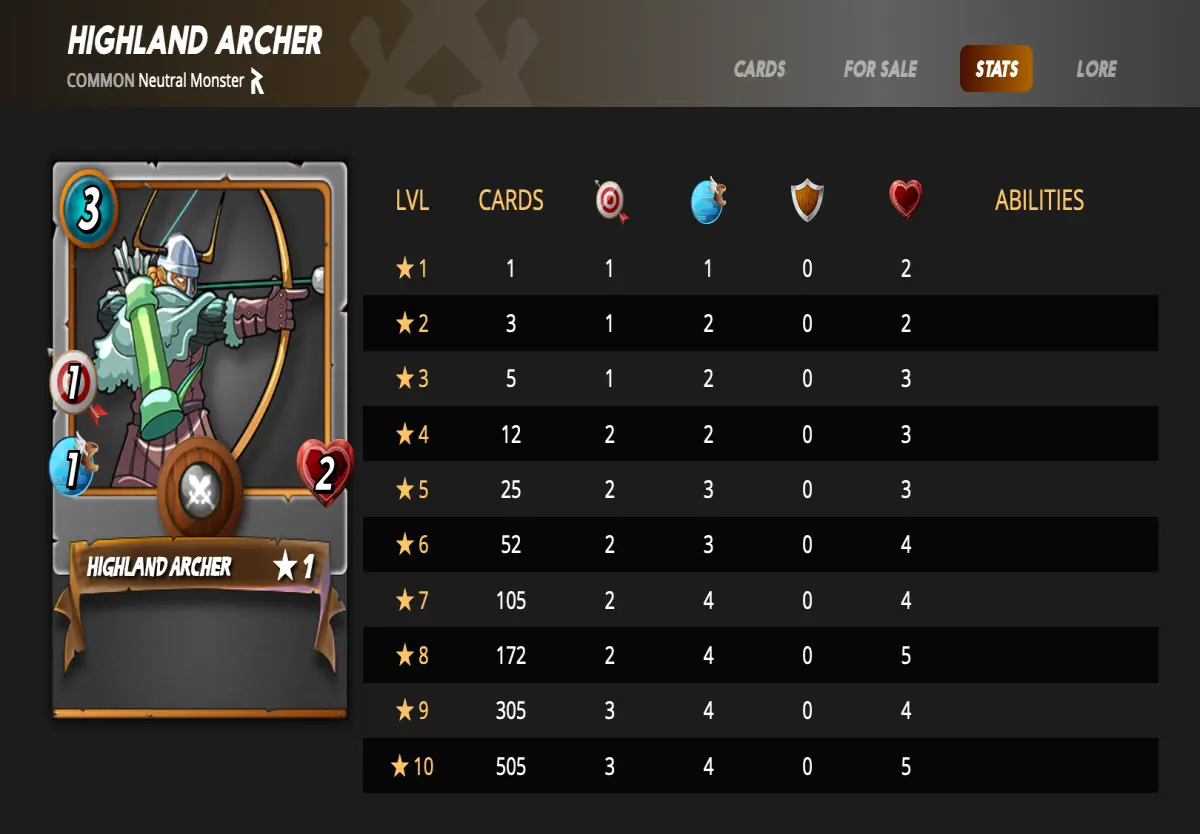
ARROW GOOD
There really isn’t much to figure out here. Highland Archer is one of the most reliable creatures with a simple and extremely useful 2 ranged attack for 3 mana. While this is not at all an unbeatable stat line it’s the kind of simple usefulness you’ll find yourself using over and over again.
The Highland Archer also provides a useful yardstick to measure other creatures against. Is Dark Astronomer good? Well it has the same attack as the Archer but costs an extra mana for some extra ability to clear shields. Is Undead Priest good? Hell yeah, between having 1 magic attack and Weaken it provides a comparable amount of offense to Archer while costing a full 1 mana less.
Again, as Highland Archer is one of the higher circulation Monsters in Splinterlands spending the extra to grab a gold one becomes a consideration. I’ve got a gold Archer and I love him!
GREMLIN BLASTER
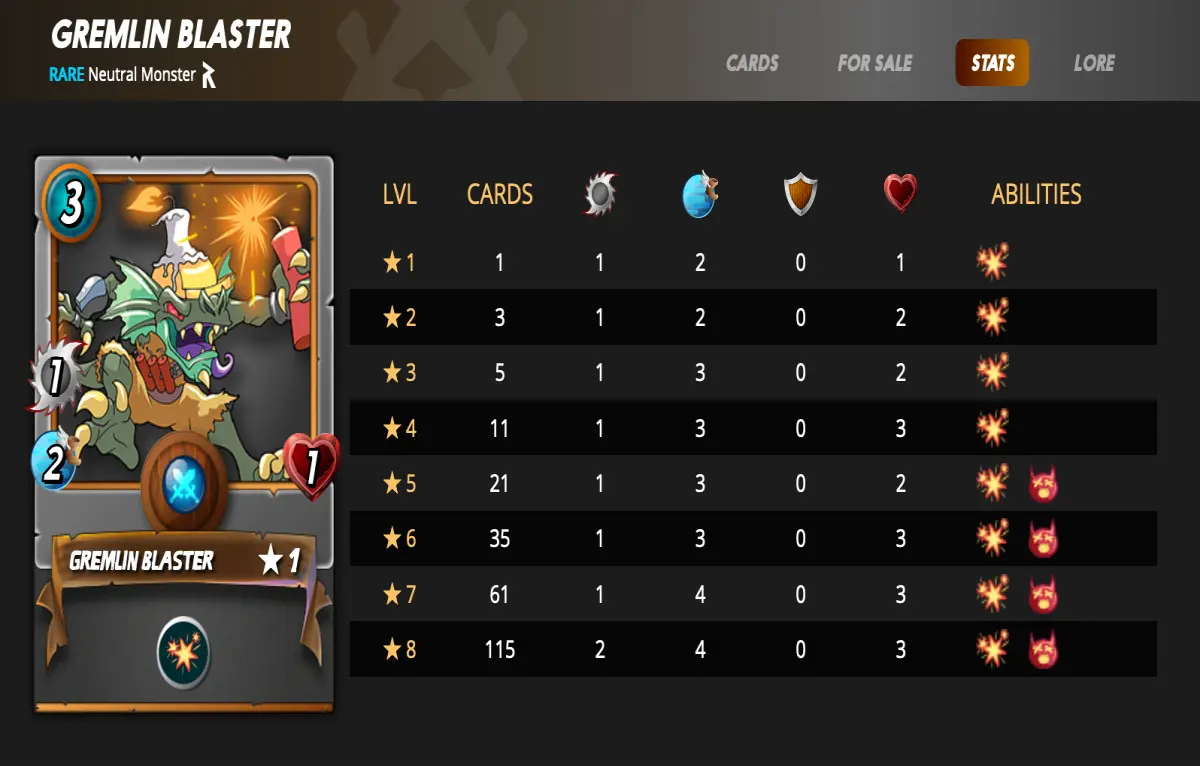
BADDABOOM ON A BUDGET
There are very few Monsters with the raw silliness of a Gremlin Blaster at level 5. At that point your humble Blaster has both Blast and Stun making it some sort of crazy suicide bomber who can fundamentally break to the timing structure of a battle. When teamed with other creatures that stun or otherwise speed up or slow down the fight Gremlin Blaster can be the kind of suicide bomber that changes the tides of a battle.
HALFLING ALCHEMIST
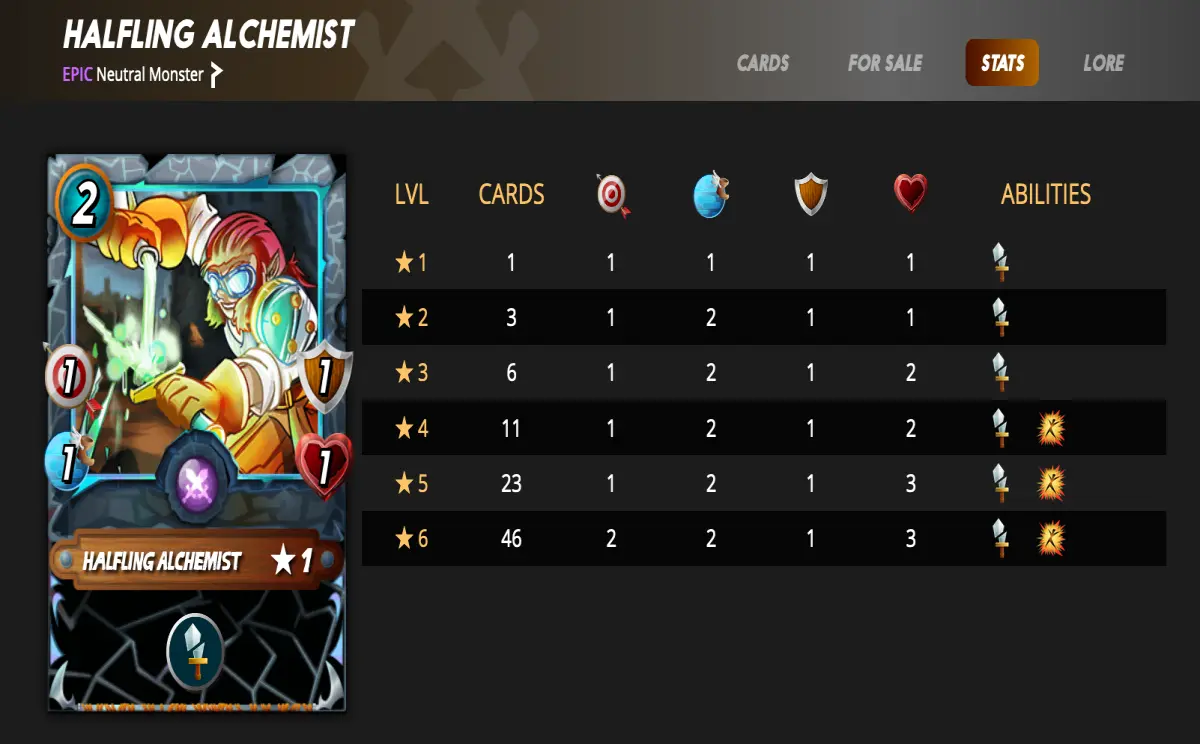
WELCOME TO THE PILLOW FORT
Now we are really getting to the heavy hitters. In my opinion Halfling Alchemist is the single best neutral 2 cost creature in the game and all of that has hinges on Halving. Halving cuts the victim of attacks from the Alchemist attacks in half, in reality this often just means giving the attacked monster -1 attack. In a longer battle such as one with Equalizer the Alchemist can decimate your opponent’s ability to damage you over time turning to tide of nearly any battle.
DWARVEN WIZARD
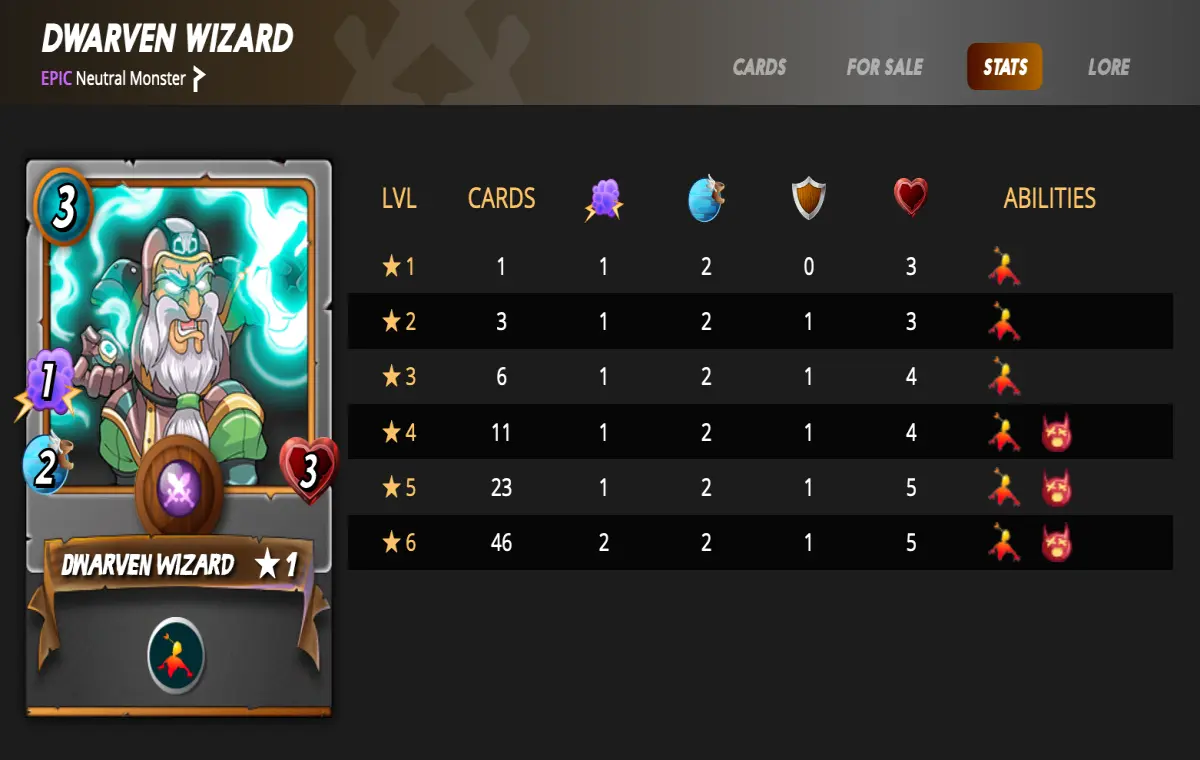
MASTER BLASTER RUNS SPLINTERTOWN
At level 4 Dwarven Wizard is one of the most reliable neutral Monsters in the game. Fitting into nearly any line-up the Dwarven Wizard is at his best when sitting back line Stunning your enemies while also taking down the weakest of them. While these abilities work against each other a bit as you’ll sometimes find yourself stunning the weakest members of a team stunning any Monster is a huge benefit. As he only has 1 magic damage to pass out you’re going to want to team the Dwarven Wizard with some heavy hitters to end the battle before it’s able to spin on you.
I hope this list Is helpful, especially for new players on a budget! If you are looking to enter the Splinterlands anytime soon I’d really appreciate you use my referral link as it will benefit both of us.
For more information please keep an eye out for more articles coming soon! Good luck and good games!






