
Migrate a Presearch node with full history
I have come to the conclusion that my previous VPS with my Presearch Node was a bit too expensive. So, to get a better ROI, I decided to look for a cheaper VPS and migrate my Presearch Node with all the history and reputation. In this post, I show you how you can secure your new VPS and easily migrate your node to it.
If you came here but don't know what Presearch is, have a look here. Presearch Search Engine
Presearch is a decentralized search engine powered by the community. Search privately, receive better results and get rewarded with the Presearch decentralized search engine, powered by blockchain technology. You can also run a node to earn PRE passively and be part of this decentralized search engine.
The minimal requirements for a Presearch node are as follows:
1 CPU
768 MB RAM (under minimized OS editions even 512 MB RAM)
10 GB storage
100+ Mbit network link
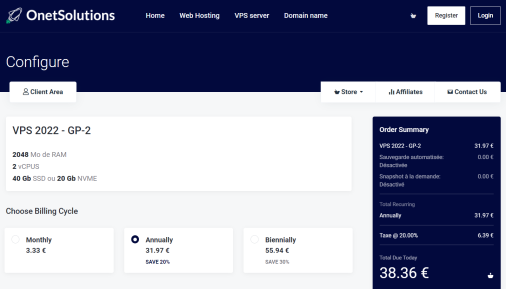
I found a good VPS configuration at a very affordable price at OnetSolutions. 38.36 € per year (3.20 € / month) for almost double the requirements looks perfect to me!
Prepare your new VPS
I have chosen to set up Ubuntu 20.04 for this task. It will receive support until 2025 and is a very stable release. But you can choose whatever distribution you want. After you have installed your Linux, we first want to secure our new VPS. We make sure that only we can log onto the system, create a user for the Presearch node, secure SSH, and install a firewall.
- Log in as root to your new VPS with SSH or via console.
Change root password, as you want to be the only person which knows the root password. Don't trust your VPS-Provider.passwd root
- Remove or comment out any SSH keys in authorized_keys of your root account, which don't belong to you. Have look at /root/.ssh/authorized_keys if there are configured any other keys.
- Add a group to permit SSH login for specific users:
groupadd sshlogin
- Add a separate user for SSH logins and running your service:
adduser <account-name> - Add the generated user to the newly generated sshlogin group and to the sudo group:
usermod -a -G sshlogin,sudo <account-name>
- Configure your SSH key for your new user:
cd /home/<account-name>mkdir .sshchown <account-name>.<account-name> .sshchmod 0700 .sshcd .sshvim authorized_keyspaste your ssh public-key and save the filechown <account-name>.<account-name> authorized_keyschmod 0600 authorized_keys
- Test your login with your new user and it's ssh public key and test if you can execute sudo.
- Now secure your SSH configuration. Change your ssh port from default 22 to 222 (for example) and disable IPv6 for ssh connections. Further, set your sshlogin group for allowed accounts to login, disable root login and disable X11Forwarding.
vim /etc/ssh/ssd_configPort 222ListenAddress 0.0.0.0AllowGroups sshloginPermitRootLogin noX11Forwarding nosystemctl restart sshd.service
- With netstat you can see which ports are open on your system. It should show now, that port 222 is open now. Test your SSH login on the new port.
netstat -tulpen
- Install the firewall ufw and configure it to allow connections on port 222:
sudo apt install ufwsudo ufw default deny incomingsudo ufw default allow outgoingsudo ufw allow 222sudo ufw enable
Install the Presearch node requirements
- Log in as your newly created user to your VPS. Install Docker and add your user account to the docker group.
sudo apt update ; sudo apt upgrade -y ; sudo apt install docker.iosudo usermod -aG docker $USER
Migrate the Presearch node
If you want to migrate your node to a new computer or VPS, while maintaining the current node's identity, grandfathered status, and node stats, you need to backup the security keys of the node while it’s still running.
- Login to your old Presearch node with SSH and backup your keys with the following command.
sudo docker cp presearch-node:/app/node/.keys presearch-node-keys
- Download the resulting folder presearch-node-keys from your old VPS to your computer. If you get a permission denied error, you have to set the owner of this folder to your user first.
sudo chown -R <account-name>.<account-name> presearch-node-keys
- To download the folder, you can use WinSCP (Windows) or the command line (Mac or Linux).
scp -r -P {old-server:port} {username}@{old-server-ip}:presearch-node-keys ~/
- Upload the folder to your new VPS Server.
scp -r -P {new-server-SSH:PORT} presearch-node-keys {username}@{new-server-IP}
- Now login again to your old VPS and stop the node running by running
sudo docker stop presearch-node ; sudo docker rm presearch-node ; sudo docker stop presearch-auto-updater ; sudo docker rm presearch-auto-updater
- As soon as your old node has stopped, login to your new VPS and restore the keys you have uploaded before. It should have disappeared now from your dashboard.
sudo docker run -dt --rm -v presearch-node-storage:/app/node --name presearch-restore presearch/node ; sudo docker cp presearch-node-keys/. presearch-restore:/app/node/.keys/ ; sudo docker stop presearch-restore
- Finally, start your Presearch node on your new VPS as you would start a new node.
sudo docker stop presearch-node ; sudo docker rm presearch-node ; sudo docker stop presearch-auto-updater ; sudo docker rm presearch-auto-updater ; sudo docker run -d --name presearch-auto-updater --restart=unless-stopped -v /var/run/docker.sock:/var/run/docker.sock presearch/auto-updater --cleanup --interval 900 presearch-auto-updater presearch-node && sudo docker pull presearch/node && sudo docker run -dt --name presearch-node --restart=unless-stopped -v presearch-node-storage:/app/node presearch/node && sleep 10 && sudo docker logs presearch-node
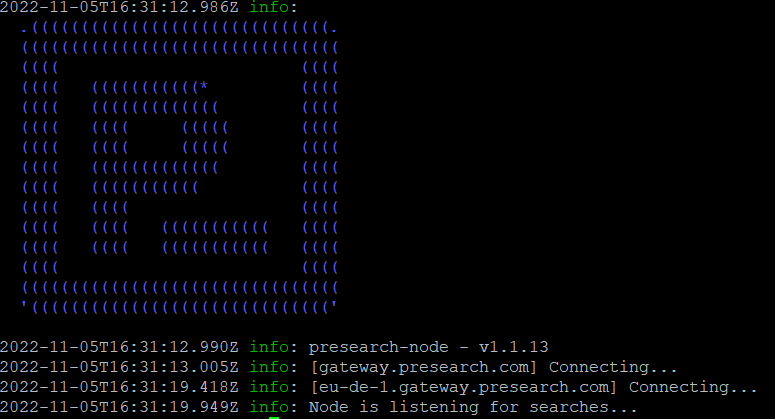
As soon as you can see the message Node is listening for searches..., your Presearch node is migrated with full history, as you can see in your dashboard.
I hope this guide is useful and will help somebody to migrate a Presearch node.
Happy PRESEARCH!
Other Tutorials from me:
Best practices for installing and securing your Crypto-Wallets
Howto resize a Dynamical VirtualBox Disk with a Linux-Guest
Howto prune (shrink) the database of the Monero Blockchain on Linux


