
The NuLink technology platform consists of blockchain, access control (Proxy Re-Encryption, Attribute-Based Encryption) and secure computation (Zero-Knowledge Proof, Secure Multi-party Computation, Fully Homomorphic Encryption) as its technical core. It provides enterprise-level data sharing and computation services.
This project was backed by some big ventures:

Project Website: https://www.nulink.org/
Discord Discussion: https://discord.gg/BBYgJU6cEE
Why Participate in the Testnet?
The Nulink testnet presents some unique opportunities to become early adopters in new privacy technology for Dapps with exciting rewards in $NLK token.
🏆 Get Rewards in $NLK
Participants are able to get token rewards for successfully testing the features and submitting their feedback. You will be rewarded for completing all the tests up to 6000 NLKs with a whitelist(public round pre-sale) qualification.
🧑💻 Getting Familiarized with Nulink Solution
This testnet will prepare you to get familiarized with how privacy & preserving technology will work for decentralized applications. It also provides you an exciting opportunity to get involved with the leadership & core development team in case of submitting some remarkable feedback or bug for improving our product.
👾 Building Your Reputation
Nulink also provides a platform to establish your presence as a strong and early contributor in the community who played an important role in improving the Nulink functions.
Nodes recomended hardware requirement:
- 4 VCPU
- 8 GB RAM
- 100 GB SSD (NVME are better)
I'm recomended Contabo , Vultr , OVH and Interserver as the the're fit for the nodes.
First, you need to use root user
sudo ufw allow 22
sudo ufw allow 9151
sudo ufw enable -y
Automatic installation script (thanks for NodeX Capital)
wget -O nulink.sh https://raw.githubusercontent.com/nodesxploit/testnet/main/nulink/nulink.sh && chmod +x nulink.sh && ./nulink.sh
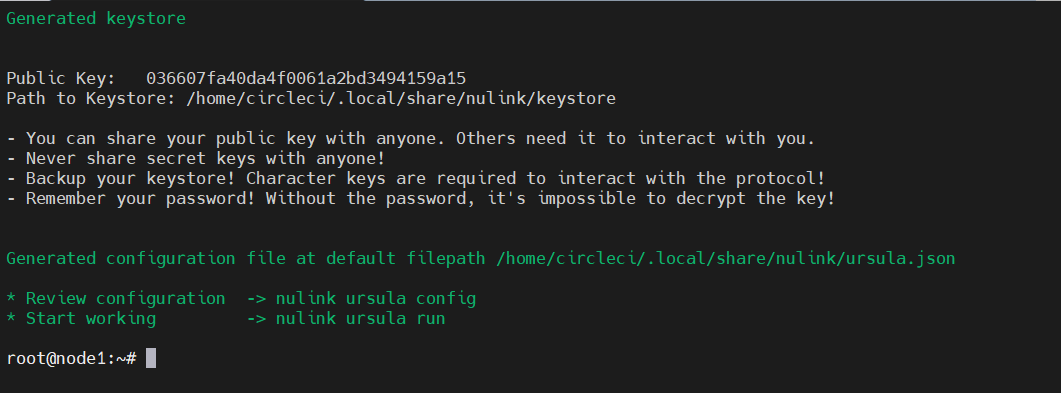
follow the instruction, when finished you'll need to submit password twice (REMEBER IT, DON'T LOSE IT!) then it'll show you KEY, save it and DON'T LOSE IT! as it's only show once and never can be recovered or exported again.
Restart system variable:
source $HOME/.bash_profile
After running auto install command you will see output that your keystore file is saved in /root/geth-linux-amd64-1.10.24-972007a5/keystore/UTC-XXXXX
Change keystore name UTC-XXXX into key with command mv for exampe mv UTC--2022-09-17T05-27-00.315775527Z--b045627fd6c57577bba32192d8XXXXXXXX key
Copy the keystore file to nulink directory that we just created.
cp <keystore path> /root/nulink
for example:
cp /root/geth-linux-amd64-1.10.24-972007a5/keystore/key /root/nulink
Give the nulink folder a root access
chmod -R 777 /root/nulink
Set Variable
export NULINK_KEYSTORE_PASSWORD=<YOUR PASSWORD>

export NULINK_OPERATOR_ETH_PASSWORD=<YOUR PASSWORD>
Docker Configuration
docker run -it --rm \
-p 9151:9151 \
-v /root/nulink:/code \
-v /root/nulink:/home/circleci/.local/share/nulink \
-e NULINK_KEYSTORE_PASSWORD \
nulink/nulink nulink ursula init \
--signer keystore:///code/<Path of the secret key file> \
--eth-provider https://data-seed-prebsc-2-s2.binance.org:8545  \
--network horus \
--payment-provider https://data-seed-prebsc-2-s2.binance.org:8545 \
--payment-network bsc_testnet \
--operator-address <YOUR PUBLIC ADDRESS> \
--max-gas-price 100
Change <Path of the secret key file> With the path of your keystore. Change <YOUR PUBLIC ADDRESS> With your public address generated after you use auto install script
For example:
docker run -it --rm \
-p 9151:9151 \
-v /root/nulink:/code \
-v /root/nulink:/home/circleci/.local/share/nulink \
-e NULINK_KEYSTORE_PASSWORD \
nulink/nulink nulink ursula init \
--signer keystore:///code/key \
--eth-provider https://data-seed-prebsc-2-s2.binance.org:8545  \
--network horus \
--payment-provider https://data-seed-prebsc-2-s2.binance.org:8545 \
--payment-network bsc_testnet \
--operator-address 0xB045627Fd6c57577Bba32192d8EXXXXXXXXXXXXXXX \
--max-gas-price 100
Important!
- After that you will get an output of your seed phrase
DONT FORGET TO COPY AND SAVE IT !!! - And you will be asked to Confirm your seed phrase , Copy/Paste your saved seed phrase.
- After that you will get confirmation , Just type
yand enter
After completing configuration you'll find somekind like this image below:
Start The Node (one line command)
docker run --restart on-failure -d \
--name ursula \
-p 9151:9151 \
-v /root/nulink:/code \
-v /root/nulink:/home/circleci/.local/share/nulink \
-e NULINK_KEYSTORE_PASSWORD \
-e NULINK_OPERATOR_ETH_PASSWORD \
nulink/nulink nulink ursula run --no-block-until-ready
Monitoring
To monitor and get alerted about your validator health status you can use my guide on Set up monitoring and alerting for nulik validator
Check logs
To check logs we can use screen to constantly look at the log
apt install screen

screen -S nulog

docker logs -f ursula
and then you'll find somekind like this images below:

Next step is doing a Staking
- Go to Staking page https://test-staking.nulink.org/faucet
- Connect your Metamask , You can use any Metamask account
- Get BSC Testnet token in BNB Faucet
- When you get your test BSC now ask for faucet in Nulink Faucet
- Go to Staking Page and Stake your Nulink and Press Confirm and approve transaction in your Metamask

Scroll down and click Bond Worker
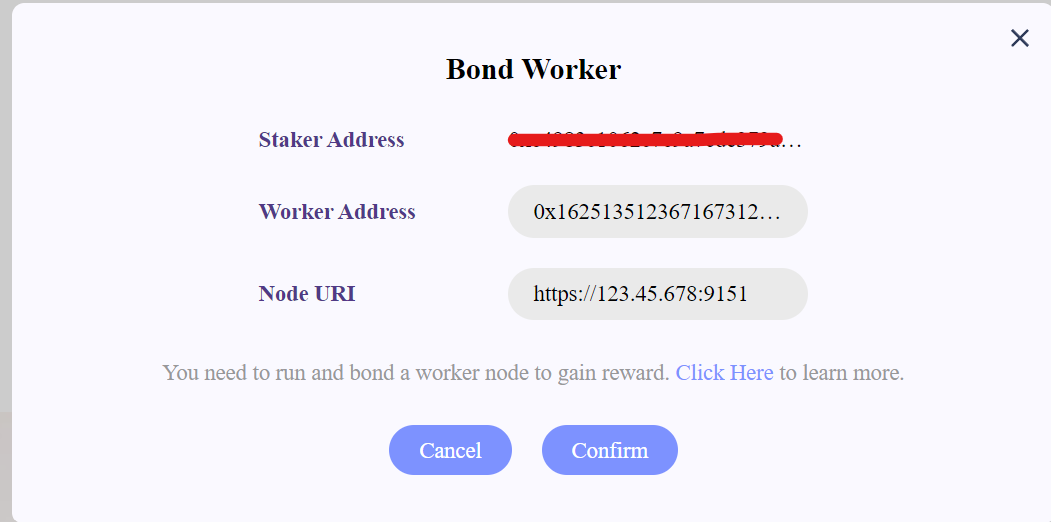
fill the form needed
Worker AdressShould be your public addressNode UrlShould be yourhttps://IP:9151/for Examplehttps://123.45.67.890:9151/( Make sure to Copy everything ! dont miss any/Or else you will get an error)- Click Bond and Approve Transaction in your Metamask
If your node keep saying "offline" status, then please wait a few moment till your nodes getting online.
Join @codeblocklabs on telegram https://t.me/codeblocklabs and Subscribe my youtube channel https://youtube.com/c/pramonoutomo for more testnet, airdrops and blockchain development talks.


