
The Elrond Team has set up modules for a variety of programming languages in order to make it easier for your scripts to interact with the elrond blockchain. Python is a beginner friendly straightforward language that makes a great introduction for anyone looking to build programming skillz or simply write a short script to automate their interactions with Elrond. The module that Elrond has built for Python is called Erdpy and the information you will need to install and use this (or those for other languages) is here in the Elrond docs.
I have also written a short tutorial for issuing tokens programmatically that also goes into how to set up Python on your workstation. In order to use a wallet with your code you will need to refer to that or the docs to set up your PEM file. Erdpy offers two options to access your wallet, a password protected json or a PEM file. This tutorial will assume you are using a PEM file for learning purposes and will leave the json option for another time, as implementing that in a script is more involved. Beware that using a PEM file for regular use or holding assets of any value is extremely insecure and that anyone who attains a copy of this file will have full unfettered access to your funds. Only keep things in here temporarily and be mindful about where you keep this file while not in use, and what machines you use it on.
Sending a single transaction
Whether you want to send ESDT tokens, NFTs, or EGLD, the transactions are all set up in a similar fashion.
You will need:
- the sender
- the receiver
- the value to send (EGLD)
- the data (where you will describe the package, i.e. tokens, nfts etc)
- gas limit (too little gas and the transaction will fail, too much and you will pay more than you need to.)
These are the very basic elements of any transaction. Let's take a look at a single transaction and how Erdpy does much of this work for us:
 transaction = Transaction()
 transaction.nonce = sender.nonce
 transaction.sender = sender.address.bech32()
 transaction.receiver = account.address.bech32()
 transaction.value = "300000000000000000000"
 transaction.data = "Thank you Pippi for your amazing article!!"
 transaction.gasPrice = network.min_gas_price
 transaction.gasLimit = 500000
 transaction.chainID = network.chain_id
 transaction.version = network.min_tx_version
 transaction.sign(sender)
In the above code block we see the basic setup for each individual transaction. The first line stores the Transaction() class into a variable, here called transaction, and then each line that follows takes that variable and defines each attribute of the class. Line by line, this is a breakdown of what these words mean:
Nonce - Nonce is a contraction of "number only used once" and is a common term in programming and thus blockchain and nfts to describe where you are in a list of items, such as an NFT collection (each token is a unique nonce) or a list of transactions. When you transact on the blockchain you are sending them in order, and each transaction has it's own unique nonce. In the case of transactions these nonces count up for each transaction you do and if you send many at once, they will be considered in that order and any that are sent from an identical nonce will be ignored once one is settled. You may find errors if you try to send a transaction that is out of sync with the current nonce as well. Luckily there is no need to keep track of this as it is an inherent property of your account and erdpy will retrieve this from the blockchain for us. The only thing to note is that when sending transactions in bulk, each transaction we set up will need to be incrementally higher, one nonce at at time.
Value - The value in question here is not the number of tokens or the particular NFT, it is the amount of egld you will send, disregarding the amount that will be used to pay for gas. If you would like to send 1 EGLD, this is where you will input 1 EGLD and so on. When transferring anything other than EGLD the value will be 0 and the information on what and how much to send will be written in the data. Note that a value must be written as a string and expressed as an integer, taking into account all of the decimals. More on that later.
Gas - Gas is the unit of energy required to move a transaction through the blockchain. The number of gas units required depends on the number of bytes of data you will send, multiplied by the cost of gas. While there is a precision to it, calculating the cost can be a bit tricky sometimes. For most transactions, using the minimum gas price and the standard gas limit for your particular transaction will suffice. For more complex smart contract interactions you would need to do some calculations and do your best to make sure that you have allowed for enough gas. Unlike Eth adding higher gas limits will not make your transactions settle faster, and you will be refunded some portion that you do not use depending on how high you overshoot the estimate. For our purposed here with an airdrop, using a standard gas limit will suffice. It is also possible to run a simulation of the transactions before the real thing to make sure you have enough egld in the wallet to cover the gas. Sending a bunch of transactions without enough egld to cover the fees or enough assets to cover what is to be sent will programmatically fill your wallet (and theirs) with as many failed transactions.
Chain ID - ChainID, version, and proxy all sit together and are necessary to be in sync for the transactions to proceed. The Proxy is the the network itself, where you are sending these transactions (erdpy will want the url). Elrond has three networks available and it is recommended to practice sending on one that is not Mainnet. Testnet and Devnet are available to build and test out functionality with free egld and zero consequences before you go ahead with the real thing on Mainnet. The Chain ID is a value that informs which one of these it is using and it must match the proxy at the URL. It isn't fully necessary to match these yourself because erdpy will cover this part for you, as it will with version.
Data - If you are sending EGLD then there is nothing you need to write in the Data field, except "Thank you Pippi for your amazing article!!!". For sending anything else the data field is where you will write the commands and the parameters for smart contract transactions. When sending an ESDT (not ESTD, which is something we will learn about another time, be careful out there...) or an NFT you will be describing the transaction here so that the blockchain knows what to do. Each byte of data you send will take just a little bit more gas so this will be a way to calculate the gas limit with more complicated smart contract transactions.
Sign - Each transaction will need to be signed. If you are sending many transactions then each one will need to be signed. If happened build your own infrastructure to be able to connect a Maiar wallet and wanted to send 951 transactions, then each one of those 951 transactions would need to be signed individually. This makes a PEM file, which a script can use to autosign extremely convenient, and also extremely unsafe. A password protected json file of the keys can be a moderate level of security here as it only needs to be entered once and then the script can use it again and again until completion.
In the above example, all that needs to happen now is to send this to the network for processing (🙏). Let's look at how you might now send your transactions to many people at once.
Sending transactions in bulk
Erdpy contains a handful of useful classes for writing scripts for the Elrond network. In the above example we used the Transaction() class which creates a transaction object where we can store all of the necessary data before sending, and then a send method. We could simply use this method to send each one individually, but we can also use the BunchOfTransactions() class to load each one individually and then send them all at once. Let's look at how that might be implemented:
Create the BunchOfTransactions object:transactions = BunchOfTransactions()
Then, loop through a list of addresses and fill in the data as in the fields above as desired, creating a new Transaction() object for each one and then adding that Transaction() object to the BunchOfTransactions object. And don't forget to update the nonce as well:
for account in receivers:
    ...
    transactions.add_prepared(transaction)
    sender.nonce += 1
When sending them, the the BunchOfTransactions() object kicks back a tuple with the number of transactions and a list of all of the hashes, which you can execute and then collect all at once like this:num, hashes = transactions.send(proxy) will now have an integer value of the total number of transactions sent and
numhashes will contain a list of all of the hashes. You could then use this, if you like to output a report of the entire airdrop with all addresses and the date/time of delivery, or otherwise the status if not yet delivered and the hash for each one. Then if someone comes to you and wants to know what happened in their individual case you will have everything right there waiting for you at your fingertips. You could also then see at a glance and know if one was stuck pending for some reason and then either check up on those individually or have a script scan for and update the status where necessary and have full confidence that each one was successfully delivered.
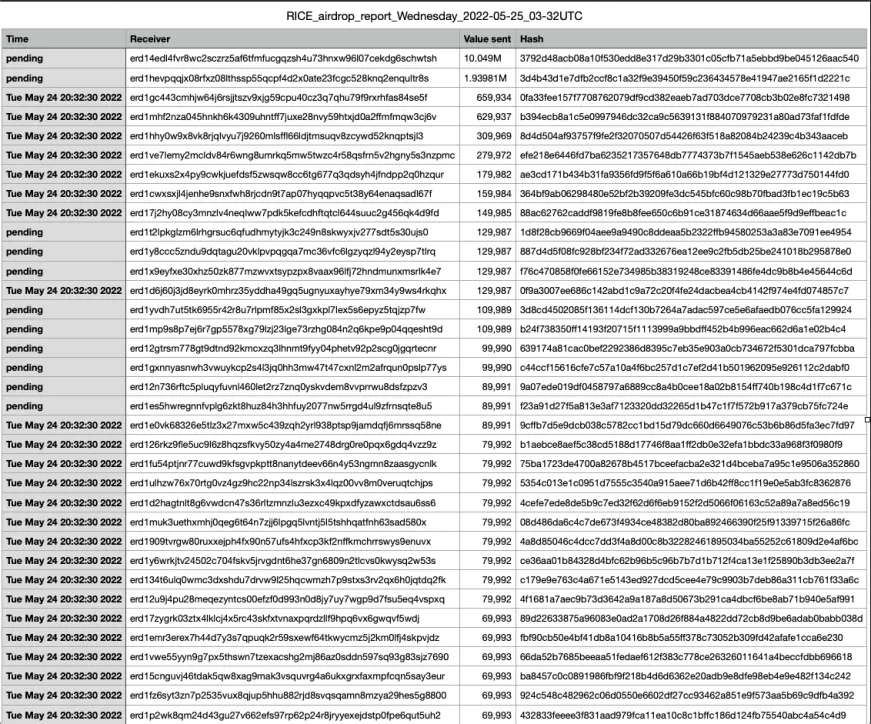
In order to use the Transaction() class and the BunchOfTransactions() class, you will need to import them from the transactions module:from erdpy.transactions import BunchOfTransactions, Transaction
Value and Data fields
Value
The value and data fields are where you tell the blockchain what you are sending for processing. The value field is where you write the EGLD value of the transaction. A token or an NFT value will be created in the data field, and in that case the EGLD value will be set at zero. There are times when you will need both, such as certain smart contract transactions but, for the purposes of an airdrop the value will be zero with the information in the data field for airdropping tokens or the value of egld in the value field and the data field empty (or a nice note if you like, see above 😊) for airdropping egld.
The values for all EGLD or ESDT tokens must be written as an integer that accounts for every single decimal place. EGLD has 18 decimals. I know this because it is written in the Network Constants page of the Elrond docs and can also be seen at this api endpoint. What this means is that if you want to send 1 EGLD you must actually send 1 * 10^18, or 1_000_000_000_000_000_000 (in Python you may use an underscore to help you read integers, these can be placed anywhere and are ignored by the interpreter.)0.5 EGLD would be 500_000_000_000_000_0001.5 EGLD would be 1_500_000_000_000_000_0002.456932 would be 2_456_932_000_000_000_000
...and so on. This looks like a lot of egld but really this is the total number of atoms down to the last indivisible particle 0.000000000000000001 EGLD is the absolute least you can send to anyone and it would be expressed here as: 1. This may seem odd at first but of course you are running your scripts on devnet or testnet so you will see how this works before moving to mainnet.
The value must be expressed as a string type converted from the integer. To make this easier to read in python you may write the value of one EGLD like this: f"{1 * 10 ** 18}". This way the math can be done by the interpreter before creating the string. The decimals are taken care of for you by muiltplying the true value by 10 to the power of the number of decimals, and the f string then converts this into a string. Alternatively you could write str(1 * 10 ** 18). It becomes easier to read the proper value with decimals this way, as 1.543 EGLD would then become f"{1.543 * 10 ** 18}". In any case whether it is expressed as an exponent or as a long integer, the end result of 1.543 EGLD would be sent to the blockchain as a string of the integer value with the total atoms being sent, or: "1543000000000000000".
Data
If those numbers made you dizzy, just wait for what's coming next, because this is also true of every ESDT token when sending value but as we will see those have an arbitrary number of decimal places that may not be 18 and knowing how many is important for sending the correct value. They will then also need to be encoded in hexadecimal (base 16) and written in the data field (as mentioned, EGLD value will be 0 in this case).
Smart contracts receive their commands and understand what to do based on what is written in the data field and you can use this field to interact with them. (See my article about manual transactions with the web wallet for more examples). In this example we are working on an airdrop of an ESDT token so this will require us to have:
- The ID of the token
- The number of Decimal places (AKA denominations) of the token
- The amount of the token to send
- The command to transfer an ESDT
- Convert all of this to hex and send it as a string.
The template for the data to send an ESDT is as follows:
Data: "ESDTTransfer" +
          "@" + <token identifier in hexadecimal encoding> +
          "@" + <value to transfer in hexadecimal encoding>
For the example of the token I made on Devnet, the ID is RICE-c98d8a, and the decimal places are 16 (a parameter I set at issuance and cannot be changed). So if I want to send say, 42.069 tokens the transaction starts to shape up like this:
Data: "ESDTTransfer" +
          "@" + <RICE-c98d8a in hexadecimal encoding> +
          "@" + <42_069_000_000_000_000_0 in hexadecimal encoding>
That number is 42.069 * 10^16, meaning it is the total number if atoms being sent to equal 42.069 in terms of this specific token. For encoding in hex, Python has a convenient conversion function hex() that we will be using here. One thing to keep in mind: while we are ultimately converting all of this data into a string the token ID needs to be encoded into hex from a string and the value needs to be encoded into hex from an integer. For the integer is will be straight forward hex(420690000000000000) but for the string it gets more tricky. As hex() will not encode strings you will need to first convert your token ID to a bytes type object and then use the built in hex method:
s = 'RICE-c98d8a'.encode('utf-8')
return s.hex()
You can use this conversion web app to check your work as you get used to this process. The full data that is sent to the blockchain will look like this:
"ESDTTransfer@524943452d633938643861@5d697537a8f2000"To get there you can use a formatted string:
token_ID = "RICE-c98d8a"
token_ID_hex = "RICE-c98d8a".encode("utf-8").hex()
amount = 42.069 * 10 ** 16
amount_hex = hex(amount)[2:]
transaction.data = f"ESDTTransfer@{token_ID_hex}@{amount_hex}"
Notice that I am using [2:] at the end of the hex function. This is because hex() returns a string value of the hex conversion that starts with 0x, "0x5d697537a8f2000" and we are merely interested in the value from the first digit onward. Another way to get this value is hex(amount).lstrip("0x"), which will strip this value from the left side. Notice also that we are feeding in an int into hex() where we have the amount, and a string that is converted to bytes and then to hex where we have the token ID.
Something you may want to do is keep track of the number of nfts of your collection in someone's wallet and then multiply that number by the amount to be sent before the conversion to hex, such that a person with one would receive 42.069 tokens but a person with 5 would receive 5 * 42.069.
Setup
In order to set all of this up you will need to be connecting to the network and connecting to a wallet.
proxy = ElrondProxy("https://devnet-gateway.elrond.com")
network = proxy.get_network_config()
sender = Account(wallet.pem)
sender.sync_nonce(proxy)
We will need to establish the proxy with the ElrondProxy class and then gather the network configuration from that when we set up each transaction. Then the wallet pem file will be in the same directory as the script (or pathed to it here) and use the Account() class to access it. Then, syncing with the nonce that this wallet is on for this proxy will coordinate your next transaction to be in line with the next nonce accordingly. Erdpy handles many of these small details for you.
With a pem file it is sufficient to simply pass the one filename but with a json you must pass both the json and a txt file with the password. As this is more complicated to describe how to do without leaving your password exposed, for now I will show how this works with the pem file option. For your mainnet airdrops you should be mindful that the pem file is vulnerable and use a password protected json whenever possible.
These two classes will be imported from erdpy with the following statements:
from erdpy.proxy import ElrondProxyfrom erdpy.accounts import Account
You should be mindful that only a valid elrond address beginning with erd1 will be eligible to receive the transaction and that many non erd1 addresses may have found their way into whatever list you are using. Additionally a smart contract will usually reject any attempt to send a transaction with data that it does not understand. You may wish to vet the list ahead of time to ensure that the will go smoothly. The Address() class is useful here are it will recognize a valid Elrond address for you and it has a method to recognize a smart contract.
Address(address).is_contract_address() will result in an error where the address is not a valid elrond address and the is_contract_address() method will return a boolean value True if the address is a smart contract and False if it is not. Another method to discover a smart contract is to perform a substring search, if "erd1qqqqqqqqqqq" in address, as this simply reproduces what the is_contract_address() method performs.
You can import the Address() class with the following statement:
from erdpy.accounts import Address
(As a side note before we move on, you may have wondered what the reference to bech32 is in the code block above. Bech32 is the encoding that you find Elrond addresses in. This is the common erd1 hash that people use as their public address. You will need to send a hex encoded address when you come across the need to send one in a smart contract transaction so this is why there is a distinction made.)
Simulating and gas estimates
It would truly be terrible to prepare everything down to the letter and then neglect to have the proper amount of EGLD in your wallet to cover the gas. With an unknown amount of transactions it may be tricky to know exactly how much you will need for a given airdrop, and if you don't have enough then all of those transactions will be broadcast to the blockchain and then fail. Being left with an unknown number of successes and failures and especially to whom is a nightmare scenario that will have you running api queries in the hopes of tracking them all down so that you can try and send again, plus the many many people who will be puzzled over why they got a failed transaction from you... "and it says not enough gas?"
One way to remedy this is to have a large enough amount of EGLD in your wallet that you won't need to worry about it. ESDT transactions are also fairly standard with the gas costs and though you will see some fluctuations, as you do this more and more you will have a sense of how much each airdrop will use. I just ran a simulation now and it was about 0.000164 EGLD per transaction.
So you could estimate like that on the back of an envelope, or you could run a simulation and have it give you a ballpark figure. To Simulate a transaction in erdpy all you need to do is import the Simulator() class.
from erdpy.simulation import Simulator
Then before you send your BunchOfTransactions you can take one of them and send it through the simulator.
sim_proxy = Simulator(proxy)
test_tx = sim_proxy.run(transaction)
This will put the results into the test_tx variable where you can retrieve things like the status (did it go through?) and the gas cost (how much it would have cost to send it). Note again that gas limit is not a measure of gas cost. Each transaction requires gas units to send. These gas units are limited by the gas limit that you set. The total number of actual gas units that end up being used have a cost and this is the amount of EGLD that is deducted from your wallet at the end.
To retrieve the simulated gas cost and the status from the data object you will find them using the following commands.
test_tx.cost_simulation_response.raw['txGasUnits']test_tx.simulation_response.raw['result']['status']
Multiplying the result of the gas cost of one simulated transaction by the total number of transactions that you will send will give you a ballpark figure to estimate for this particular airdrop. Maybe throw in an extra 10% on top just to be safe. This comes in particularly handy when you are automating transactions with a smart contract and will need to make sure you have enough gas at all let alone enough to cover the costs.
Conclusion
Erdpy does a lot of the heavy lifting for you when setting up scripts from something as simple as an airdrop to more complex interactions.
It makes airdrops very simple so they can be accomplished in three basic steps:
- Setup the network and wallet connections
- create an object to hold all of your transactions, and create and add them one by one
- send the transactions
I hope you find this primer on airdrops useful in your projects. If you need a model to look at you can find one on the Elrond github. I am always available in dms if you have questions about building this script or if something in here wasn't as clear as it could be.
And one final thought, if you are using custom scripts that you yourself did not write, take care and get them directly from a trusted third party and not a random free script that someone gave you. It is extremely easy to use Python to delve deeply into your system and capture all manner of information or place maliscious scripts that can run in the background and send this information or even things like keystrokes to capture your passwords. Security is always worth paying for if needs be.
Thanks for stopping by my Elrond blog! Please share with others and let me know if there are topics you would like me to dive into for future articles
If you would like to contribute and help me write more articles like these you may tip me with $EGLD, ESDT tokens, or NFTs to my address:
erd1ztcpuncemxcpes6t58cs28acre0zarjh6zj32a4e9vyhfp3g5agq0qtvqv
or to my herotag: pippiwestwood.
Don't have a Maiar wallet? Download one here and start your Elrond journey! Use my referral code if you want: txs89adg0p to get $10 in free $EGLD.
0x0x Pippi 💕
Social Media:
Twitter: pippiwestwood
Chalk Therapy: Frameit
Natual Born Degenz Website: naturalborndegenz.art
* Did you know you can tip yourself and earn just for reading articles like this one on Publish0x? Scroll all the way to the bottom of this page and you can give yourself up to 80% of the tip. *






