I transitioned from Windows to Linux Mint about 2 years ago. I began keeping notes on paper for anything I thought would be important to be able to refer back to at a later date. Eventually, I moved from paper to electronic text files so that I could pass my information to my friends who might also wish to transition. This file will keep growing as I run into new problems. Whenever I set up a new computer with Linux, I will simply give my friend this file in a .pdf version so that they can read it from whatever operating system they have saved the file on.
I recently found a video that is worth watching in order to understand exactly what Windows is doing and why people are abandoning it. https://www.youtube.com/watch?v=jQRMTMvD-Dg
BOOT MENU = _____ key BIOS setup = ______ key
partition #2 of SCSI1 (0,0,0)(sda) reformatted as ESP
partition #3 of SCSI1 (0,0,0)(sda) reformatted as ext4
USERNAME = ________________ PASSWORD = _____________________
When installing Linux, it lets you choose if you want to be required to type a password when you log into the computer or if you want the computer to start without requiring a password. In either case, the user should generally log in as a regular user with limited privileges for security reasons. No matter which option you choose when installing Linux, you must still set up a username and password for the Super-User that has all privileges. I find it annoying to have to constantly enter my regular user name and password, so I recommend people to use the automatic login method. That way when it asks for a user password, you need not think about which one of the 2 passwords you need to enter and the number of times it will ask is greatly reduced.
* snapshots are auto-saved to the root of the designated (primary) partition and exclude /home/username. (Snapshots use HARD LINKS that WIN. doesn’t support, so Snapshots require a Linux file system).
* Backintime (install from the SOFTWARE MANAGER) is a complimentary software that saves ONLY the /home/username folder (to the /media/username mount point). (Backup Tool may already be installed. It came with my Version of Linux Mint.)
WHEN A PROGRAM HANGS:
Open SYSTEM MONITOR, click PROCESSES, click on the offending process/application, R-click to open a menu then choose either:
(1) STOP to pause it
(2) END (closes the process & cleans TEMP FILES)
(3) KILL (only use if END fails).
NOTE: After clicking END PROCESS, wait a while and it usually closes eventually.
WHEN LINUX MINT HANGS:
(1) Ctrl+Alt+Esc should restart the session.
(2) If the above fails, try Ctrl+Alt+F1, then login as root (username = root, password = your super-user password) note that there is no visual feedback when entering this data. Next, enter CODE: SELECT ALL service mdm restart and tap the ENTER key. This will quit the user session. Press Ctrl+D (to log out of root), then Ctrl+Alt+F7 (or F8) to bring back the login screen to start a new session without a reboot. (I haven't personally been able to use or confirm this instruction.)
(3) If still frozen, hold down Ctrl+Alt, then press and release the PrtSc/SysRq key. Release Ctrl+Alt. Then type reisub with a 2-second pause between each letter. This is the equivalent to Windows Ctrl+Alt+Del and will reboot the system.
(4) If all of the above fail, hold down the POWER BUTTON for several seconds to do a hard shut-down.
LINUX KERNELS:
The kernel is one of the major parts of the Linux operating system and it gets updated every now and then. When it is updated, you will see a message in red text telling you to restart your computer as soon as possible. You don’t have to restart immediately, but if you forget to restart, it could present some issues with attempting to run some programs, so it is best to restart fairly soon. Restarting the computer will then load the new kernel for use. Rarely, an older program that you may use, could be incompatible with the new kernel, so all old kernels are NOT deleted when a new kernel is installed. That way, you can always roll back to an older kernel that did work with your old software. However, the area where Linux stores these kernels is inside a tiny partition called the BOOT PARTITION and if you don’t manually clear out the old kernels, this area can fill up and once it does, your computer may no longer be able to start! It is recommended that you keep just a couple of old kernels and the newest kernel so that you always have 3 kernels that you can choose from. I have yet to find a reason to roll back to an older kernel but that doesn’t mean it can’t happen.
At the bottom right of your screen, you should see a shield icon. That is the icon for your UPDATE MANAGER.
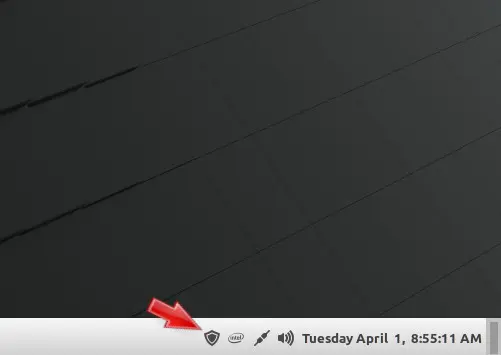
If the icon has a red dot on it, then there are updates available. I update everything that shows up.
If you click on this icon, a window opens and looks like the following image (when there are no updates available):
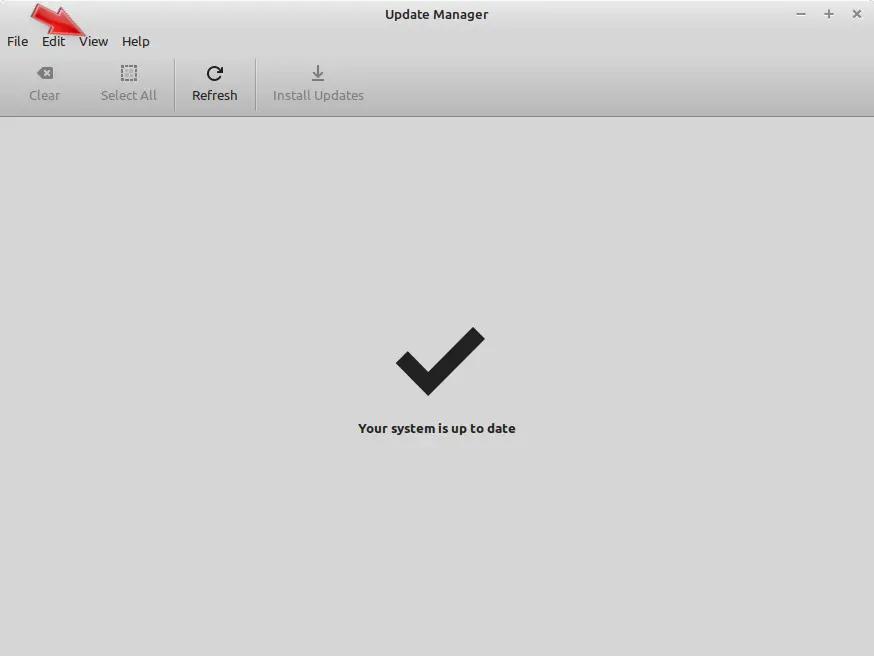
If you now click on VIEW (at the top left), you will be presented with a warning page:
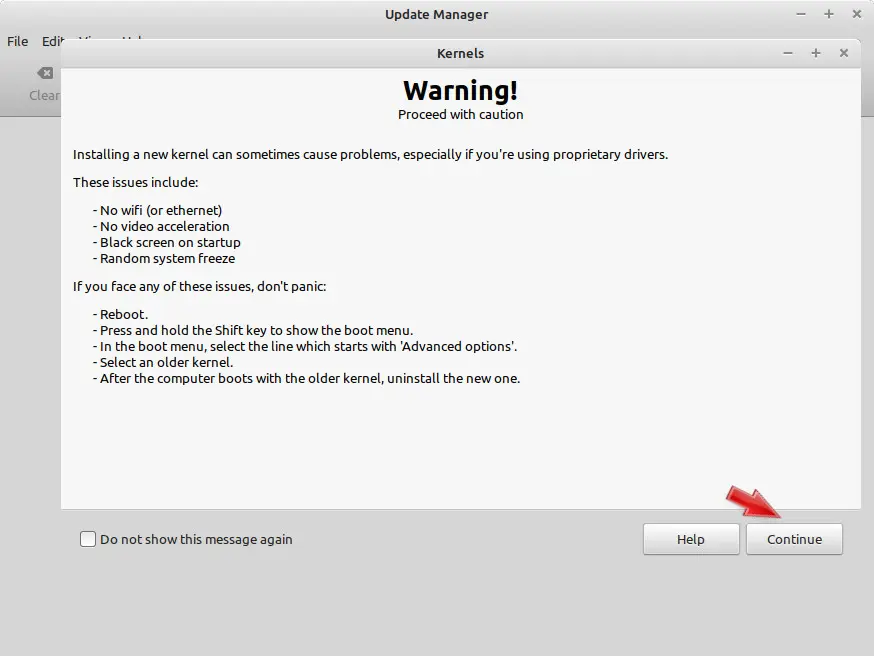
If you never want to see this warning message again, click the checkbox at the bottom left, otherwise, click the CONTINUE button. You will then be presented with a list of kernels similar to the one pictured below.
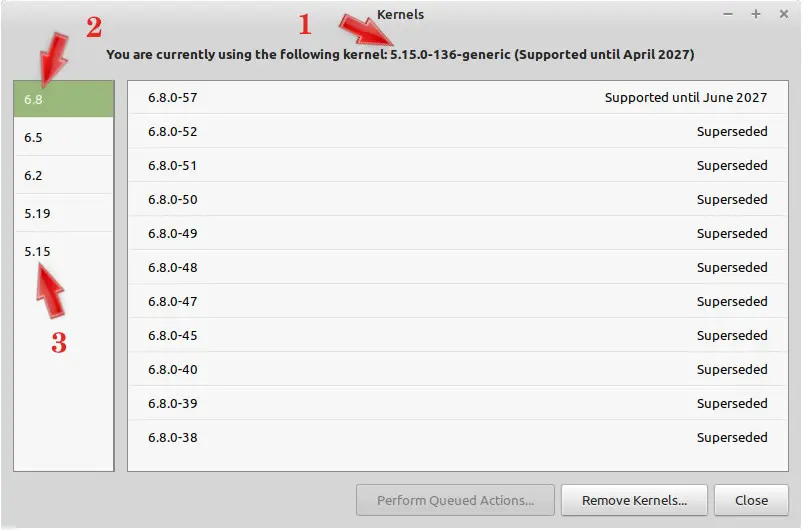
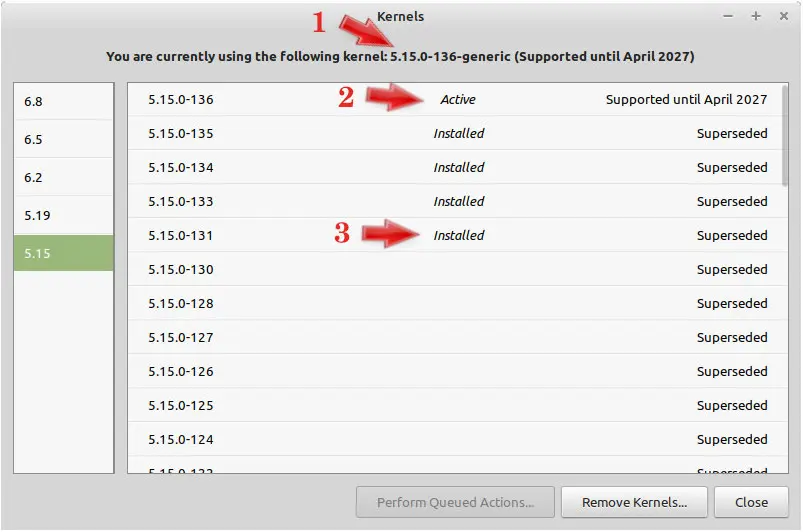
Note that the header (at arrow 1) will show you which kernel is currently in use (kernel: 5.15.0-136-generic) for this example. Also note that arrow 2 is pointing to a green box with 6.8 in the box. The green box indicates that the 6.8 series has been selected and inside the big white box you will see a list of numbers that begin with 6.8. If you scan across to the other side you will see that all of those kernel numbers have been superseded; in other words, they are obsolete. I’m guessing all these old kernels are still listed just in case someone is still running a very old computer and needs those old kernels. However, since the version of Linux used to generate these images is much newer, none of those old kernels were ever loaded into this machine, so they are not listed as installed.
In the list on the left (at arrow 3), we do see the numbers 5.15 and that matches the series indicated in the header (at arrow 1). This would be the list we are interested in, so let’s click on the numbers 5.15 (at arrow 3).
Now the highlighted (or selected) series of 5.15 kernels is listed and the green box moves to our chosen numbers. The large white box now shows us that we have one active kernel 5.15.0-136, 4 installed but superseded kernels and a bunch more obsolete kernels that are NOT installed. Note that the active kernel (at arrow 2) matches what is shown in the header (at arrow 1). We can also see that there are 5 sets of kernels currently installed, so let’s get rid of the oldest one at the bottom of the list.
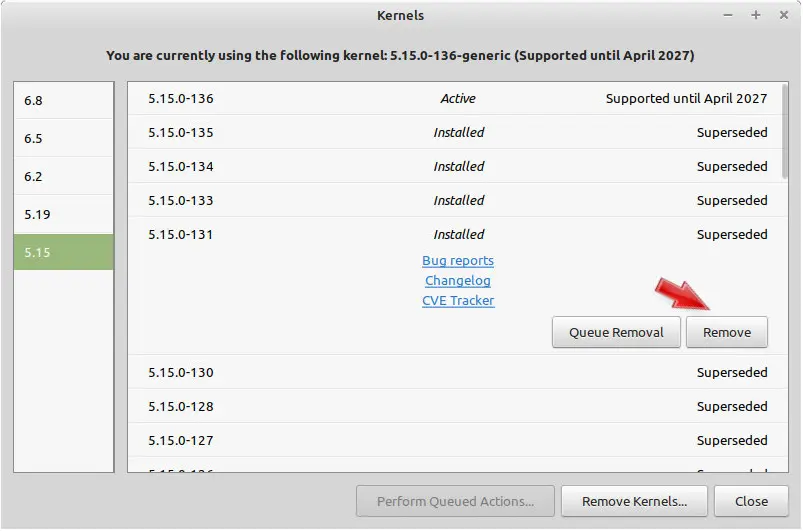
If we click on the line at arrow 3 above, the line expands to give us some more choices:
There are 3 links that we can click on to get some additional information and a couple of buttons for the removal of this outdated kernel. If you are computer-savvy and want to run batch files to automate or delay the removal of this kernel, you could choose to ‘queue removal’, or do it immediately like I do and choose the ‘remove’ button.
After you click on the REMOVE button, give it some time to do its thing. Once it is done, the word ‘installed’ will no longer be shown for that kernel and you have just freed up some space in the boot partition.
If you want to get some more breathing room, go ahead and clean out one more old kernel by clicking on the next line up and removing that kernel as well, leaving just 2 superseded kernels and 1 active kernel.
When you are all done, simply click the CLOSE button or the little X at the top right corner. Just like with Microsoft Windows, there are several ways to accomplish tasks in Linux Mint.
DOWNLOADING FILES:
This is what messed me up for a while, until I got used to it. In M.S. Windows, the file manager was very intuitive and I was able to quickly grasp where I could expect to find my files. But actually, a lot of stuff happened behind the scenes and we just were not aware of it.
Unless you are attempting to install or run software that doesn’t come from the SOFTWARE MANAGER, Linux is actually quite straight-forward: As a regular user, you are given a HOME directory and a folder with your name on it. Inside this folder with your name on it, are sub-folders: Desktop, Documents, Music, Pictures, Videos, and Downloads. When you download something, the default path will be to place it inside the downloads folder. However, you do have the option to specify where you want a particular file to get placed (if you R-click and choose the location manually) instead of Left-clicking the download button. For instance: when downloading a music file, you might want to put it directly into the Music folder rather than having it go to the downloads folder and then having to move it from there to the music folder. And by the way, Linux supports both Cut-and-paste and drag-and-drop for individual files as well as a group of files. Hold SHIFT while selecting files in continuous order (click on the first file, depress Shift, click on the last file and release Shift) or Ctrl while choosing certain files while omitting others (click on the first file, depress Ctrl, select the next file with another click, select the next file with another click and when you have clicked on all the files you want selected, release the Ctrl button); just like it was done in Windows to select files using the mouse and the left mouse button. That’s all quite straight-forward for anyone familiar with Windows. However, Linux files are all permission-based, so not everyone can manipulate all files. This is where it becomes a bit tricky, but is also why Linux is much more secure than Windows.
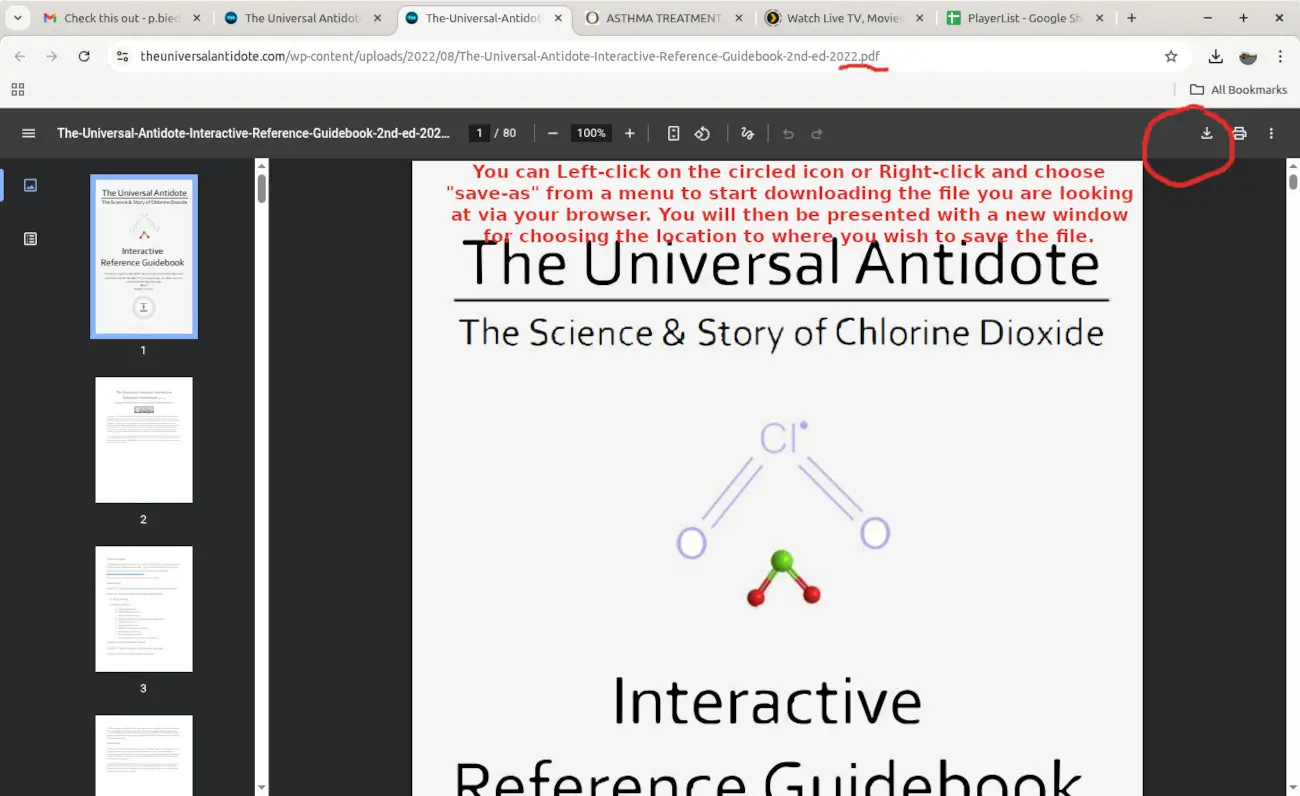
My first couple of downloads disappeared on me because I simply clicked on the download button without paying attention to what location was shown in the file path (the circled area in the image below). If you see anything resembling that path shown below, make sure to CHANGE the path to at least be inside your own folder (the one with YOUR name on it).
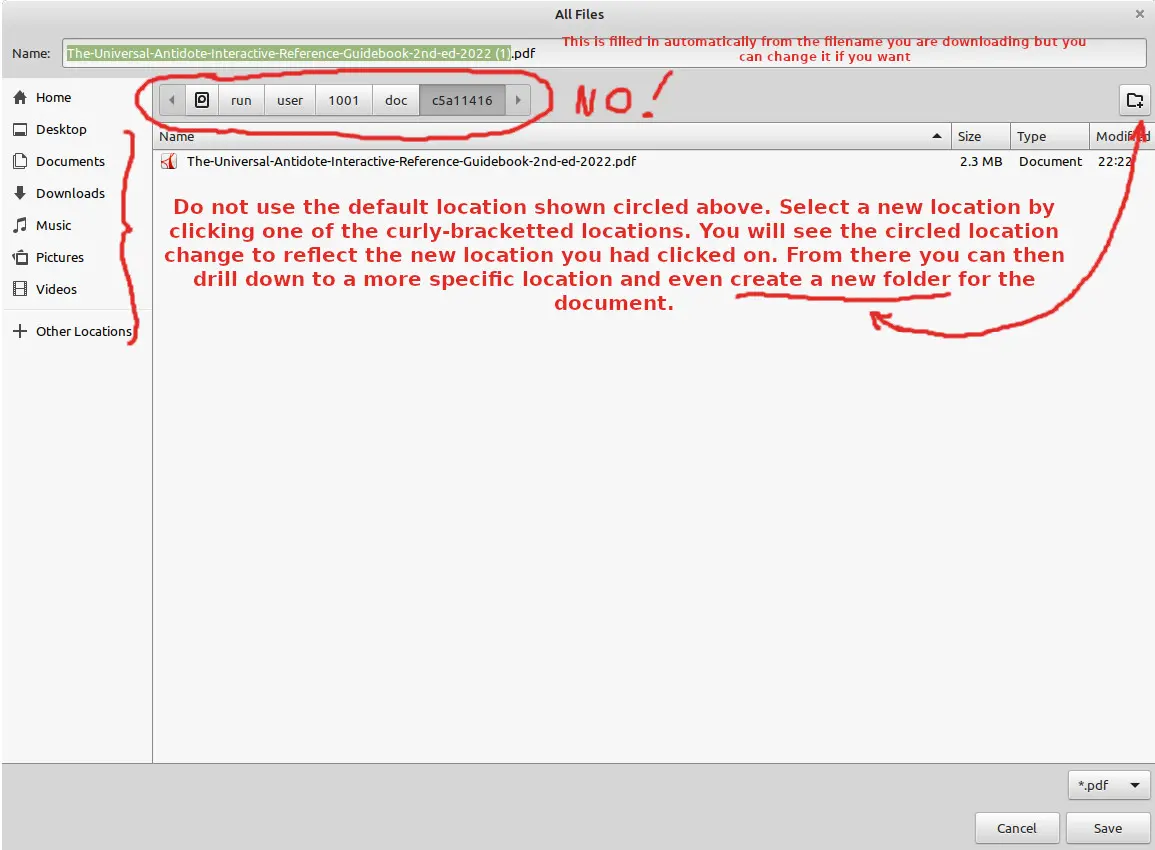
To create a new folder for saving the downloaded file into (or for any other reason that you may want a new folder), click on the icon that looks like a file folder and then give it a name by typing the new folder’s name into the text box. Then tap the ‘enter’ key.
If you are in file explorer and do not see a folder icon for creating a new folder, you can click on the top left side where it says ‘File’, then click on ‘Create new folder’, give it a name and tap the ‘enter’ key.
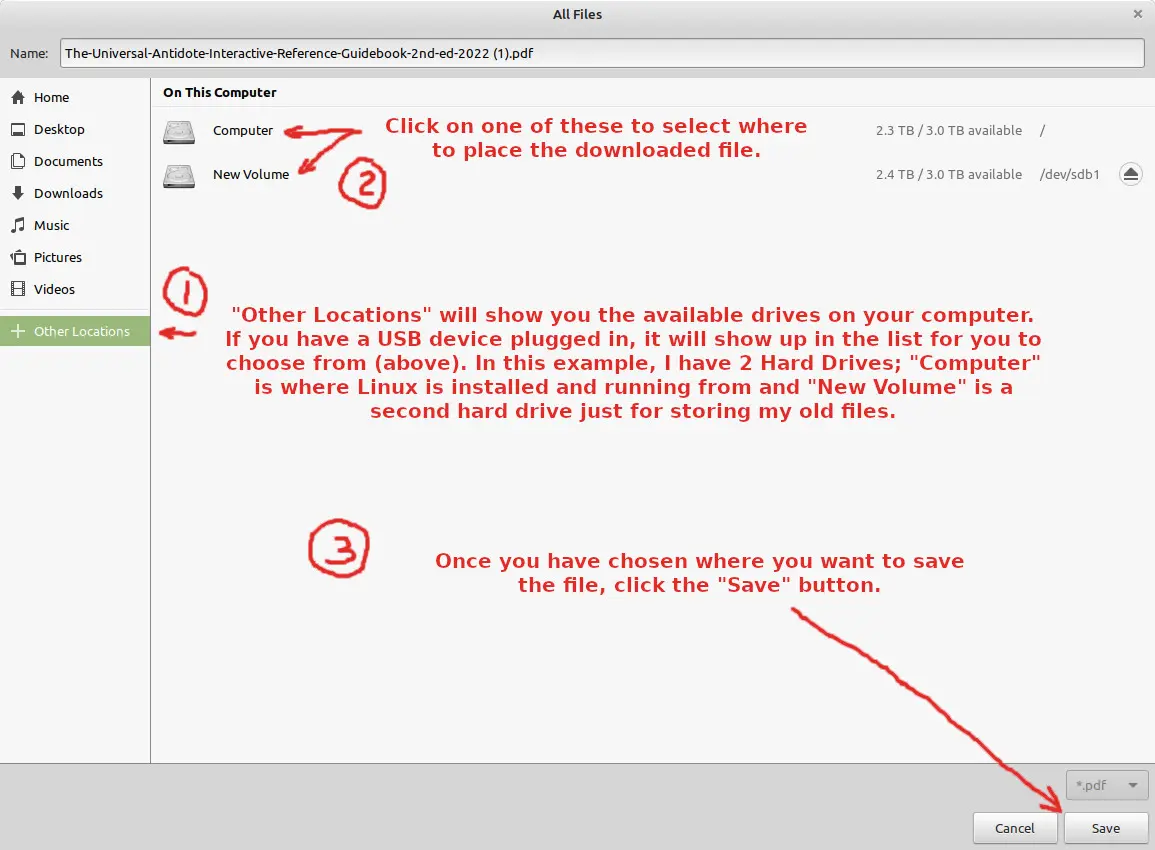
Note that you may need to double-click a file in order to select and then open that location.
Earlier, I mentioned that all files have permissions. That fact also gave me problems when I was asked to post a picture to Discord (a popular gaming chat website). The website supports drag-and-drop, but when I attempted to drag an image from my Pictures folder into the drop area, nothing happened. I was stumped for quite a few days. Eventually, I figured out that I could drag pictures from my Desktop or from my Downloads folder into the drop area and it would work. I concluded that those 2 folders give different permissions to my images than my other folders do, so now if I ever need to share any images, I just move those images into one of the 2 folders mentioned and share from there.
To look at (and change if you need to) a file’s permissions, use the file manager. Look at the bottom left of your screen for the icon that looks like a file folder and click on it. (it is highlighted in green, below)
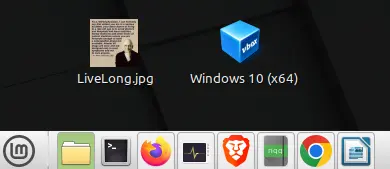
A new window will open (generally to your personal directory); in my case, paulstandard (that’s me as a standard user with no administrator privileges).
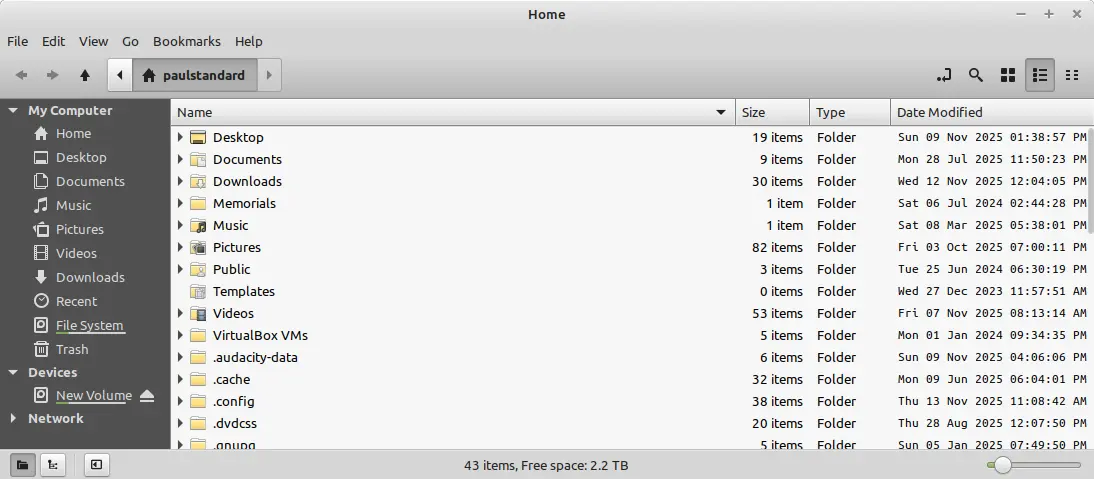
In the white area are all the folders that are inside the paulstandard folder. If you look closely, you will see some folders have a period in front of their names. These are hidden unless you choose to ‘show hidden files and folders’. Most users are advised to leave these hidden because they are system files and generally not used by people. If I now double-click on ‘Documents’ from the white area (or single-click from the black area), I will be shown what is inside the ‘Documents’ folder.
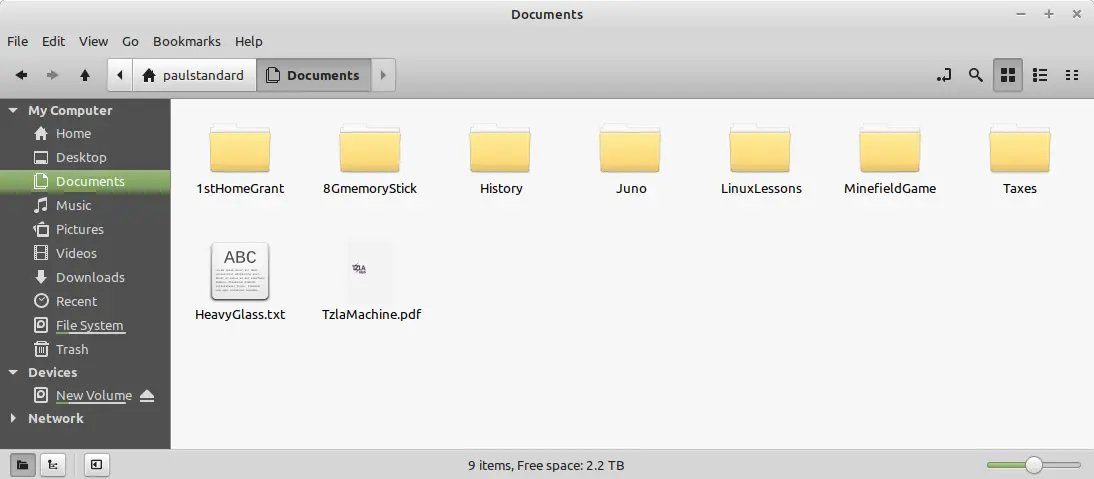
You probably noticed that in the upper image, my folders were shown as a list, while in the lower image they are shown as icons. You can change how you wish to see the contents of any folder by choosing from the 3 icons at the top right of the window (icon view, list view and compact view); if you hover your mouse over those icons, their names will appear. That first icon at the top right will alter the way the path to your folder or file is displayed in the area to the left of that icon. Clicking on the magnifying glass icon allows you to search for a specific file or folder. Now if I double-click on LinuxLessons, that folder opens and I double-click on Downloading to see the following:
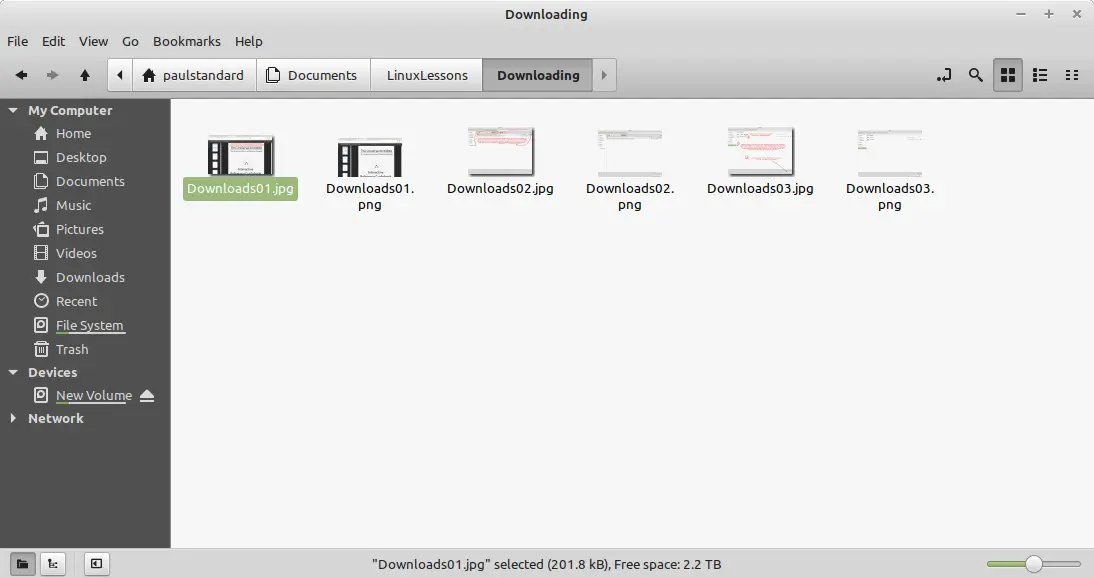
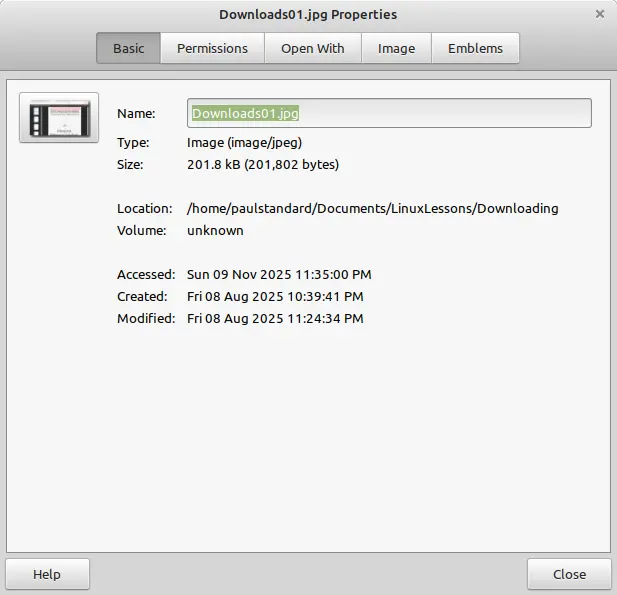
If I R-click on Downloads01.jpg, a menu appears and if I select Properties from that menu, another window opens that gives me basic information about that file (shown below).
If I now click on the Permissions button from the row of buttons at the top, new information is displayed about that file.
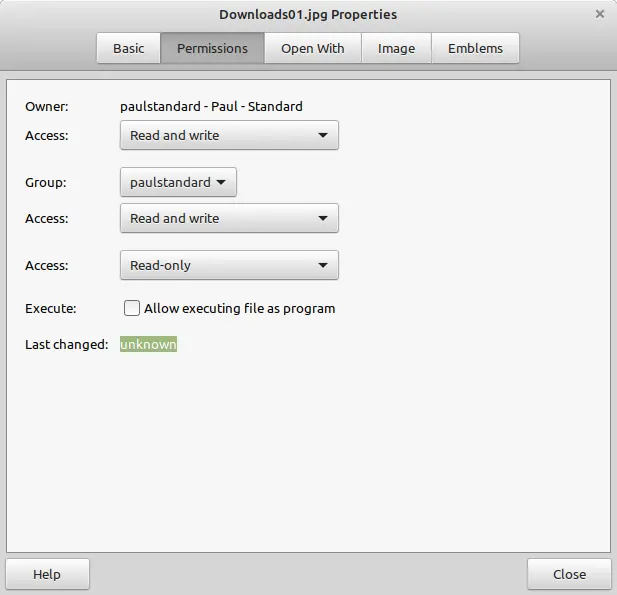
Here we can see that the owner of this file is my standard user and that I can both read and write to this file.
I am also part of the group of people that have access to this file and anyone in this group of people can also read and write to the file. This is useful if I want to share files in an office setting where various personnel will collaborate on projects and need full access to the files assigned to the group.
Anyone else (not the owner and not in the group) can only read the file but do not have permission to write to (change) the file in any way.
The Execute checkbox is for certain types of files that can run as programs. If the checkbox is clicked into, the file will be able to be run as a program. If not checked, the file is prevented from running.
If we compare the above image with the permissions settings from a system file, we can clearly see that it has very different permissions:
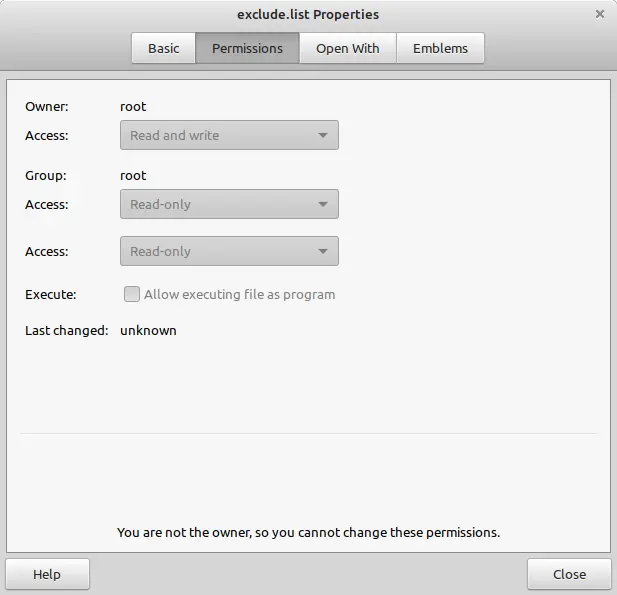
I just took a screenshot of a random system file called, exclude.list. Above, we see that the owner is now called, root. As one might guess, root is the start of the chain or tree from which all other files and folders originate. This is the basement of the file system and needs to be protected from malicious or accidental changes. The root has permission to read and write to ALL files. Root is like a super administrator. If you need to make changes to this file, you need to grant yourself root privileges. This can be done by logging in as root or using the sudo command from the command-line in Terminal.
The root group can only read this file and everyone else can also only read this file.
Also, note how it tells me that I am not the owner of this file (at the bottom of the window). It is this permission system that gives Linux far more security than a Windows operating system, where it is so easy to run viruses and spyware.
I haven’t figured out why I can drag-and-drop files from Desktop or Downloads to the Internet, but not from my other folders because the file permissions look the same to me, but I’m sure there is a good reason for it and I now have a solution that works for me, so I’m not concerned about it.
For files that belong to you, you can alter permissions to allow certain groups of people to have access to the files by selecting the new permission from a list, available to you once you click on the down-arrow for that particular access box.
EXTRA NOTES I TOOK BUT NEVER TRIED:
Advanced boot menu > Recovery mode > Fix broken packages:
Do not resume booting or the GPU won’t be recognized! Instead, use the DROP TO ROOT SHELL menu item. Press the enter key to enter maintenance and then type ‘reboot’ for a fresh boot.
There’s also a GRUB2 Bootloader Rebuild menu item (assuming I can get there). However, also available is a bootable ISO called LINUX BOOT REPAIR which analyzes partitions and rebuilds the GRUB2 BOOTLOADER as needed.
USING AN EXTERNAL DRIVE (USB-DRIVE or MEMORY STICK):
Same as for Microsoft Windows, you should properly shut down the drive before pulling it out of the USB port. Shutting down the drive in Linux is called, ‘unmounting‘ it. This can be accomplished in several ways:
1) You may see an icon for removable drives in the taskbar at the bottom right of your screen. Click it or R-click it and look for something like, “safely remove drive” or an icon that resembles a pyramid (or an arrow with it’s point in the up direction) sitting above a horizontal line. Click that and listen for a tone confirmation, text confirmation, or both. It might take a few seconds.
2) In your File Manager, look for the drive you wish to remove, select it and again, look for “safely remove” or the arrow over the line and click on that. Wait for confirmation before pulling out the USB drive.
3) The drive may show up on your desktop. R-click it and again, look for “safely remove” or the icon for unmounting a drive. Click on that and wait for confirmation before pulling out the drive.
If you pull out a USB drive while data is still being written to the drive, you will probably corrupt the files on your drive. Personal files is the least of your worries. If you corrupt the file system itself, the drive may become unreadable in any device!
USING THE FILE MANAGER:
For convenience of moving files from one location to another, you can open 2 windows or 2 tabs in the same window. After clicking on the icon that looks like a file folder (bottom left of screen), in the new window select FILE, then either NEW WINDOW or NEW TAB. I prefer 2 windows because with tabs, you still need to click between each tab to see it. Then you can select files from one location and copy then paste into the new location, or click-hold, drag to the new location and drop by releasing the left mouse button. You can move windows around on your screen by click-hold a blank area of the window header and drag it to a new location before releasing the mouse button.
Installing New Software:
Each version of Linux comes with its own set of pre-installed software and Mint comes with most things you used when using MS Windows. To look at what you already have, click on the menu icon at the bottom left of your screen (LM inside of a circle). I cannot get a screen capture of it because each time I click on the screen capture software, the menu shrinks to nothing. It is actually almost identical to the Windows start menu. Hovering the mouse over the various icons on the left column of the menu window allows you to see what each icon represents. The bottom icon is the shut-down button. Clicking on it will give you some shut-down options to choose from. However, if you move the mouse pointer to the right, in the middle column of this menu window, you will find a column of categories. Hovering the mouse pointer over each category will alter what appears in the last column of this menu section (which lists all installed programs of that category). When my menu opens, the default selection is at the top of the middle column and All Applications is selected (highlighted) and the right-side column lists all installed software. Sometimes the software you want to use cannot be found under the category that you expected to find it, so, although the list is much longer, it might be easier to find what you want under the category of All Applications. Scrolling through that right column will let you see all the programs that you already have installed. Note that there is a scroll bar on the far right of that window that you can click and drag down to find everything. Also note that you don’t need to click on the (middle column) categories column, so if you slide your mouse pointer past one of the OTHER categories, you will see the contents of that other category and not the All Applications category, unless you are careful to navigate first to the All Applications category and then from there continue to move right to the scroll bar.
If you hover the mouse pointer over the Office category in the middle column, you will see quite a complete set of tools, similar to the suite of tools available in MS Office. Because of copyright laws, Linux cannot use any of Microsoft's proprietary properties but if you double-click (from within the file manager) on a file created by a MS program, chances are, one of these Linux programs will run and open the file. If you edit that file and try to save it in the edited form, you will be asked if you want to convert to the Linux program’s format. Converting will ensure all future edits will be compatible with Linux, but not with Windows, so if you need to share that file with others who use Windows, do not convert. After saving the document (without converting) check it to make sure it did not get corrupted before sharing it with others (open it and look to see that it still looks the way you expect it to look). Some formatting options or styles may not be properly saved because there is no direct replacement for it.
If you need some software that is not already installed, click on the menu icon and move the mouse pointer up the first column until you find the icon for Software Manager and click on that. You will see a new window that looks something like the one shown below.
If you know the name of the software you need, you can quickly search for it using the search box at arrow 1.
Arrow 2 points to several Featured items.
Arrow 3 points to categories through which you may want to look.
Arrow 4 points to a group of top-rated software that you can see by using the scroll bar at arrow 5.
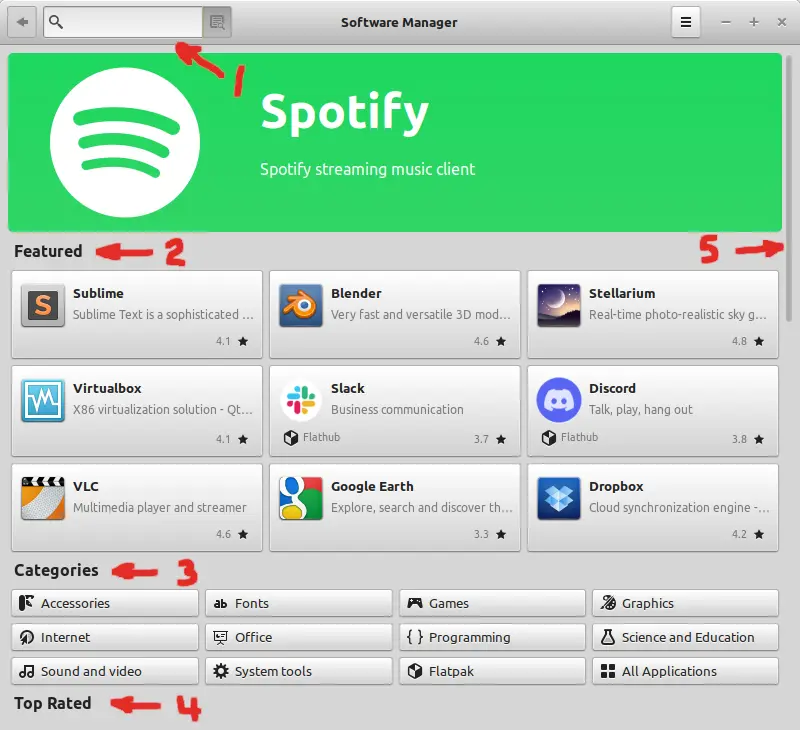
For this example, I clicked on VLC (just above arrow 3 in the image above) and saw the following:
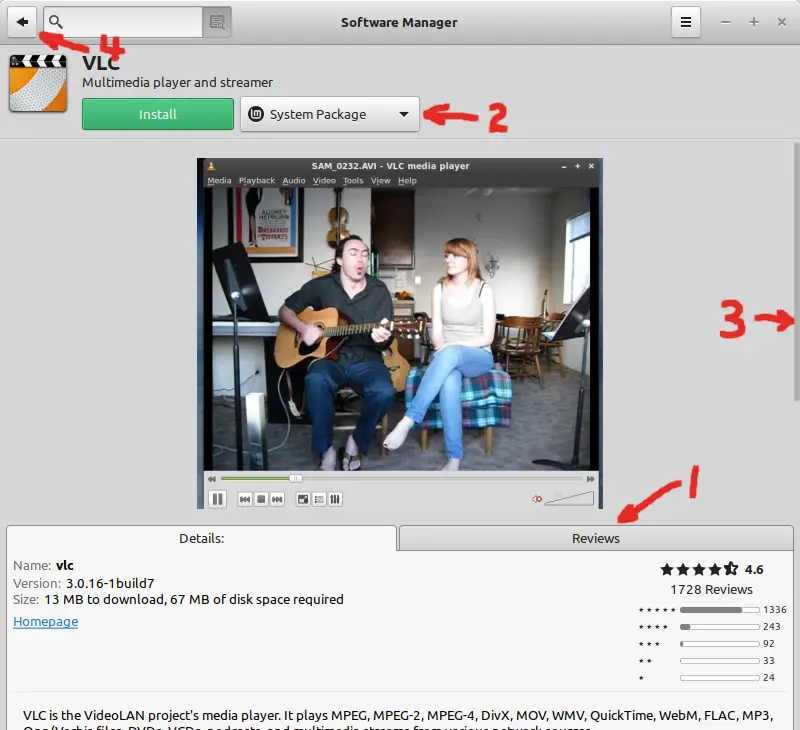
The Details tab is open and shows information about the program. To read more, use the scroll bar at arrow 3. To see what users have written about the program, click on the Reviews tab at arrow 1. To return to the previous page and continue searching for programs, click on the little arrow at arrow 4. If you think you want this program, look at which choices you have. At arrow 2 there are 2 buttons: One is labelled Install and the other is labelled System Package. Note that System Package has a little down-arrow on it. If you click on that arrow, another button appears that is labelled Flatpack (Flathub). You have the option of choosing from where you want to get this program.
If you choose System Package, you will get the software from the repository where the Linux Mint team store software they have tested and approved, but it might be old and not up to date because these people are all volunteers and they can’t be constantly evaluating every piece of updated software that comes out. When the update manager wants to install updates of this software, you will always be asked for your password.
If you choose Flatpack (flathub), you will get the software from a repository that the makers of the software upload their software to. Of course the makers will be uploading new versions as they come out, so you will get the newest versions from there, but anyone can upload to the repository, so you better do your due diligence to make sure the software comes from a trusted maker. When the update manager wants to install updates of this software, you will not be asked for your password.
I prefer not to be pestered for my password all the time, so if I’m installing a well-used software with lots of positive reviews, I will choose the Flatpack version. According to what I’ve read, the Flatpack version often performs better because of more frequent updates and bug fixes.
Once you have selected which option you want, click on the Install button and wait for it to be installed.
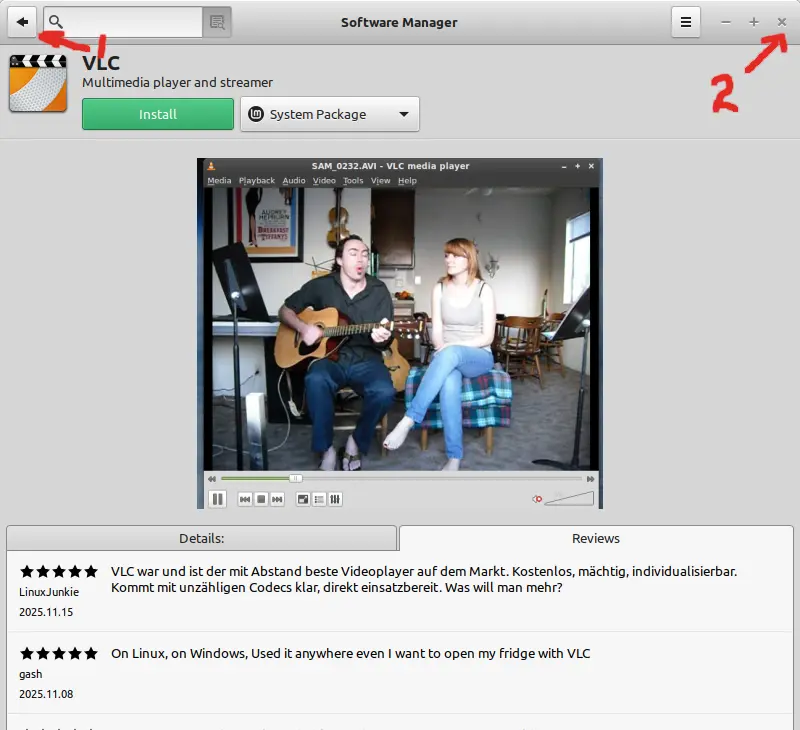
Or, if you do not want to install the software program, click on the back arrow (at arrow 1 above) or close the Software Manager window by clicking the x at arrow 2 in the image above.
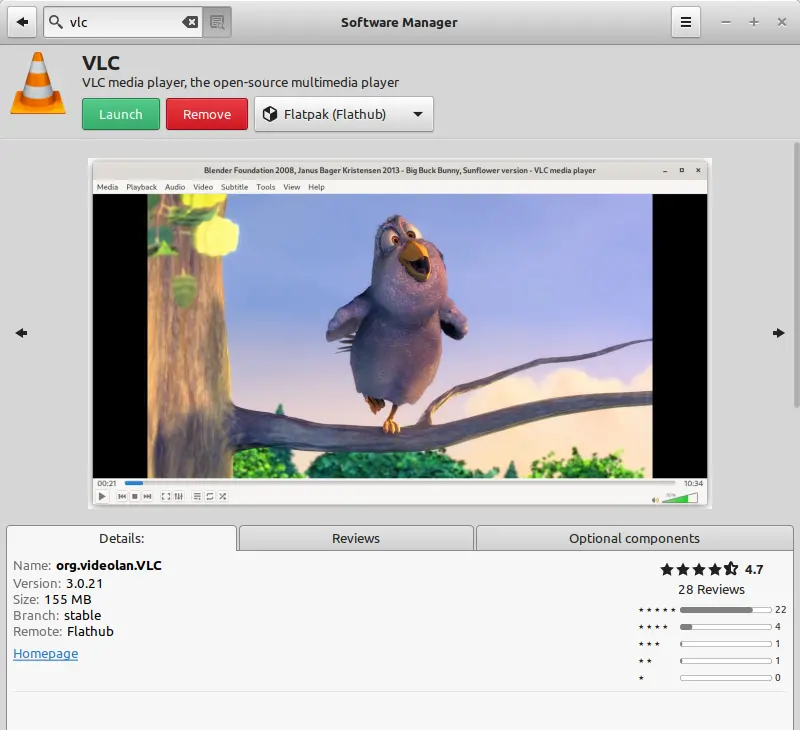
However, VLC comes pre-installed in many cases. Once a program has been installed, the Install button will be replaced with a launch button and a remove button. Clicking the Launch button will start the program from here. To remove a program, find it the same way you would for installing it, but this time, click on the Remove button, then wait while files are deleted.
My personal choices: (probably safe to choose Flatpack for these)
Calibre e-book library manager/converter
E-book Editor edit e-nooks in various formats
E-book Viewer read e-books in all major formats
GIMP alternative to Adobe PhotoShop (steep learning curve)(likely already installed)
Imagination a slideshow maker
PDF Arranger Merge, shuffle and crop pdf files
Shotcut video editor (very powerful, but has a bit of a learning curve)
Simple Screen Recorder records video and audio of what is on your screen
Video Downloader saves YouTube videos to your hard drive (fast; no need to record in real time)
VLC Media Player plays practically any multimedia (likely already installed)
Linux with Windows
Linux is able to “see” Windows partitions on the hard drive but Windows cannot see Linux partitions. Sections of the hard drive formatted for Linux are not recognized by Windows and Windows will only ‘see’ those drives that are formatted for Windows operating systems. The drive Windows is installed on will be called C drive and subsequent drives will be assigned letters such as D, E, F, G, etc. Any drives formatted for Linux will not be recognized and not assigned a drive letter (it will be skipped).
Linux operating systems are able to recognize Windows partitions and those will be treated as if they are another physical drive (hard drive, USB memory stick, disk drive, etc.). In my case, my second hard drive was formatted for Windows and I copied all my files from my Windows 7 computer to that drive. If I wish to copy a file from or add a file to the second drive, I simply use the file explorer to navigate to Devices > New Volume and double-click on New Volume to mount and open it. From there I can drill down until I reach the file I need. When I’m done, I can then R-click on New Volume and select, Unmount or Safely Remove. I think Safely Remove is the better choice if both choices are available.
Linux is not able to run Windows software and Windows cannot run Linux software, so don’t bother trying.
There is a software for Linux called Wine that makes it easier to work with Windows computers that are on the same network for file-sharing, but if you do install Wine, be aware that it must run as root all the time, so that compromises the security of your computer. I recommend not using Wine and simply use a memory stick to share files between computers.
Instead of drive letters, Linux assigns names to drives. In my case, sdb0, sdb1, sdb2, etc.
When a drive is mounted, it needs a Mount Point. Every Home directory for the user will have a bunch of folders created for just such a purpose. When mounting a device (such as a drive partition or memory stick), it will be mounted under your username/dev/devicename (where devicename is the name of the device being used). In my case, when mounting my second hard drive, it will have the path paulstandard/dev/sdb1. Temporary files will be created there until you unmount the device. Sometimes it takes a while to erase all the temporary files, so always be patient when unmounting a drive.
You need not worry about Mount Points in most cases. The software assigns the appropriate Mount Point for the type of hardware being mounted.
To make Zoom calls on Linux:
-
Download Zoom Client: Visit the Zoom Download Center and download the Linux client (available for Debian, Ubuntu, Fedora, and Red Hat).
-
Install the Package:
-
For Debian/Ubuntu: Install the
.debfile usingsudo dpkg -i zoom_amd64.deband fix dependencies withsudo apt -f install.
-
-
Launch Zoom: Open the app from your applications menu or by typing
zoomin the terminal.
4.Sign In or Join a Meeting:
-
Sign in with your Zoom account, or
-
Click "Join a Meeting", enter the meeting ID and your name.
5.Enable Mic and Camera: Zoom will prompt you to allow access to audio and video. Ensure your devices are properly configured in Zoom’s settings.
6.Start or Join the Call: Click "Join" to enter the meeting.
Zoom supports screen sharing, chat, and virtual backgrounds on Linux.
Participants do not need to install the Zoom client to join a meeting. Zoom offers a web client that allows users to join meetings directly from a web browser.
On Linux Mint:
-
Use a supported browser like Google Chrome or Mozilla Firefox.
-
Click the meeting link and choose "Join from your browser".
-
Enter your name and meeting ID when prompted.
-
You’ll be able to participate with audio, video, and chat.
Note: The browser version may have limited features compared to the desktop app (e.g., no virtual backgrounds), and the host must have the "Join from Browser" option enabled.
Run Linux from an external drive
https://www.youtube.com/watch?v=Glu1f90NrJc for step-by-step instructions.
Privacy Browsers
Brave (Chrome based), Librewolf (Firefox base code), Mullvad (based off TOR browser with TOR removed)
GETTING HELP
Almost every program on your machine (and there are lots of them) has documentation already installed on your machine. The documentation is accessed using the command 'man' from a terminal session (man is short for manual - as in "RTFM" - there are other man page viewers). The output is paged to your terminal screen with a program called "less" which can give you a short description of its own capabilities if you press the 'h' key while it is in the foreground of your session, but the critical things are:
space - move forward one page
b - move back one page
q - quit
Open a terminal and type in
man cat and tap the ENTER key to see a description of what the program cat does.
Unlike Google, the man page knows exactly what version of a command you have installed along with most of its behaviours and idiosyncrasies, so should always be your first port of call for questions like this.
Cat is for concatenating documents.
if you have a text file with "All cats are " called textfile1 and another with the line "made of liquid." called textfile2
you can "concatenate" them with
cat textfile1 textfile2
it will print: All
cats are made of liquid. to stdout (the terminal) (stdout=standard output).
If you use cat on just one file it merely outputs the contents to stdout.
When you make a file, you can use cat to read the contents; you can also join files together like this: “cat file1 file2 (etc) > NewFile.” I put the books of the Bible together as an exercise. “Cat Matthew Mark Luke John > Gospels” if you want a fun way to learn terminal commands checkout Gameshell on GitHub! (Use sudo apt git)






