
Disclaimer:
I am not responsible for anything done with this bot(s). You use it at your own risk.
There are no warranties or guarantees expressed or implied. You assume all responsibility and liability.
Hey,
I´m back with the second part of my new series about the trading bots "ZenBot" and "Gekko". In this tutorial, you will learn how to install and setup "ZenBot" on a Windows 10 machine and on an Ubuntu 16/18 server, installing NodeJS as a requirement and configuring your installation with a config file. For these files, you need an API-Key from your exchange of chose. These are easy to obtain and only needed if you want to start the bot in "live trading" mode. But I will tell you more about the configuration after we have successfully installed our bot.
If you haven't read my first article covering "ZenBot" and "Gekko" you can do so here.
If you need to insert a command in the shell and I don´t mention the distribution, you can insert the command on Windows or Linux equally.

Requirements:
For the sake of this tutorial, you need a Windows 10 or Ubuntu 16/18 machine with at least 100mb of free space and some experience with your operating system of choice.
Windows 10 | Linux 16/18
Node.js (version 8.3.0 or higher)
MongoDB
Git (optional)
Install NodeJS:
NodeJS is crucial for the installation since it contains the NPM-Packetmanager to install all the node modules required by our bot. Now we need to download not the latest NodeJS version since "ZenBot" does require NodeJS version 8.x to run. So please go ahead and download this release.
https://nodejs.org/dist/latest-v8.x/node-v8.16.0-x64.msi
for linux type
sudo apt-get update
curl -sL https://deb.nodesource.com/setup_8.x | sudo -E bash -
sudo apt-get install -y nodejs
sudo apt-get install -y build-essential
After installing NodeJS please install git so we can easily fetch our bot from GitHub. To do so, we need to open a command shell on Windows. This can be done with the keys on your keyboard.
Windows-Key + R
In command promt insert -> cmd <- then press -> ENTER <- or the "OK" button below
Now enter -> cd c:/ <- then press again -> ENTER <- to switch to your C: drive in windows
Perfect ... Now we can start to install more requirements before we start finally to install the bot. We need to install MongoDB to save the backfills we need to make any simulations on a specific selector like ETH-BTC. But I will tell you more on simulation and the selector in a later tutorial. Ok, you need to verify that NodeJS was successfully installed.
node -v <-- show the current installed / used NodeJS version
it should show something like
C:\Users\casp0or>node -v
v12.2.0
Install MongoDB:
After we checked that everything was done right and is working we can install MongoDB by downloading it from the official site on Windows 10 or following one of the following tutorials.
Windows 10
https://fastdl.mongodb.org/win32/mongodb-win32-x86_64-2008plus-ssl-4.0.10-signed.msi
Linux
https://www.digitalocean.com/community/tutorials/how-to-install-mongodb-on-ubuntu-18-04
https://www.howtoforge.com/tutorial/install-mongodb-on-ubuntu-16.04/
Install GIT:
I hope the installation was successful and we can move on to the next step which is fully optional. To install GIT we only need to insert one command into our currently opened shell.
npm install -g git
This installs the GIT command line into our "GLOBAL NPM-Package" dir and we can use GIT now globally. This means, that you don´t have to download the files for installing the bot manually from GitHub. If you don´t want to use GIT, just download the Zip-File from https://github.com/deviavir/zenbot with the green button on the right side. Then unpack it to c:/zenbot...
git clone https://github.com/deviavir/zenbot.git
without GIT for linux do
wget https://github.com/deviavir/zenbot/archive/master.tar.gz
tar -xf zenbot-master.tar.gz
mv zenbot-master zenbot
Install "ZenBot":
Ok, now you have the needed files on your hard drive to install "ZenBot". Next, we need to switch our command shell to the folder just created by you or GIT and install the required NodeJS-Modules.
cd zenbot
npm install
When the installation is finished it should look something like this.

Edit config file:
After installing the modules without any error, we can proceed to the config file and copy it to the same directory it is already in but without the "-sample" in its name. So copy the file "conf-sample.js" and rename it to "conf.js". Now open the just copied file and insert your API-Keys if you want to do live trading later on. How to obtain an API-key is something I want to do in a later tutorial since I want to cover all of the main exchanges in one single tutorial.
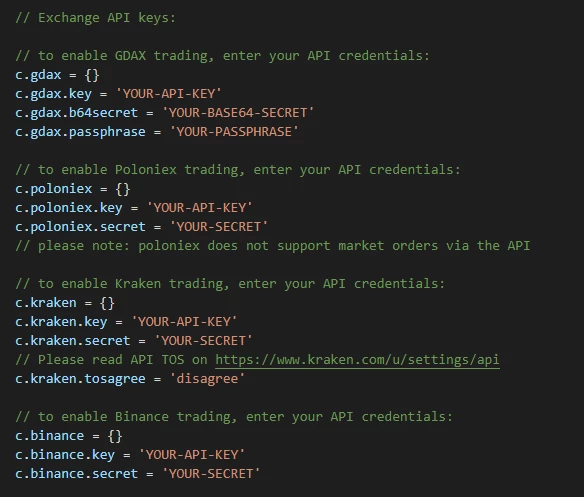
Please go to line 159 in your config file and edit the line
c.currency_capital = 1000
change to
c.currency_capital = 1

This changes the amount of BTC the simulation is running with. I like to enter 1 or 0.1 so simulate some value I can afford. "currency_capital" is your value in BTC and "asset_capital" is your value in ETH. If you want to start simulating with ETH instead of BTC then you need to change these values.

Start MongoDB:
Puh... this was a long way down here... but wait... If you haven´t started MongoDB, now it is the right time to do so. If you are on Linux and followed one of the tutorials above, then MongoDB should already be running. On Windows, you should open another command shell like described above and enter the command to start MongoDB.
mongod
This command should start your "local MongoDB community server". If you see an error like "command not found" you need to enter the directory the DB was installed to. In my case, this would be "C:\Program Files\MongoDB\Server\4.0\bin".
for "command not found" on Windows 10 enter
cd C:\Program Files\MongoDB\Server\4.0\bin <- may vary on your installation
then press -> ENTER <-
after changing the directory enter
-> .\mongod <- and press -> ENTER <-
First backfill:
I think we have everything set up to start our bot the first time. To be able to run a simulation, we need to fill our database with some data for the preferred selector and market. This is done by inserting a specific command into the first shell we opened before. On Linux, you should already be on the screen where you can see the directory where we installed "ZenBot". Something like this.
On Windows, it should look like this
On Linux like this


Now we are ready to start our first "backfill". Choose a selector you want to simulate and type the following command into your shell and press "ENTER" to start.
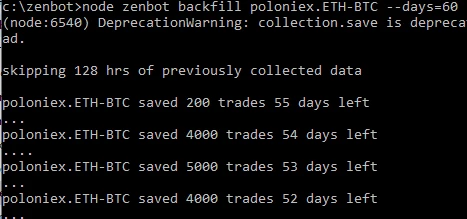
node zenbot backfill poloniex.ETH-BTC --days=60
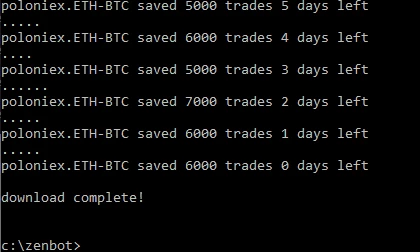
This backfill will save all trades for the last 60 days on the exchange "Poloniex" with the market "ETH-BTC". Note the "--days=60" parameter I used to get the last 60 days of trading. This can be configured in the "conf.js" file so you don´t have to type this in all commands. The default value for days in the config file is 14 days. But for the sake of this last step, I don´t cover editing the config file here. You can play around with the values later on. But your current logs in the shell should look something like this if everything before was done right.
Finally the simulation:
Nice, the DB is filled with some trading data to simulate the last 60 days of trading Ethereum against Bitcoin on the exchange Poloniex. To start our simulation, we need to enter the command for simulating in our shell. Many parameters can be added to this command but for simplicity, we enter just our "--days=60" parameter.
Ok here is now the command you are waiting for...
node zenbot sim poloniex.ETH-BTC rsi --days= 60
Here you can see we first inserted "node zenbot" this starts our bot. Next comes the command we want "ZenBot" to execute, here it is "sim" for simulating. Then comes the "exchange.market" here "poloniex.ETH-BTC". And finally the "--days=60" parameter to run the simulation for the last 60 days of trading Ethereum against Bitcoin on Poloniex.

Results:
A simulation result from "ZenBot" should look something like this. Here we didn´t make any profit but this was only a test without any real parameter tweaked.
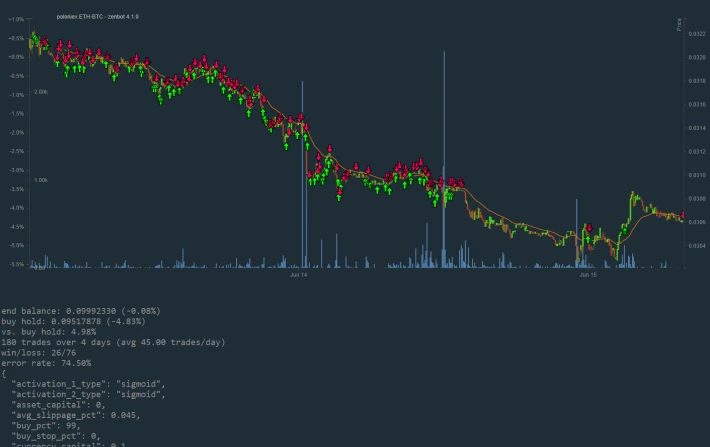
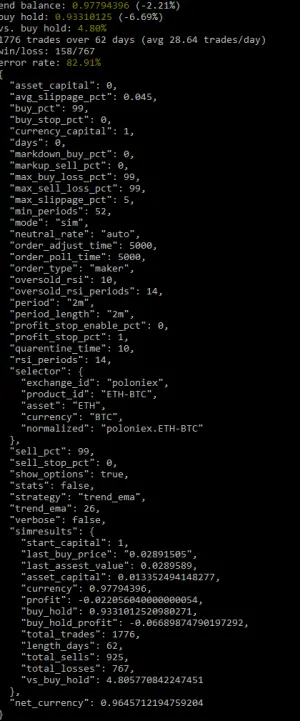
After our simulation is ok and made some money, all we need to do is changing the "sim" command to "trade". But please wait for the next tutorials where I will cover more on simulating and finding the right coin and market for you.
I hope you found this useful and please play a little bit around with the "sim command" to get familiar with the "workflow".
Best Regards
casp0or






