![Git - [Part 2] Add your code to a Github repository](https://www.publish0x.com/img/460522.jpg?action=resize&ar=1&inv=0&ori=1&st=1&up=1&w=1140&signature=b58fe804f6399ab19b962f6f37c7b2a5f1790adc540ee9ebe30ca410a6a057ac)
If you are programming with a team or just for yourself, it is always recommended to add your changes to a version control system. It helps you keep track of your changes and also works as a backup if you lose all your locally stored files. In this article we will have a look at creating a GitHub account and how to create a repository to remotely store our files.
Git Setup
If git is not already installed on your system, go to the git install website and follow the installation instructions.
Create a Github Account
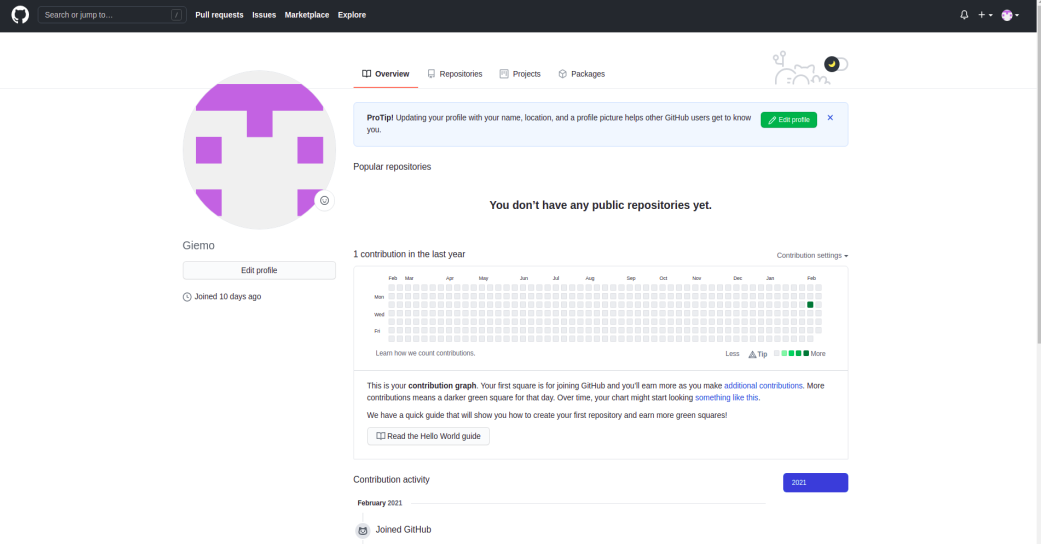
Go to the official GitHub website, where you see Sign Up on the top right. Follow the instructions to create your account. Afterwards log into your account and navigate to the profile page, which should look similar to this:
Create a repository
The repository is where all the introduced changes should be stored. We can have multiple repositories for different projects, that's why we need to create one before we even start using git. There are two main options on how to create a git repository:
- local first
- Create a folder on your PC
- Open a terminal
- Type git init into the terminal
- You successfully created a local git repository

- Add the local repository to the remote
- Type git remote add <repository_name> <url_to_repository> into the terminal
- You successfully added your local repository to the remote

- remote first
- Navigate to the repository tab on GitHub
- Click on New
- Fill in your repositories name
- Decide if you want to have it Public (visible for everyone) or Private (only visible to you and people you invite to this repository)
- Click on Create repository
- You successfully created a remote repository
- Add the remote repository to your local PC
- Go to your repository on GitHub
- Click Code at the top right
- Copy the https-address (e.g. https://github.com/Giemo/thebeginnerscodingblog.git)
- Create a folder on your PC
- Open a terminal
- Type git clone <https-address>
- You successfully cloned your remote repository onto your PC

Set your global git configuration
If we want to push code to our remote repository, we will need to provide a username and an email address. Therefore it is necessary to add both to the global git configuration. Use the same terminal as above and write the following two commands with your username and email address:
- git config --global user.email "[email protected]"
- git config --global user.name "Your Name"
Adding files to the repository
After we created our repository and set our global git configuration, we can finally add our code to the repository. I therefore use the code that I wrote in C++ Basics - [Part 1] Hello, Publish0x!
I created the repository where the 0_hello_publish0x folder is present and I intend to add the whole folder to the repository. We can check if we setup everything correctly by typing git status into the terminal. The output should look similar to the image below:
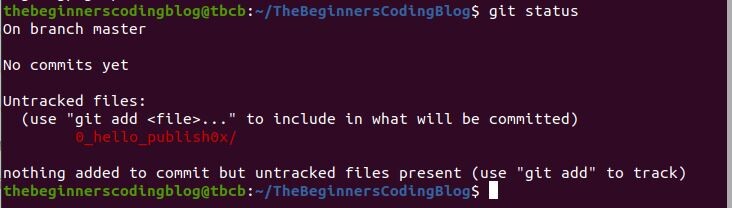
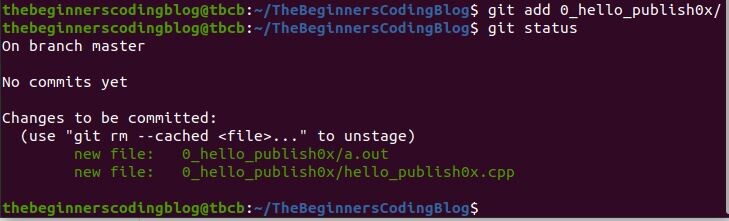
We can see that 0_hello_publish0x is currently untracked, meaning it is not added to the repository yet. If we want to track it (add it to our repository) we first need to add the folder to the staging area. This is done by executing the command
git add <name_of_file_or_folder_to_add>
If we again do a git status we can see that the message has changed. Our changes are now to be committed, meaning we successfully added our folder to the staging area.
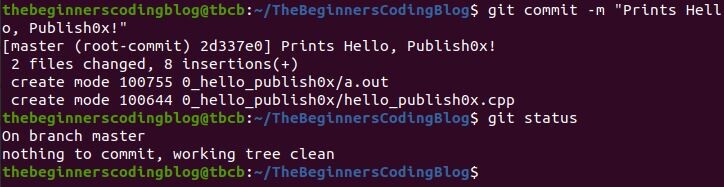
Committing the changes means adding them to our local repository. The easiest way to commit the changes is with the command
git commit -m "<descriptive_commit_message>"
Here we need to provide a commit message, that shortly describes what the purpose of this commit is. Afterwards we again do git status, which will show that there is nothing to commit.
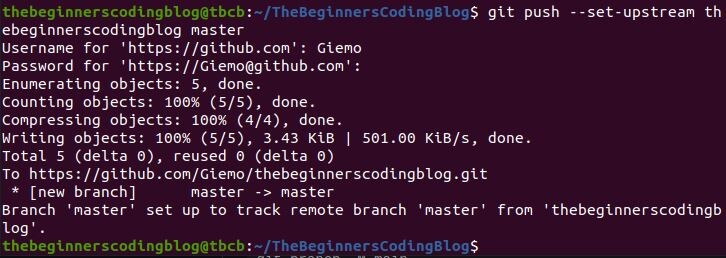
Now that our changes are locally added to our repository, it is time to also add them to the remote repository. If we push to a new repository for the first time, we need to set the upstream. That basically tells git that our local repository belongs to that specific remote repository. Therefore we need to write
git push --set-upstream <name_of_repository>
We will be prompted to add our username and the password for the repository. This step is important, otherwise everybody could change the contents of our repository however they like.
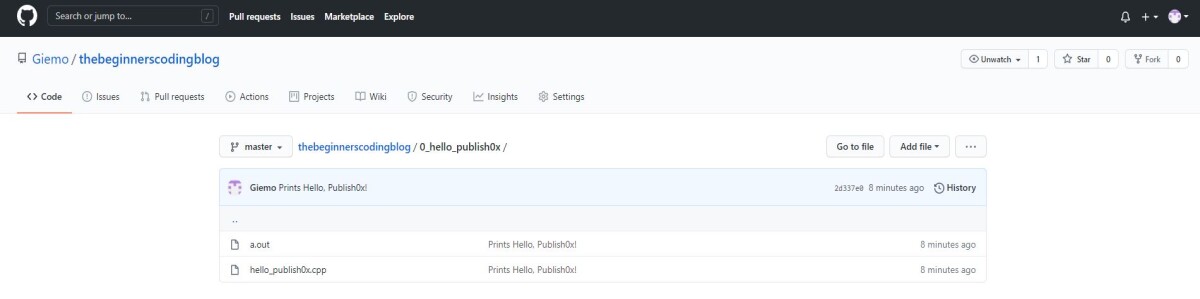
In the last step we verify that our changes are really pushed to the remote branch. Therefore we go to our GitHub repository and check that the files we just pushed are in fact present.
If you have trouble at one of the steps, leave a comment and I make sure to help you resolve it.


