
So, I've been having this idea in the back of my mind for some time and have been crystallizing and re-articulating it — just made a post on Cent about it, here (to give you better context for the following below).
So, with that in mind, you understand why Scuttlebutt is of interest to me (and apparently quite a few others who have had similar thoughts and ideas). Apart from it, there's also Holochain, which addresses similar issues and implements similar architecture/technical approach to p2p social apps and constituting subjectivity in socio-technical complex systems, or what Deleuze and Guattari might call "collective assemblages of enunciation".
Anyway, we do a quick, general overview of how to develop apps on Scuttlebutt in the following.
Scuttlebutt has two basic components/layers — the database one and the networking one.
The database layer is secure-scuttlebutt, implemented using flumedb — it's an immutable append-only database of feeds, optimized for efficient replication for peer-to-peer protocols. The scuttlebot (or sbot) provides the networking layer and services on top of the database — it's the gossip and replication server. An app is basically a client which uses sbot with various modules and plugins in the back-end (similar to what I've described in my Cent post). Each peer on the network corresponds to an sbot + database instance, though the same sbot may also be shared by several clients (see ssb-party).
An ssb-client can be set to connect to an sbot running in a separate process. How you set your caps.shs and caps.sign determines which network your app connects to. SHS stands for secret handshake (white paper about it here). The client needs shs, and sbot needs sign. Setting caps.shs makes gossip connections not occur with peers who have a different shs key. And setting caps.sign makes messages created with a different sign key be considered invalid.
If you only set the shs key, messages could leak out of your network if someone in the network changes their shs key, or adds messages manually. Setting the sign key ensures that the messages will not be able to be published (or validated) on the main ssb network, only on a network where that same sign key is used.
var crypto = require('crypto')
crypto.randomBytes(32).toString('base64')

var Client = require('ssb-client')
var path = require('path')
var home = require('os-homedir')
var getKeys = require('ssb-keys').loadOrCreateSync

var SSB_PATH = path.join(home(), '.ssb')
var keys = getKeys(path.join(SSB_PATH, 'secret'))

Client(keys, {
    path: SSB_PATH,
    caps: {
        shs: 'abc'
    }
}, (err, sbot, config) => {
    // `sbot` here is an rpc client for a local sbot server
})
The client depends on an sbot using the same caps.shs as the client. You can pass it in as an argument
$ sbot server -- --caps.shs="abc" --caps.sign="123"
Plugins expose methods via rpc to interact with an sbot. A plugin will typically read data from the ssb log, then create a view of that data that is saved somewhere, so it doesn't need to be recalculated from the beginning.
Plugins have an interface used by secret-stack. For plugin authors this means you need a few fields in your module. exports.manifest is familiar if you have used muxrpc. The manifest is used to tell remote clients what functions your service is exposing via rpc.
exports.name = 'contacts'
exports.version = require('./package.json').version
exports.manifest = {
    stream: 'source',
    get: 'async'
}
exports.init = function (ssb, config) { /* ... */ }
Setting up a Testing Playground
First, install Scuttlebot (sbot):
$ npm install -g scuttlebot
To test it run it as a server:
$ sbot server
And then, in a second shell, try:
$ sbot whoami
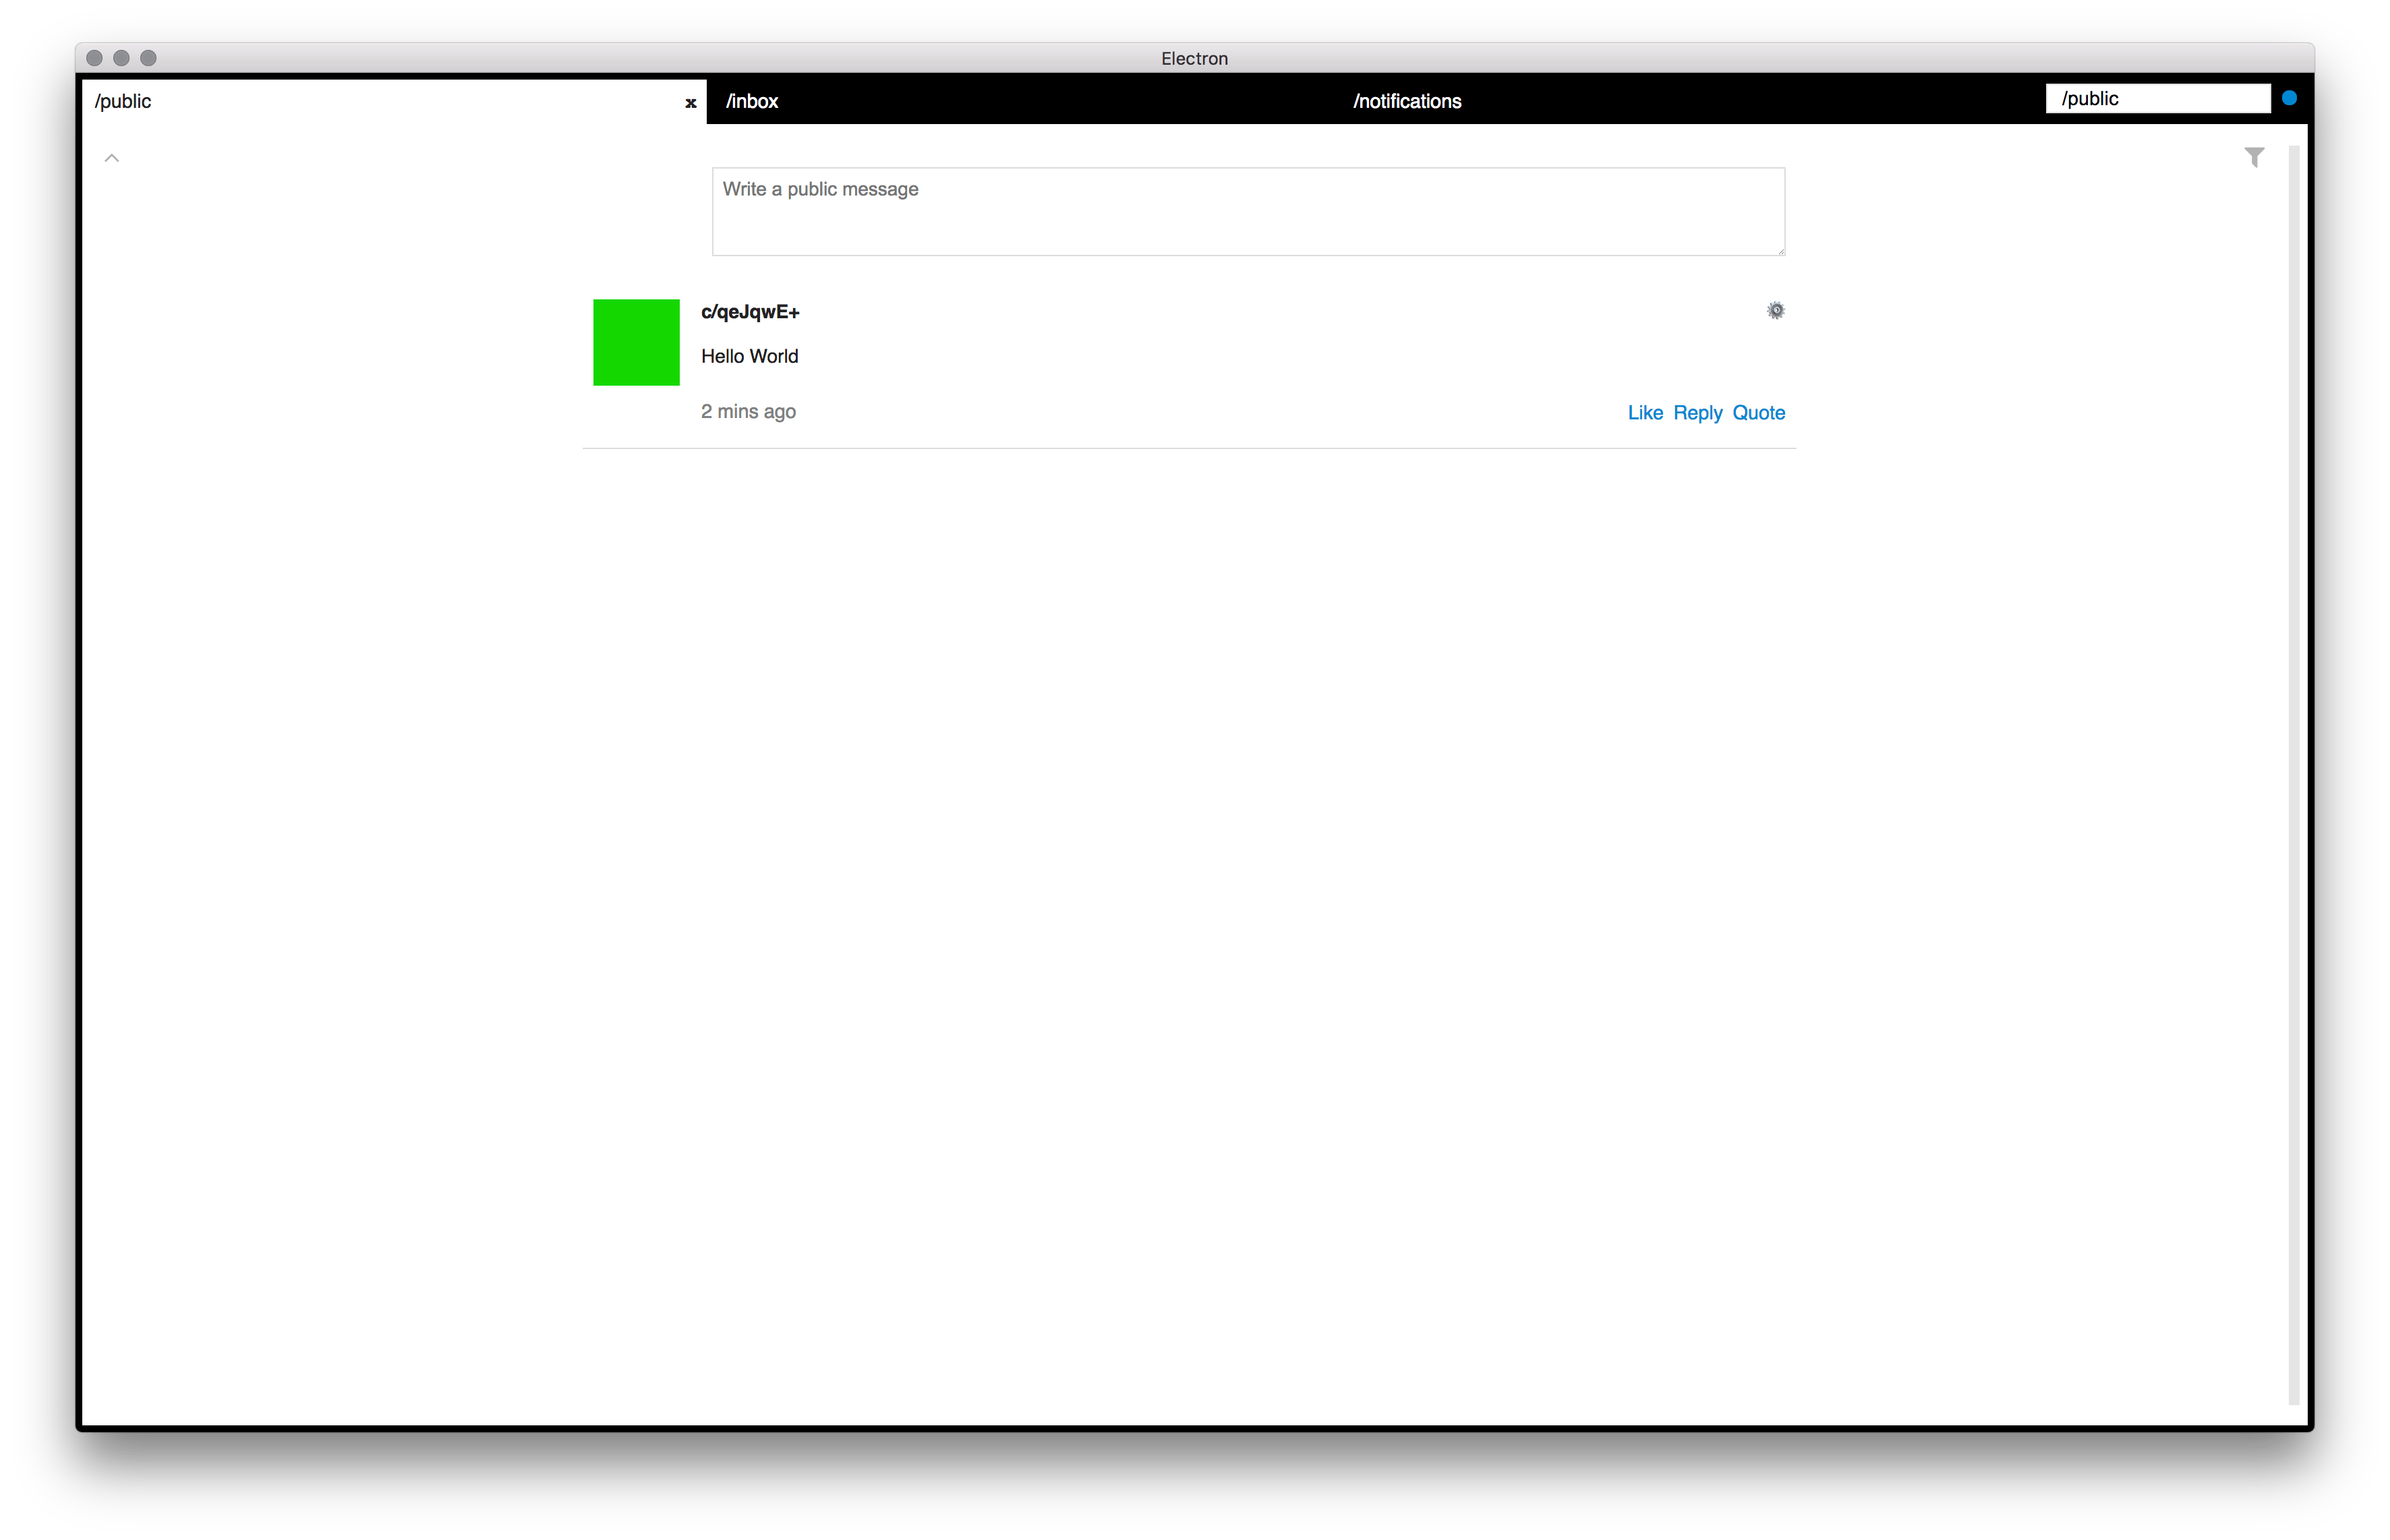
$ sbot publish --type post --text "Hello World"
$ sbot createLogStream
When you run sbot server for the first time, sbot creates a folder in your home directory called .ssb. This is where sbot stores all the messages, indexes, blobs and more.
Scuttlebot comes with some pre-configured settings (can check out all the default settings here) that need a little adjustment. The first parameter to look at is name. The default network name and the Scuttlebot files folder have the same name (e.g., if network = ssb, the folder would be ~/.ssb).
Then there's the port settings — both port and ws.port.
And lastly, and perhaps most importantly, there the caps — the caps holds the network keys. The caps.shs key that sbot comes with by default is the key of the “main network” (the key that all the packaged Scuttlebutt clients use).
Now, to make our local testnet, we need to give it a name which will in turn create a new folder in the home directory with that name and inside that directory we'll create a file called config.
Open up a node REPL and generate new shs and sign keys with:
crypto.randomBytes(32).toString('base64').
We want a new shs key so that our testnet messages won’t be gossiped to the main network and we want a new sign key so that our testnet messages can’t be gossiped onto the main network.
And now copy the config file just made, filling in the keys where specified.
{
  "caps": {
    "shs": "your shs key here",
    "sign": "your sign key here"
  },
  "port": 8007,
  "ws": {
    "port": 8988
  },
  "ssb_appname": "ssb-test"
}
Once you save your config you’re almost ready to go, you just need to tell sbot which network you want to run on. To do that, you need to set the environment variable ssb_appname, this is what sbot looks for. So run export ssb_appname="ssb-test" and we’re good to go.
You can now run sbot with sbot server and it will be running your testnet! The ssb_appname environment variable will tell sbot where to look for the network files and there it will find your config file.
This is just a bare bones sbot with the default plugins installed, such as ssb-friends which handles the logic of whose feeds you will replicate. There are few other plugins that are used by some of the popular Scuttlebutt clients (ie. Patchbay and Patchwork) which add some helpful functionality. To install these plugins, run the following commands in your second shell:
sbot plugins.install ssb-about
sbot plugins.install ssb-backlinks
sbot plugins.install ssb-fulltext
sbot plugins.install ssb-private
Once these plugins are installed, kill the sbot server that you have running and restart it. One thing to note is that these plugins are installed in .ssb-test/node_modules. This means that the plugins are installed per network and need to be installed again if you create another network.
We will install Patchbay with git so that we have access to the source code to make changes as needed:
git clone [email protected]/ssbc/patchbay.git
cd patchbay
npm install
npm run rebuild
Patchbay actually uses the ssb-config we were looking at previously to determine how it connects to an sbot, so in order to get Patchbay to connect to your testnet you will need to make changes to ssb-config. Clone it now:
git clone [email protected]:ssbc/ssb-config.git
Next open up inject.js and modify it to match the settings you specifed in your testnet config previously. Once you have saved those changes we’re going to need to make Patchbay look at this ssb-config. In ssb-config run:
npm link
This is make your ssb-config available to other repos on your machine via npm. Next, navigate back to Patchbay and run:
npm link ssb-config
This tells Patchbay to look at your local ssb-config rather than the one published to npm. Assuming your testnet sbot is still running, you can now start Patchbay by running (you may need to set the enviroment variable ssb_appname in this session as well):
npm run dev
This will open an electron window with Patchbay in it and you should see the message that you posted earlier!
Scuttletron is a minimal Electron application template running with a Scuttlebot server (sbot). To install and launch it proceed executing the following steps:
# Clone this repository $ git clone https://github.com/kgibb8/scuttletron # Go into the repository $ cd scuttletron # Install dependencies $ npm install # Run the app $ npm start # Options APP_NAME=scuttletron PORT=4567 npm start
[...to be continued shortly...]


