
Privacy Series Part 1 - Network wide ad-blocking

This is first post of a series of blog posts that i would like to share
for attaining better privacy on your internet connected devices.
In today's' world, we have a large number of connected devices at our homes, and all of them leak a large amount of data to third-party analytics services, without our knowledge. So instead of setting up each of these devices, its better to setup something that manages all of these devices.This approach would drastically simplify our goal.
This can be easily achieved using pi-hole software stack, that the generous opensource community has provided for everyone to use.
Though, this software stack can be installed on your local Linux/UNIX based system, but since our goal is to have the ad-blocking at the network level, so that all of our devices are benefited, we are going to install this on a separate device called the raspberry pi.
And the way we would install it on the raspberry pi is through docker images, which is a containerized way to use and deploy whole software stacks on machines in a platform independent way.
Here are the advantages of using the docker method:
- Easy to deploy and use.
- No need to worry about the dependencies that the core software brings in.
- Easier to update/upgrade the docker images.
- Integrates with the OS for things like start-on-boot, so that there is no separate configuration required for achieving it.
So without any further ado, lets start.
We will use Ubuntu 20.04 as example in these steps.
If you use other distros, the major difference would be just a different package manager, but the packages needed would be more or less same.
Step 1 Get docker and docker-compose installed.
Update you packagemanger's cache:
$ sudo apt-get update
Install docker and docker-compose:
$ sudo apt-get install docker docker-compose
Step 2 Make docker run without root privileges everytime(This completely optional, but recommended)
Add you user to docker group:
sudo usermod -aG docker ${USER}
Apply the group permissions:
su - ${USER}
Step 3 Start setting up the pihole folder for raw material for docker container
Create a folder named pi-hole containing a file named docker-compose.yml
with the following content in it:
version: "3.5"

volumes:
        etc-pihole:
        dnsmasq.d-pihole:
services:
  dnscryptproxy:
    container_name: dnscryptproxy
    image: djaydev/dnscrypt-proxy:arm32v7
    restart: unless-stopped
    networks:
      pihole_cloudflare_net:
        ipv4_address: 10.0.0.2
    environment:
      - TZ=Europe/Bucharest
      - DNSCRYPT_LISTEN_PORT=5054
    volumes:
      - './dnscrypt-proxy.toml:/config/dnscrypt-proxy.toml'
      - '/etc/timezone:/etc/timezone:ro'

  pi-hole:
    container_name: pi-hole
    image: pihole/pihole:latest
    restart: unless-stopped
    ports:
      - "80:80/tcp"
      - "53:53/tcp"
      - "53:53/udp"
    environment:
      - ServerIP=10.0.0.3
      - DNS1='10.0.0.2#5054'
      - DNS2=''
      - IPv6=false
      - TZ=Europe/Bucharest
      - DNSMASQ_LISTENING=all
      - WEBPASSWORD=your-secret-password
    networks:
      pihole_cloudflare_net:
        ipv4_address: 10.0.0.3
    dns:
      - 127.0.0.1
    cap_add:
      - NET_ADMIN
    volumes:
      - './etc-pihole:/etc/pihole/'
      - './dnsmasq.d-pihole:/etc/dnsmasq.d/'

networks:
  pihole_cloudflare_net:
    driver: bridge
    ipam:
     config:
       - subnet: 10.0.0.0/29
Copy the dnscrypt-proxy.toml file from this github link and place it in the pi-hole directory
Step 4 Now fire the docker-compose command.
docker-compose up -d
This fetches all the necessary pieces for the pi-hole stack to work with the docker container images.
In the above docker-compose.yml file, the volumes sections are the mounted directories from HOST m/c to the docker containers i.e the etc-pihole and dnsmasq.d-pihole serve as the persistent data of the pihole setup, that actually lives on your howt m/c and gets mounted in the container when it starts up.
This way, its very portable, to keep your data backed up.
This also comes in handy at times when you need to do the upgrade.
So as i talked of the upgrade, lets see how tedious a task of upgrading your pi-hole container is!
docker-compose down
docker pull pihole/pihole
Viola! You have an upgrade just happened in the blink of an eye!
Thats the power of docker containers!
Step 5 Browse the pi-hole admin page and tweak few settings
Once the docker container is up and running, just visit the raspberrypi's ip on you network e.g http://192.168.1.105
Login with your password that you provided in the docker-compose.yml, i.e your-secret-password
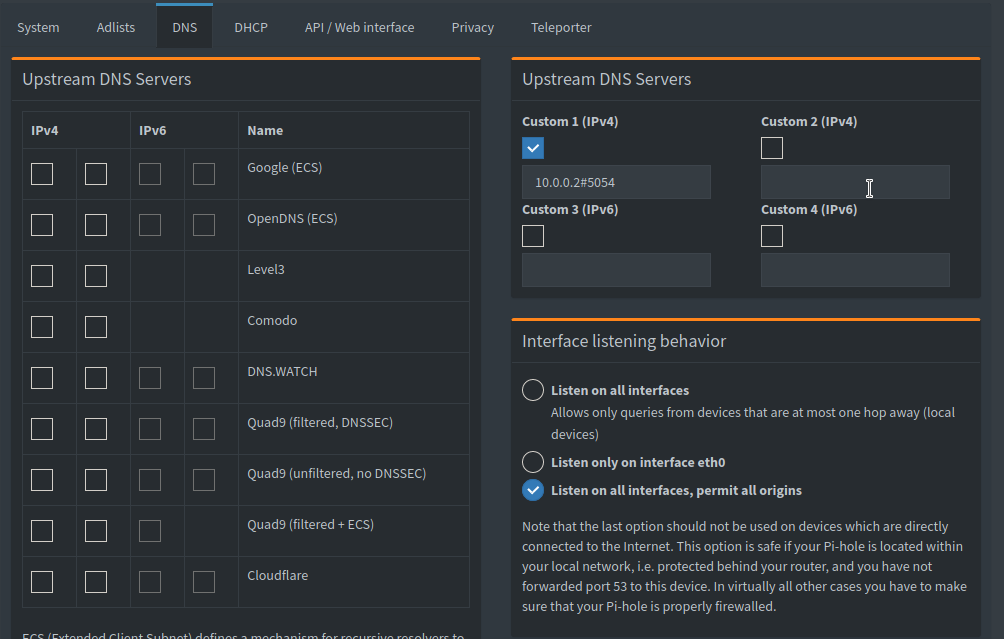
Once you are in the the admin page, visit the settings -> DNS page and change the Upstream DNS Servers entry as shown below:
Step 6 modify WAN DNS IP settings on your router
This is required so that the router talks with the pi-hole to resolve DNS requests instead of your ISP's ip. For e.g:
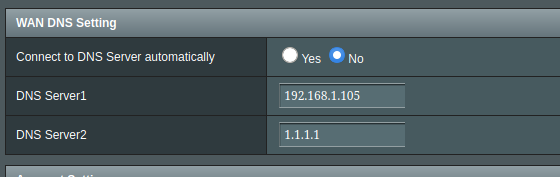
Add 1.1.1.1 as the secondary DNS ip, so that if for somehow your pi-hole enabled raspberrypi goes down, your devices can still connect to the internet.
Let me know if this post was helpful, and also of any issues that you face.
I would try my best to help you out.
I have been running this setup for near a year, and the pi-hole is super stable, and works as expected.


