
Splinterlands is a pretty complicated game and there are some interesting battles with all the options available. This is a part of the weekly social media challenge for Splinterlands. For this week, I chose a great battle where I took advantage of void armor and repair.
Featured cards

Adelade Brightwing is a life splinter that costs 7 mana. It has the ability flying and repair from the very first level. It learns resurrect at level 2, immunity at level 3, and swiftness at level 4. As a support monster, this monster is quite good but the only downside is the low speed. I like combining this monster when there is armor available.
Rule set, Battle and Plan

The ruleset this time is Healed Out and Odd Ones Out. This means that monsters can't heal and only odd mana monsters can be used. There are 35 mana available and I am left with the choice of fire, life, or dragon splinter.
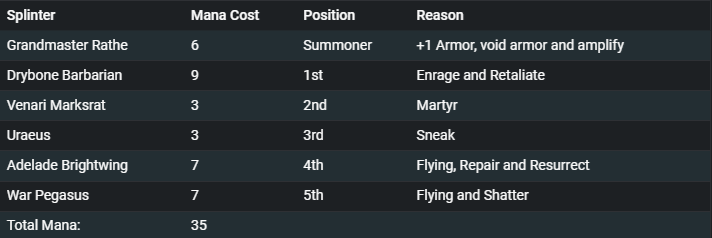

I used Grandmaster Rathe my summoner for +1 armor, void armor and amplify. My first monster is Drybone Barbarian because it can deal a lot of damage and it has both enrage and retaliate. Any melee monsters that attack it can suffer. Then I have a marytr monster after that to buff up my monsters if it dies. After that is a sneak monster followed by Adelade Brightwing for the support abilities. Last is a monster with flying and shatter to get rid of armor. One thing to note is that the void armor from my summoner and repair works out well to reduce my damage every turn.
Round 1

At first glance, I think that I have the advantage in this fight. My opponent's lineup is almost all melee monsters so I think Drybone Barbarian will work out well against my opponent. My opponent does have a speed advantage though so I am worried about my backline.
Round 4

I fast-forwarded to round 4 because we were just trading blows on our stronger tanks. Both me and my opponent lost 2 monsters. It isn't the best but at least, I still have flying on my monsters and the repair can alleviate some of the damage that I will take.
Round 5

Both me and my opponent lost another monster, but this match is going to be quite close. If I can land all my attacks, then I should win this match but I will lose otherwise.

I was able to win the match a few rounds later because I dodged a few more attacks and landed all my attacks.
Conclusion
The battle this time around did go as I expected but I won due to the armor recovered through repair. I was expecting my Drybone Barbarian to retaliate a few times, but I failed to get the 50% chance over 4 times. In the end, I barely won because I dodged a few attacks and managed to land enough attacks. However, this match was too close for comfort.
You can see my entire match here.
Feel free to leave a comment if you read my post. If you have any questions, feel free to ask and I will do my best to answer.


