Proxmox makes it easy to start, end and recover containers.
The time was fast approaching. The old lab had served its purpose, and time had turned it into a collection of VM’s that was becoming ever more cumbersome to use, running on hardware that was ready for retirement. It functioned well, right up to the point that it didn’t. While everything still worked, it was clear that it was time for a change. This whole rebuild was initiated due to the need for better, more secure containment and the ability to “roll back” after testing. This is the story of how the Radio Hackers testlab was rebuilt from the ground up to make something much, much nicer.
There’s no denying that in some instances, a homelab is a great addition to your toolbox. It comes with some cool perks, like blocking ads on your network and taking back much of your privacy by giving you the option of bypassing the big tech companies, though.
For cyber students and professionals, though, the home lab does something else. It acts as a demonstrator that helps to prove that you learned and mastered industry-relevant skills. Set up correctly, it also gives you a fully contained network where you can continue to safely develop your skills. So, there are plenty of reasons as to why homelabbing can be great for skills development.
Why Proxmox?
We don’t need to spend much time trying to sell you on hypervisors. If you’re here reading the publication, you’re probably already aware of some of the advantages that come from running a Virtual Machine. The real question is what makes sense for a cybersecurity research environment.
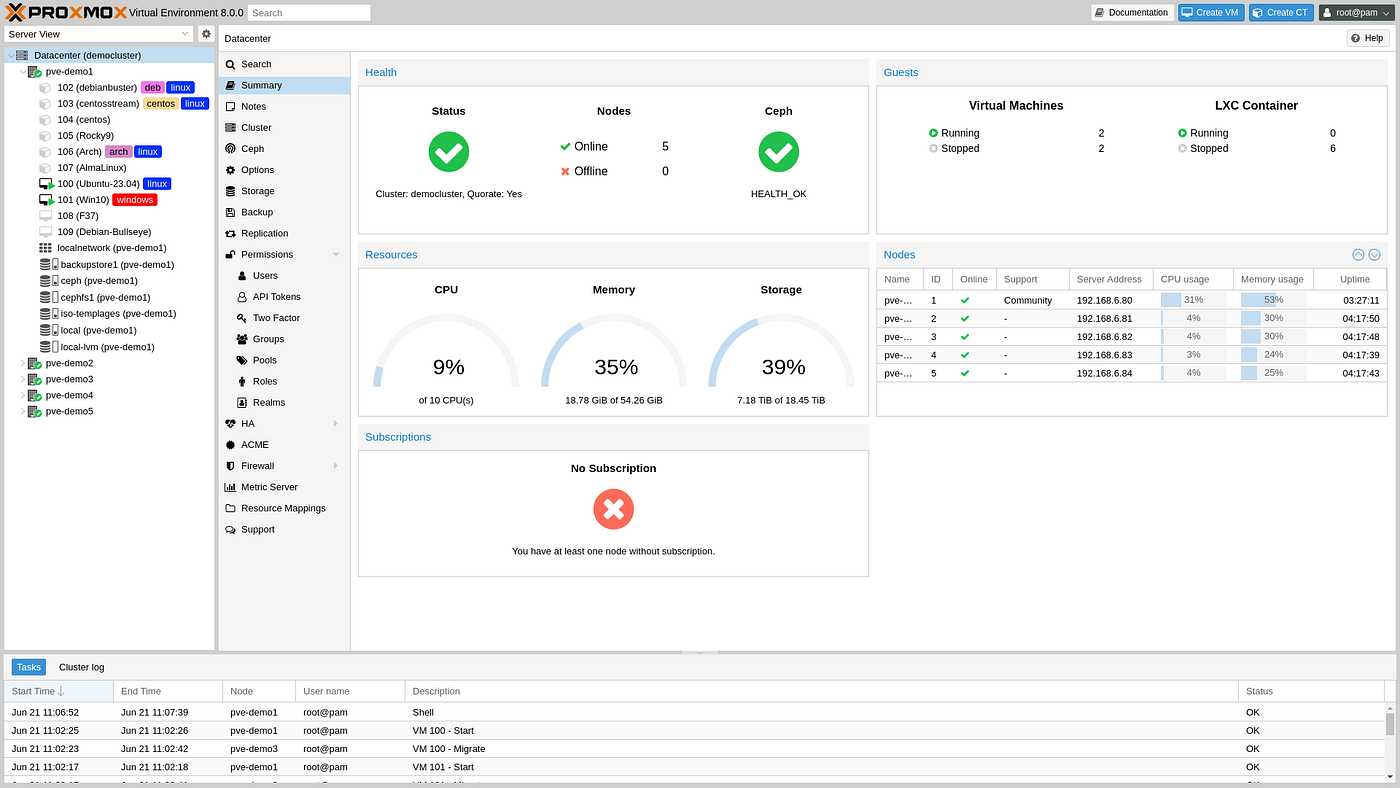
Proxmox VE wins for a few reasons. It’s open-source, based on Debian and can be run for free on home systems. It’s capable of running both KVM virtual machines and LXC containers from the same interface.
Most importantly, Proxmox has the ability to give full network control and containment. For research work, this is a huge win as it allows for the integration of firewalls, VLAN tagging and multiple bridges to help create the ideal, secure test environment.
This is a secondary computer that is going to be used for specific experiments rather than a primary lab server, so overall, we can get away with using much more modest hardware rather than needing to run something cutting-edge.
So it’ll run on a Lenovo Tiny. It’s a small form-factor PC that gives us 16GB of DDR3 RAM and a 500 GB SSD powered by a 4th Gen Intel chip. The specs are modest, but it’s still capable of doing serious work by being disciplined about how things are set up.
These constraints will also help to shape our end design. Rather than something large and unwieldy, we can optimise it as a lightweight system that can be easily reverted to its original state.
The Network Design
This is where things start to get a bit more serious. Get it right, and you have a user-friendly lab that is surprisingly flexible. Get it wrong, and we end up with a liability rather than a test lab.
The ultimate design principle here is isolation through zone separation. Different types of activity will live on different networks, and these networks will never communicate with each other unless we explicitly allow it. We’ll also route everything through a single chokepoint we can use as a final point of control. To achieve this, we’ll set up the following network bridges:
vmbr0: This is the clean network. It connects to the outside world as well as the internal LAN. The Proxmox management interface and a simple analyst workstation are set up here. No dirty/risky software is ever run here.
vmbr1: This is the lab network where all active research happens. Controlled internet access when needed, which is isolated by default.
vmbr2: The target network. Vulnerable machine, honeypot or malware box. Anything under active testing is run here. Fully isolated. No internet and no route to vmbr0, vmbr2 will only receive traffic, not send it.
Setting this up via Proxmox is extremely simple. We can navigate to our node using the web interface, then visit the following menus:
System > Network > Create Linux Bridge
Then we’ll name it, leave our IP field blank and bridge ports blank.
Repeat as needed for each zone (or as per your own configuration), then hit
Apply Configuration
We are done! No reboot is required.
Note: The lab network has its own dedicated internet connection and hardware. This gives a final safeguard as the network solely exists to power the lab with no other available hardware to compromise.
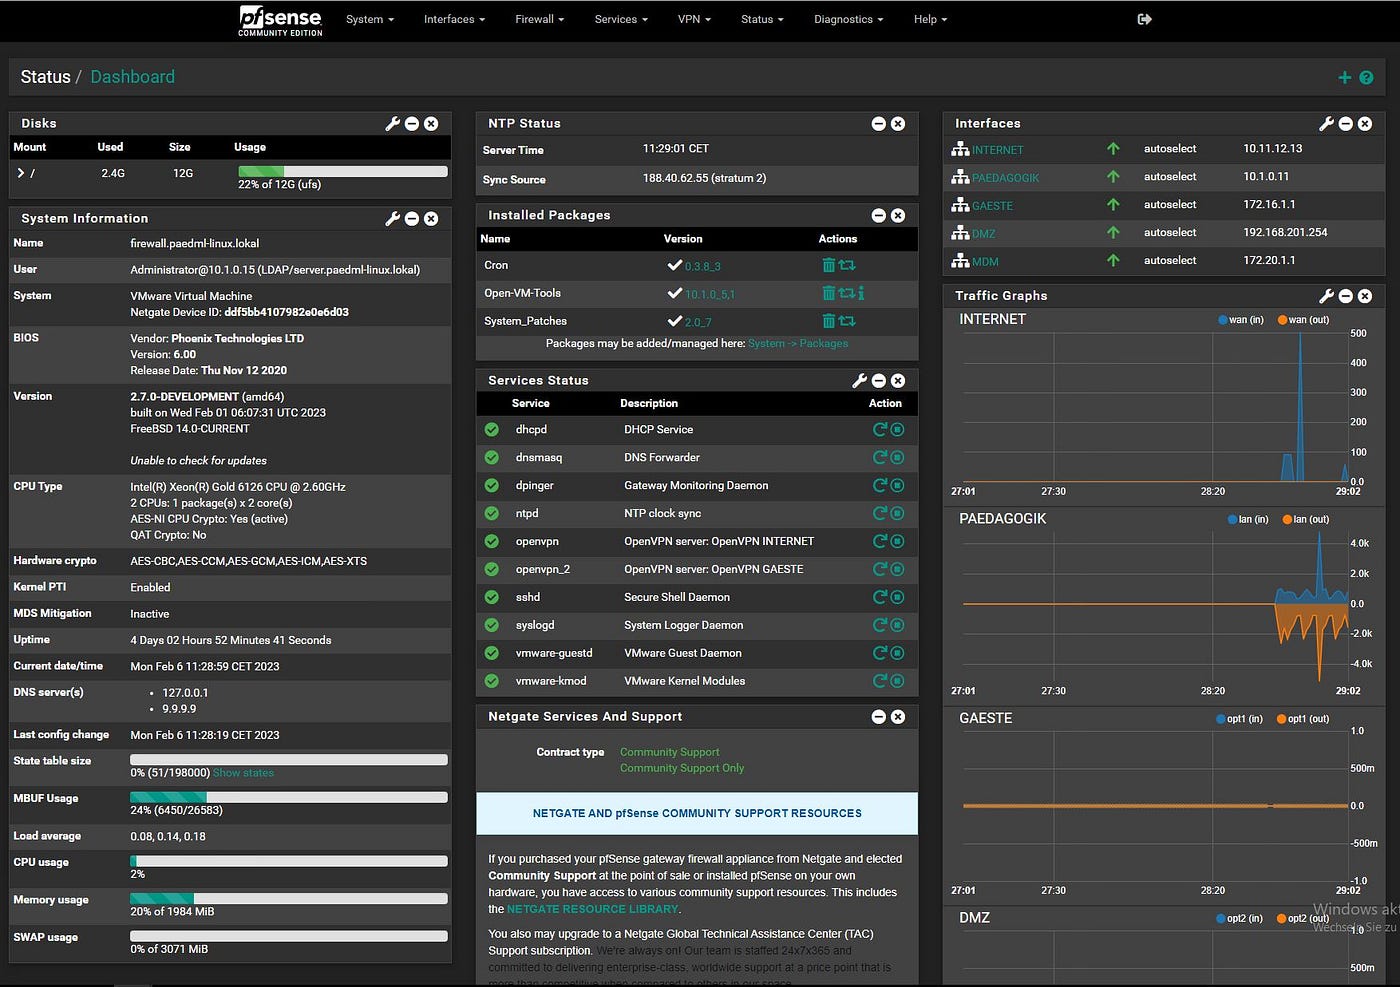
pfSense As The Chokepoint
Three isolated bridges are essentially useless without something to route between them, and here, we get the chance to analyse and isolate our network traffic. For that, pfSense is the star of the show here.
pfSense is a FreeBSD-based router and firewall distribution that can be run as its own VM. To set it up correctly, we will give it one network interface for each bridge, making one available for each zone. All inter-zone traffic will pass through this, meaning that it’s logged, inspectable and controllable.
Part of the reason it’s useful is its need for minimal resources. It’s a router, not a workstation, so we can get away with 1GB of RAM and a single core to run it.
When assigning the interfaces, it’s pretty straightforward.
vtnet0 becomes WAN connected to vmbr0.
vtnet1 becomes LAN connected to vmbr1.
vtnet2 becomes opt1 connected to vmbr2.
We then end up with a traffic flow that should look like what we see below.
Internet
    ↓
vmbr0 (WAN side of pfSense)
    ↓
pfSense — firewall, logging, packet capture
    ↓                   ↓
vmbr1               vmbr2
Analyst/clean       Dirty lab
Parrot box          Malware VMs
                    Target machines
Everything passes through the middle, and more importantly, nothing passes through zones without our knowledge.

We Are Nothing Without Rules
pfSense ships with a default allow rule on the LAN interface. For a home network, that makes sense. For a research lab, it’s the wrong default. So, we’re going to replace it.
First, we need to keep in mind how pfSense will read these rules.
Rules in pfSense are evaluated from top to bottom. First match wins. Block rules go above pass rules.
For the dirty lab network (vmbr2), the ruleset will look like this:
Block traffic from the lab network to the clean network.
Block traffic from the lab network to the internet.
Block traffic from the lab network to the target network unless deliberate.
Allow traffic within the lab network.
For the analyst network (vmbr1):
Block all outbound traffic to the clean network.
Block all outbound traffic to the internet.
Allow inbound traffic from the analyst network.
For the clean admin network (vmbr0):
Allow outbound internet access.
Allow controlled access to the lab and target networks.
The most important rule of all is a floating rule, one that applies globally across all interfaces. This will block any traffic from any lab zone to your home LAN subnet. This is the final backstop. Even if a rule is misconfigured somewhere, this gives us a final chance to catch it.
Use aliases to keep rules easily readable. Define your subnets once (LAB_DIRTY, LAB_TARGETS, HOME_LAN) and reference the alias in every rule. When a subnet changes, you update it in one place.
Lastly, enable logging on every rule. To get a live feed of what’s hitting what, we can visit the following menu to view traffic logs in real time:
Status > System Logs > Firewall
When you're analysing a suspicious binary, watching that log in real time tells you exactly what the sample is trying to do.
At the end of it all, that's the intelligence we're here to collect.
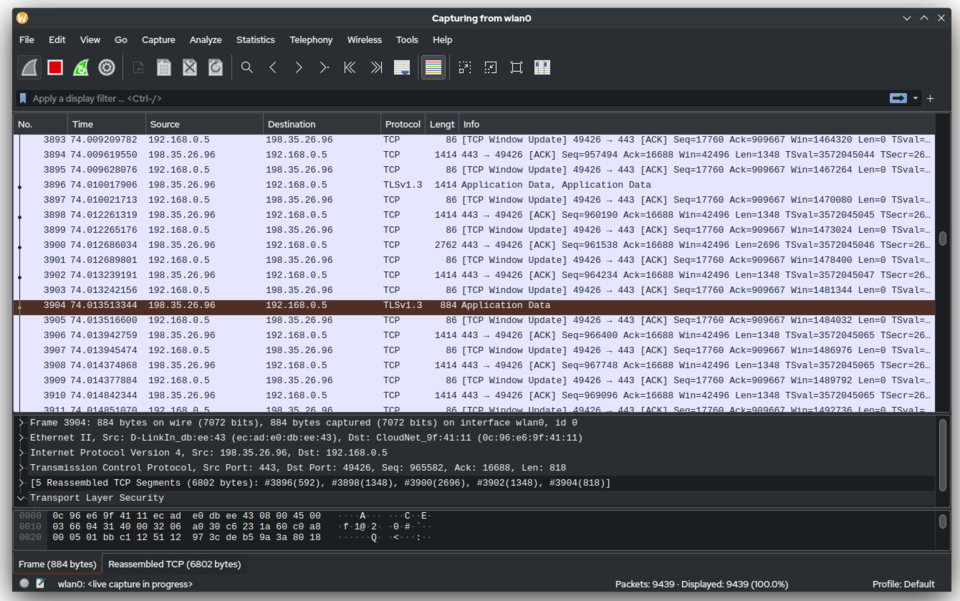
Live Packet Capture
Proxmox gives us the ability to initiate full packet capture via any interface. To set this up, we can visit:
Diagnostics > Packet Capture > "interface"
Set a filter if you want one, then hit start. Proxmox will initiate packet capture and export everything into a pcap file for later analysis.
This is malware and analysis defined in a nutshell. We blow something up safely in an isolated container, we capture all traffic put out and then analyse it later on a clean station. At the end, we roll back and are ready to test again.
The isolation is the feature that allows this to happen, and it keeps the rest of the network safely contained while doing so.
Templates For The Win
Templates are a huge feature that is seriously underrated for long-term work. Once your lab is set up correctly, each virtual machine you are running can be configured to act as a “template” for a later install.
This template feature is 90% of what makes Proxmox so flexible for research purposes. Rather than configuring a new machine at the end of each session, we simply roll back to the clean version of each install using the template model.
We aren’t messing around with bare metal stations here, and in terms of timeframes, it shows. Now, the entire lab can be rolled back and be ready to accept something new in a matter of minutes. No drama, no fuss.
More importantly, it makes it much easier to configure the lab in a way that is most useful for us. Windows machines, Kali boxes and vulnerable stations can all be set up as templates that are able to be deployed rapidly as needed.
What We Have Now
It’s worth mentioning that overall, the hardware specs for the new lab are modest. With just 16GB of RAM, things have to be optimised however, for targeted research, this is an advantage, not a restriction.
This hardware still gives us the means to run 3–4 LXC’s while comfortably running pfSense in the background, and while it won’t win any awards as a powerhouse, it’s still an entirely acceptable test lab that can be deployed cheaply. More importantly, the lightweight nature means we know exactly what is on it.
Let’s face it, hardware limitations and the fact that most homelabs are never finished are probably going to mean that at some point, hardware capability is eventually going to become the bottleneck again.
For now, though, we are left with a fit-for-purpose test lab controlled via a single chokepoint that lets us analyse everything. We can deploy, detonate, analyse, and revert in a controlled environment without needing to touch anything outside of that.
When treated right, marginal hardware can still punch far beyond its weight. In the next article, we’ll walk through how to correctly deploy a vulnerable machine and set it up as a refreshable template.
Investigator515 explores the RF spectrum, cybersecurity, and the hidden tech behind modern espionage.
Follow for new content weekly
You might also like,
- OSINT Investigators Guide to Self Care & Resilience
- Spies In The Mud: The RF-111 Aardvark
- What The Tech?! Space Shuttles