
This is a tutorial on how to develop, test & deploy an Ethereum Smart Contract to a public testnet
The full working project code is available on Github
Introduction
This article explains step by step instructions of how to use the Truffle Suite to develop and test a Smart Contract locally. Codebase checkpoints throughout this tutorial let you see what your code should look like at each stage. They look like this:
Codebase checkpoint: version x.x.x
Once we’ve tested our code locally, we will deploy it to a public Ethereum testnet and check it out on Etherscan!
We’ll do this in 6 steps:
- Setup
- Creating Our Project
- Writing The Smart Contract
- Compile and Migrate
- Testing
- Deploy To Testnet
1. Setting Up
Node & NPM
Follow instructions for installing NodeJS on your machine. NPM comes bundled with Node by default. For this walkthrough, I’m using Node version 9.10.0 and NPM version 5.10.0.
Text Editor
Ensure you have an up to date text editor installed. I’m using VSCode.
Truffle
Truffle Suite is a popular framework for developing full-stack Decentralised Applications on the Ethereum Network.
We want to make sure we have Truffle installed globally, so in the terminal run:
npm install -g truffle
Ganache
Ganache acts as our local Blockchain so we can deploy and test its functionality locally before deploying it to a public testnet. Follow the install instructions on the Ganache Webpage.
2. Creating Our Project
Navigate to your preferred workspace and create a new directory in which our Truffle project will reside, I’m using the name truffle-smart-contract/:
mkdir truffle-smart-contractcd truffle-smart-contract/truffle init
When finished, you should see something similar to the output in figure 1.
 Figure 1.
Folder Structure
Open up the new project directory in your text editor. Your folder structure should look like figure 2. There should be 3 subdirectories: contract/, migrations/ and test/; and a file: truffle-config.js.
 Figure 2.
- contract/ is where our Solidity Smart Contract code is stored. Truffle knows to look here for .sol files to compile and migrate to the Blockchain.
- migrations/ is where our migration logic resides. Here we can describe the steps needed when deploying our contracts so that they are correctly deployed.
- test/ is where we will write for our Smart Contracts to ensure they function as expected.
- truffle-config.js contains information about networks, compilers, file locations and other custom configurations for the Truffle framework to know where our things are. More on this file later…
Codebase checkpoint: version 0.0.1
Connecting Ganache
Open up Ganache, which we installed earlier, then click “Quickstart”. This will start up our local Blockchain. Your window should look something like figure 3.
 Figure 3.
The public addresses you can see are the first 10 addresses that Ganache has provided you to interact with the Blockchain. Ganache has loaded each of them up with 100 ETH. We’ll use these later.
Along the darker navigation portion at the top of the window, you can see a row displaying details about the Blockchain: Current Block, Gas Price, Gas Limit, etc. Make note of the Network ID and RPC Server details and head back over to your text editor.
Open up truffle-config.js and delete everything currently in there. Paste in the following from figure 4.
module.exports = {
  networks: {
    development: {
      host: "127.0.0.1",
      port: 7545,
      network_id: "5777",
    }
  }
}
Figure 4.
In figure 4, we are defining where Truffle needs to look in order to find our local Blockchain. On line 3 we define a network called development . Use the Network ID and RPC Server details we made a note of from Ganache to fill in host, port and network_id.
Let’s go back to our terminal to make sure that Truffle can connect to our Blockchain. Run the following:
truffle test
You should see something similar to the output in figure 5.
 Figure 5.
Great stuff. Our workspace is set up to start interacting with our local Blockchain. We can now start developing our Smart Contract.
Codebase checkpoint: version 0.0.2
3. Writing The Smart Contract
Let’s head back to our text editor and create a new file in the contracts/ folder called HelloWorld.sol. Figure 6 shows the HelloWorld code, so paste this in.
pragma solidity >=0.5.0;

contract HelloWorld {
    string private greeting;

    constructor() public {
        greeting = "Hello World";
    }

    function getGreeting() public view returns(string memory){
        return greeting;
    }
}
Figure 6.
Line 1: Version
pragma solidity defines the version of Solidity to use when compiling the Contract. I’m using solidity version 0.5.0 and above, you may need to check which version you’re using so that yours compiles correctly. Do this by heading back to the terminal and running truffle version.
Line 3: Contract
Here we define our Smart Contract name: HelloWorld. All functionality for this contract is contained within the trailing curly bracket.
Line 4: State Variables
Here we define a state variable called greeting, of the string type. This is the greeting that our getGreeting function will return.
Lines 6–8: Constructor
The constructor is called when the Smart Contract is initialized. In ours, we’re setting the greeting state variable to be “Hello World”.
Lines 10–12: getGreeting() Function
Our getGreeting function simply returns the value of the greeting state variable, which was set in the constructor. The view keyword means that the function doesn’t make any state changes during its execution.
Codebase Checkpoint: version 0.0.3
4. Compile & Migrate
In this section, we will get our new Smart Contract compiled into machine code and deployed to our local Blockchain.
Compile
Head over to your terminal and run the following:
truffle compile
You should see something similar to the output in figure 7.
 Figure 7.
There should now be a new folder in your root directory called build/. This is where your compiled code sits.
Migrating
Migrating is the process of deploying compiled Smart Contracts to the Blockchain.
In your text editor, create a new file in the migrations/ folder called 2_deploy_contract.js. In here we will instruct Truffle how to deploy our newly created Smart Contract. Paste the code from figure 8 into 2_deploy_contract.js:
const HelloWorld = artifacts.require("HelloWorld");

module.exports = function(deployer) {
  deployer.deploy(HelloWorld);
};
Figure 8.
Run the following in your terminal to migrate your Contract:
truffle migrate
You should see something similar to the output in figure 9:
 Figure 9.
Awesome. Your contract has been deployed to your local Blockchain! Head over to ganache and take a look at the first row from the accounts table. You should see that the ETH balance has dropped slightly and that the number of transactions has increased above 0, shown in figure 10.
 Figure 10
The ETH balance drops because it costs GAS to deploy to the blockchain, and the increased transaction count represents the transactions that were used deploying the contract.
Codebase checkpoint: version 0.0.4
5. Testing
To ensure our Smart Contract works properly, we need to write some tests. We’re going to write a Solidity test for our HelloWorld Contract to ensure that when we call getGreeting() the correct response is returned.
Head over to your text editor and create a new file inside the test/ folder called TestHelloWorld.sol. Paste the code from figure 11 into the file.
pragma solidity >=0.5.0;

import "truffle/Assert.sol";
import "truffle/DeployedAddresses.sol";
import "../contracts/HelloWorld.sol";

contract TestHelloWorld {
    function testItGreets() public {
        // Get the deployed contract
        HelloWorld helloWorld = HelloWorld(DeployedAddresses.HelloWorld());

        // Call getGreeting function in deployed contract
        string memory greeting = helloWorld.getGreeting();

        // Assert that the function returns the correct greeting
        Assert.equal(greeting, "Hello World", "It should greet me with Hello World.");
    }
}
Figure 11.
Let’s run the test! Run:
truffle test
You should see output similar to figure 12 confirming the test has passed:
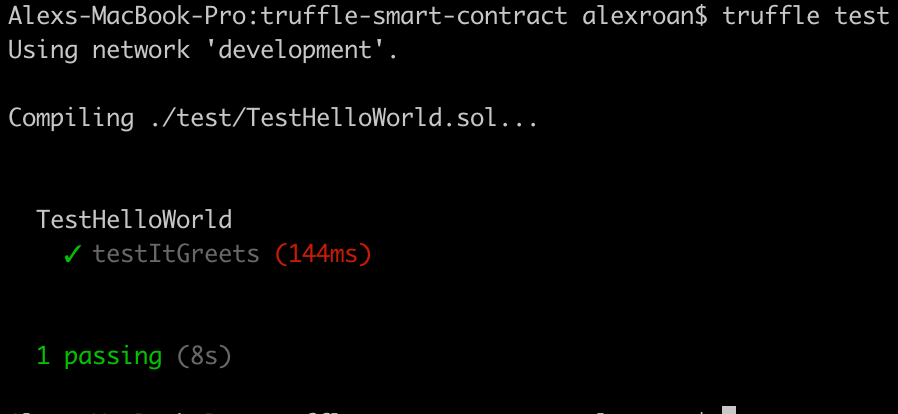 Figure 12.
Codebase checkpoint: version 0.0.5
6. Deploy To Testnet
To deploy Smart Contracts to a network, we need to own Ether on that network. Fortunately on testnets, obtaining Ether doesn’t cost anything.
Obtaining Ether
We’re going to use the Kovan testnet. To obtain Kovan Ether head over to the Kovan Faucet and sign in. Open up Ganache and copy the public key address of the first account in the list, you can see mine in figure 10. (Note, the public key is the one that is displayed in plain bold text as seen in figure 10, do not copy the private key). Paste the address into the chat as shown in figure 13 and send.
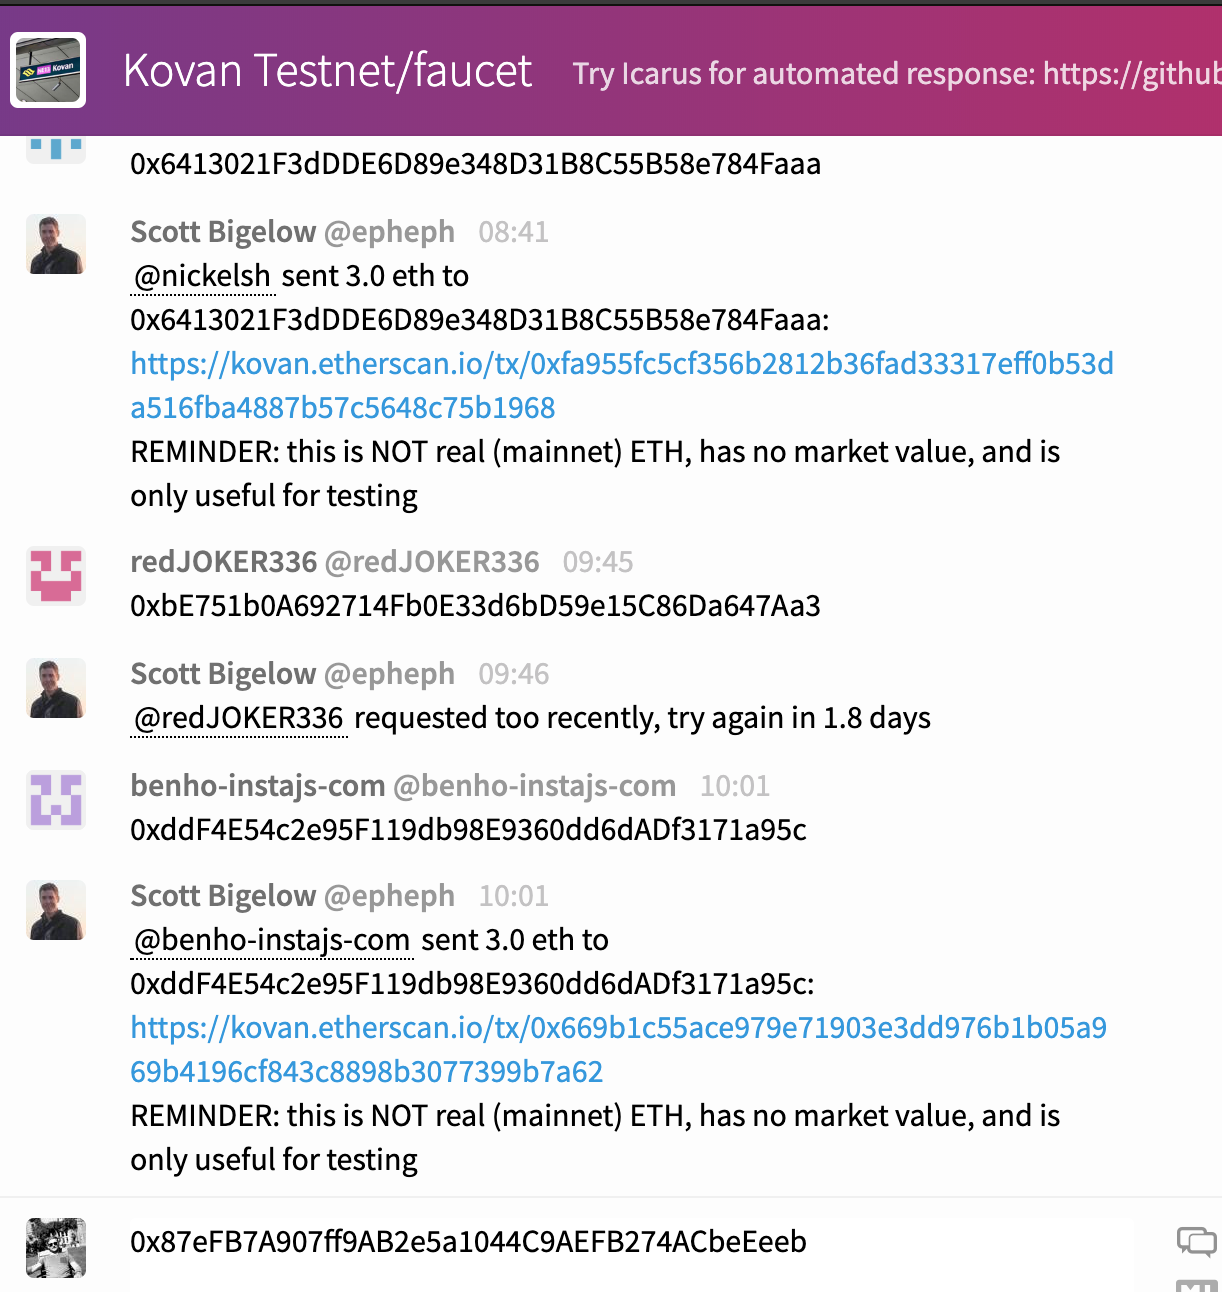 Figure 13.
You might need to wait a few minutes, but eventually, you will see a response like the one seen in figure 14 informing you that Ether has been sent to your address.
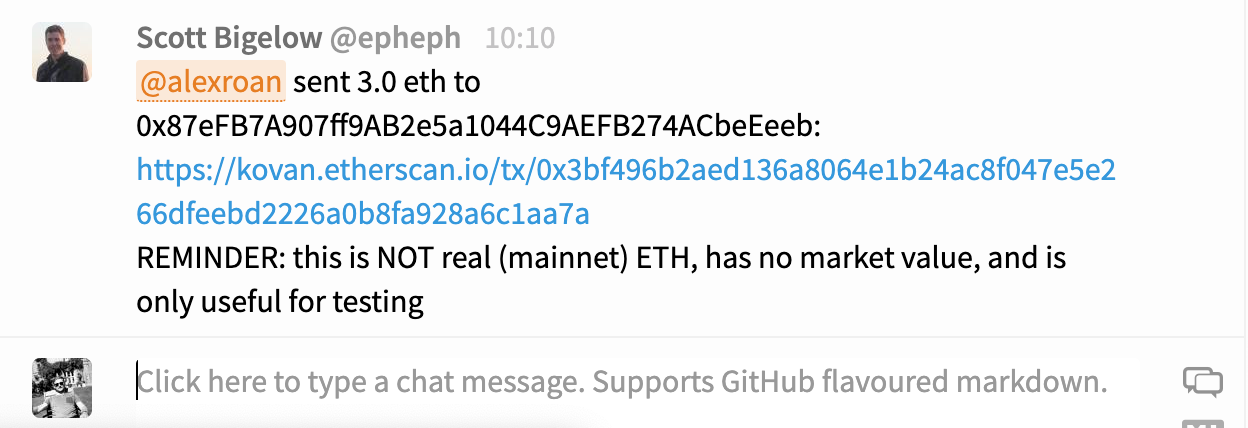 Figure 14.
Infura
Now we need Truffle to be able to access the Kovan network. A service called Infura makes this easy for us. Go to infura.io and create an account.
Once logged in, create a new project. I’m calling mine truffle-smart-contract. Click View Project in the dashboard. There should be a section called KEYS, as seen in figure 15. Make sure that you select KOVAN in the ENDPOINT dropdown.
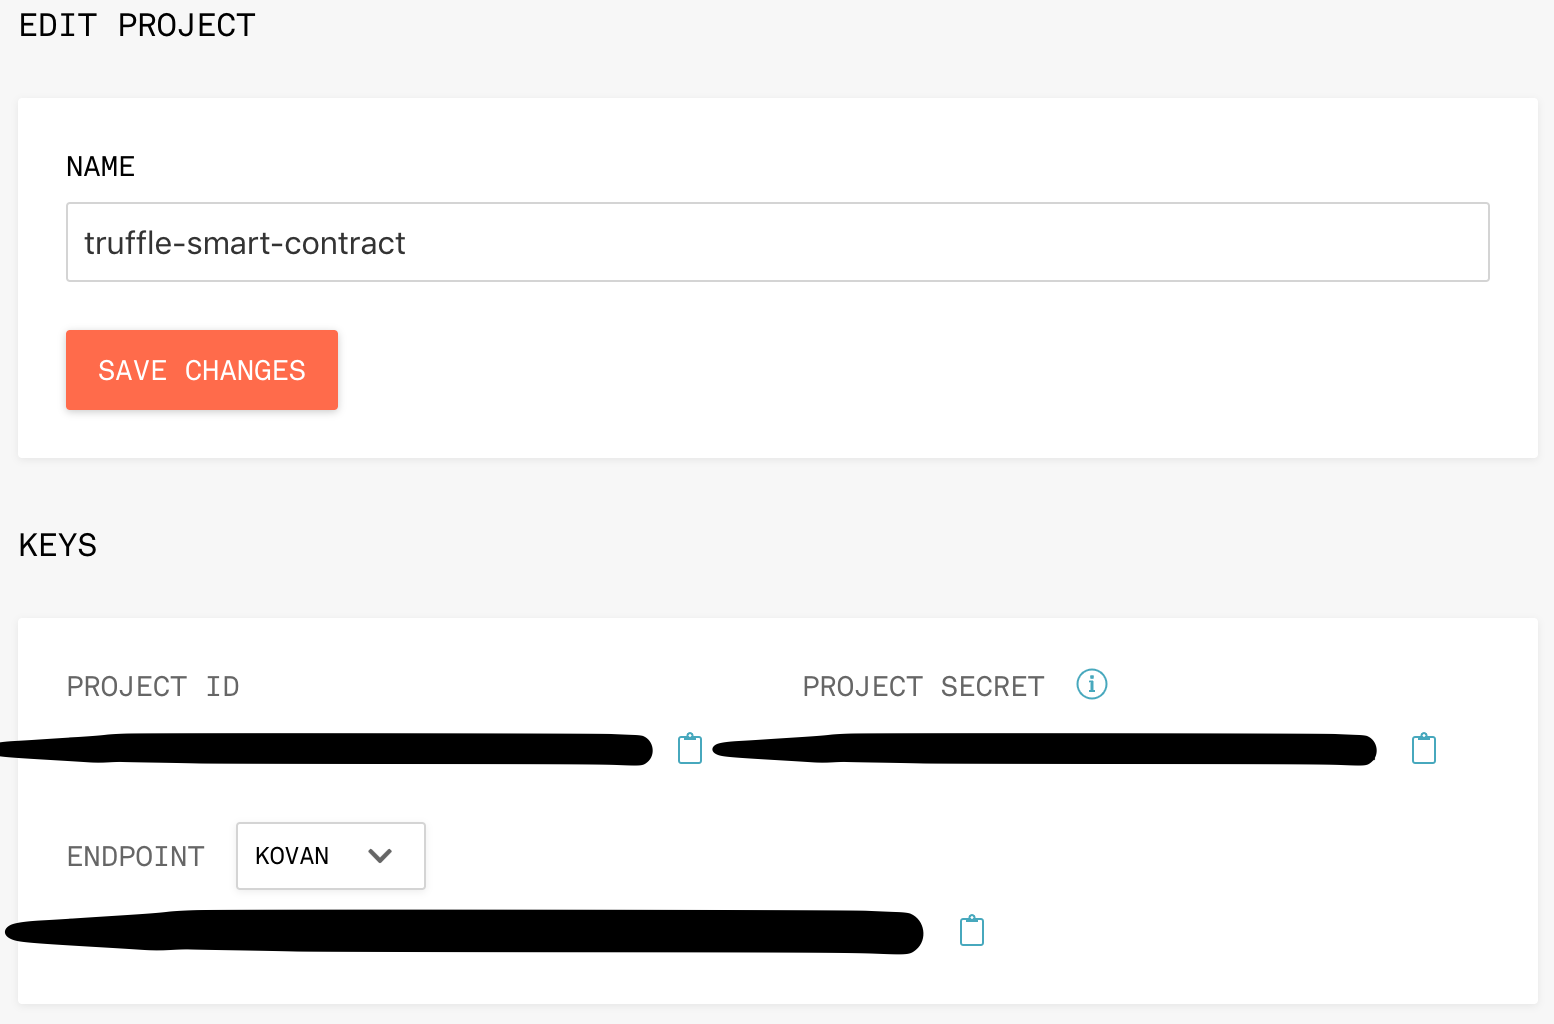 Figure 15.
The ENDPOINT data, greyed out in figure 15, is what we need, but first, we need to add a few dependencies to our truffle project.
In the root folder of your project create a new file called package.json and paste the contents from figure 16 into it.
{
    "dependencies": {
        "truffle-hdwallet-provider": "1.0.4",
        "truffle-hdwallet-provider-privkey": "1.0.3",
        "web3": "1.0.0-beta.46"
    }
}
Figure 16.
Head back to the terminal and run:
npm install
This may take some time, but once finished head over to your text editor and open truffle-config.js. Edit the file so that it looks like the contents of figure 17.
const HDWalletProvider = require('truffle-hdwallet-provider-privkey');
const privateKey = "private-key-goes-here";
const endpointUrl = "endpoint-goes-here";

module.exports = {
  networks: {
    development: {
      host: "127.0.0.1",
      port: 7545,
      network_id: "5777",
    },
    kovan: {
      provider: function() {
        return new HDWalletProvider(
          //private keys array
          [privateKey],
          //url to ethereum node
          endpointUrl
        )
      },
      gas: 5000000,
      gasPrice: 25000000000,
      network_id: 42
    }
  }
}
Figure 17.
On line 2, change the text value to equal the private key for the first account in your Ganache accounts list (use your private key this time. you get this from clicking on the key icon on the left side of the row. Seen in figure 10).
On line 3, take the ENDPOINT data copied from Infura and paste into the text value replacing endpoint-goes-here.
Notice the new network configuration on lines 12–24.
Please note: it is NOT good practice to place private keys in version-controlled files, we are only doing so here for the purpose of this tutorial.
Migrate
Now we’ve got everything in place to migrate, let’s do it! Run:
truffle migrate —-network kovan
Initially, the migration runs a dry run to ensure there is enough gas and ether to deploy the contracts. Once that’s finished it’ll go straight onto deploying your contracts. You should see output similar to figure 18.
 Figure 18.
The highlighted contract address is the address that our Smart Contract has been deployed to. Go to kovan.etherscan.io and search for that contract address and you will see your newly created contract on the Kovan Blockchain! Well done! Check out mine here.
Test
Much like the previous migration, testing on the Kovan network requires us to pass the network name when running the test command in the terminal. Run:
truffle test —-network kovan
Codebase checkpoint: version 0.0.6
Done
Well done, you developed, tested and deployed your very own Smart Contract to the Kovan Ethereum testnet. I hope this will inspire you to experiment more with Truffle, Ethereum and Blockchain in general.
Happy coding.
Learn More
If you’re interested in Blockchain Development, I write tutorials, walkthroughs, hints, and tips on how to get started and build a portfolio. Check out this evolving list of Blockchain Development Resources.
If you enjoyed this post and want to learn more about Smart Contract Security, Blockchain Development or the Blockchain Space in general, I highly recommend signing up to the Blockgeeks platform. They have courses on a wide range of topics in the industry, from Coding to Marketing to Trading. It has proven to be an invaluable tool for my development in the Blockchain space.


