
Some people are naturally talented in particular areas and make art (visual, auditory or otherwise) by hand. I'm not one of them, but that doesn't mean I'm not creative. (Everybody has the ability to create something; it's part of being human.) For me, I've always used digital applications/tools (some of which I've created myself, since I know a handful of programming and scripting languages).
I can't teach you how to find what it is that makes you creative in the particular way that you are; that's up to you to find. What I can do is (hopefully) teach you to write code (but that's not the focus of this post). I can also teach you how to use a few tools to create digital art the way that I do. (For those of you that know that I create music and have released albums on Bandcamp, I feel compelled to disclose that this post is not about teaching you how I do that, either. It's pretty experimental/random at this stage. I'd really like to learn ChucK and SuperCollider, to make the process more logical, methodical and ordered.) Here, in this post, I'm going to teach you how to databend (also called datamoshing), which is a way of manipulating the bits in a file to make it look different. Now, there are basically two ways to do this:
1. The Hard Way
Back before I knew it was possible to do things the easy way, I used to edit my files with a Hex editor. (I prefer frhed or HxD for Windows. GNU/Linux has a plethora of hex editors). This approach is random and unpredictable, with a high risk of corrupting the file beyond recognition. (The whole point is to essentially corrupt the file in such a way that the compression algorithm does weird things to the output when viewed, but it's far too easy to completely break it.) Essentially, this is the approach I use:
1. Make a backup of the file I want to bend.
2. Open the file with a hex editor and navigate down to a point at least a few lines below where the metadata ends. (If you don't do this, you'll break your file before you have even started, since nothing will render it.)
3. Replace/overwrite some of the hex code by typing random characters in quick succession, hitting keys at will. Save a copy of the file and then view it using the appropriate viewer/player. (I like IrfanView and Mirage for this.) If it still renders, good. (Ideally, you should start to see colour changes and alignment shifts.)
4. Repeat steps 1 through 3 until I am happy that the image has been sufficiently altered/distorted. Then, open the image in GIMP or other image editing software and overwrite it. (What this does is "heal"/restore the file to a slight degree, so that the file will appear normal to any site to which you upload it, especially one that downscales the quality. If you don't do this, some sites will end up changing how the image looks, including making it all black or failing to render it.)
5. In the event that the image does not render, delete the broken file, open the previous backup, select a different region to mung and repeat steps 1 through 3.
As mentioned above, this is a tedious and time-consuming process without guarantee of success.
Here are some example images made using this process:
 1. Original photo of a raft by Tom Fisk on Pexels
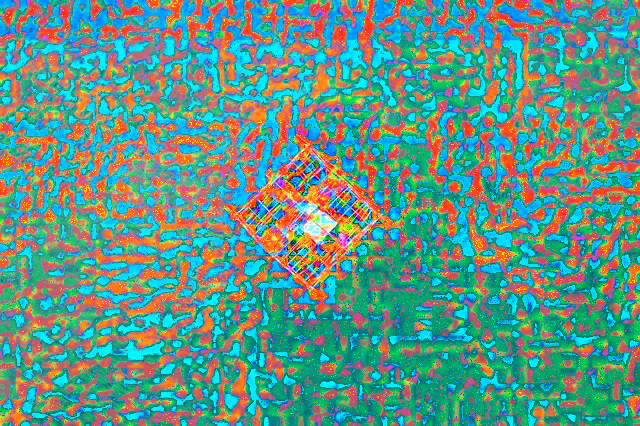
2. After a lot of bending.
 3. The same original image, bent by overwriting data in different places.
This process can also work for audio and video files, but the chances of breaking them tend to be higher.
2. The Easy Way
All you'll need for this is to install Audacity, GIMP and either Darktable or Rawtherapee (which GIMP uses for importing raw data). I prefer to do this on GNU/Linux, since package management chooses and installs all the needed components. However, there are installer releases for Windows. (GIMP for Windows is over 2 GB when installed, thanks to it bundling the required GTK+ and Python libraries!)
Note: I prefer to use JPEG and PNG images for bending. I have not tried WEBP and WEBM files, since I can't get GIMP to open or export them on GNU/Linux, even with the WEBP libraries installed.
This way is far safer and guarantees that, no matter how much manipulation you do, you will get a file that renders at the end. (I know it works for images. I haven't yet tried it with videos, but am willing to bet they'll be fine too.) Since there's a good tutorial on it on YouTube, I'm not going to repeat that. Here, have a video ...
Warning: As pointed out in the video, as long as you don't change the length of the file in Audacity (and remember the dimensions of the original image when importing raw data into GIMP), you can't go wrong.
Optionally, you can use a tool like Stegosuite (GNU/Linux-only, AFAIK) to hide an encrypted message in the image and then put the password for it (and instructions on how to install and use stegosuite) in the "unlockable content" field when you upload it to OpenSea. How well this will work, IDK, since I haven't tested it. AFAIK, OpenSea doesn't downscale uploaded images, but I could be wrong.
Here are some screenshots of the process:
 Original Image from This Person Does Not Exit
 2. Data imported into audacity
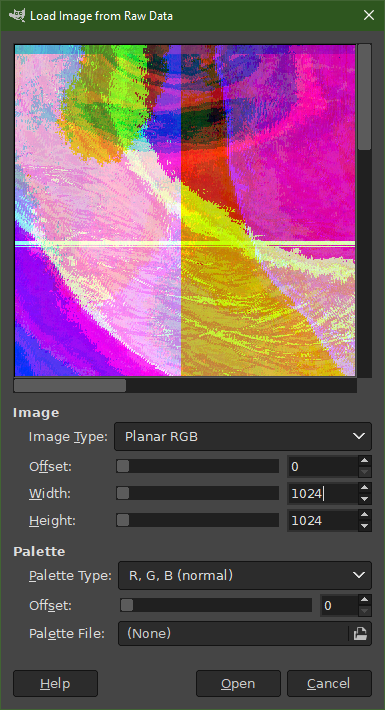
3. Importing data back into GIMP. (Note that image type must be planar RGB and dimensions must match original.)
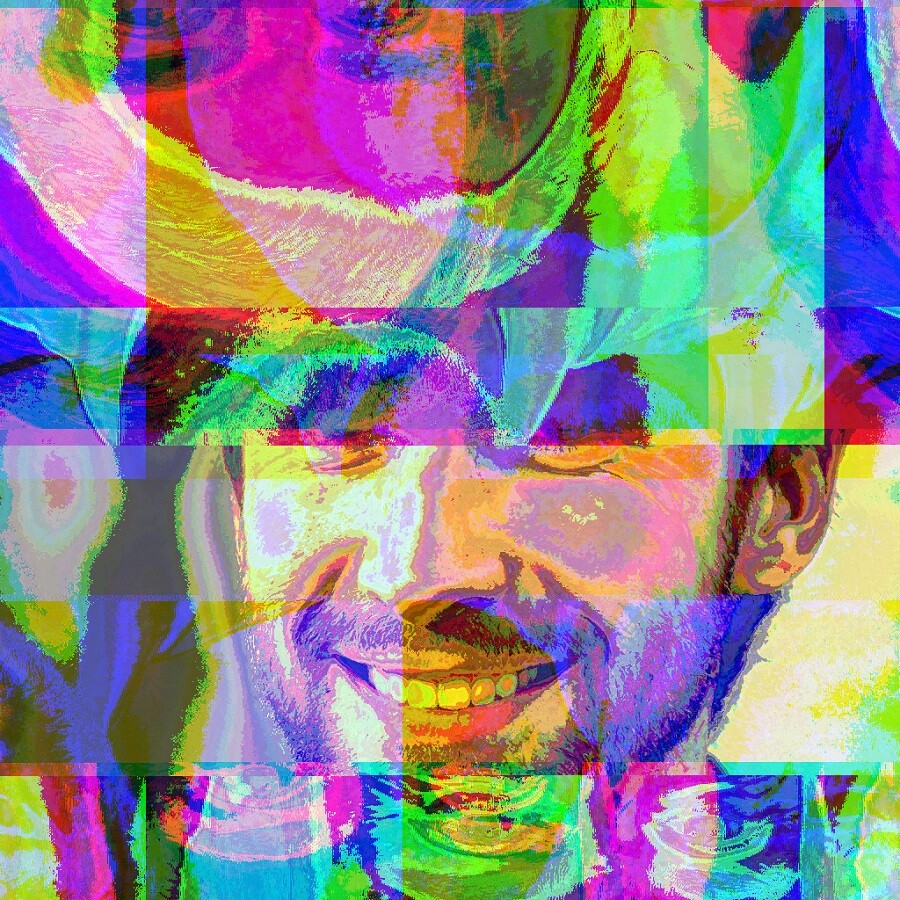
4. Resultant image, which is available for purchase on OpenSea.
Sell it on OpenSea
Now you have some artwork. The next step is to upload it to OpenSea and sell it as an NFT.
For this, you'll need a wallet (MetaMask, Phantom, Glow, etc). Since I'm lazy-minting my NFTs and want to get Polygon (MATIC) or USDC (on Polygon) for them, I'm using MetaMask. (Lazy minting means that the first person to buy them pays the price of having them minted. I pay nothing for this.)
1. Create an OpenSea account by connecting your preferred wallet and logging in.
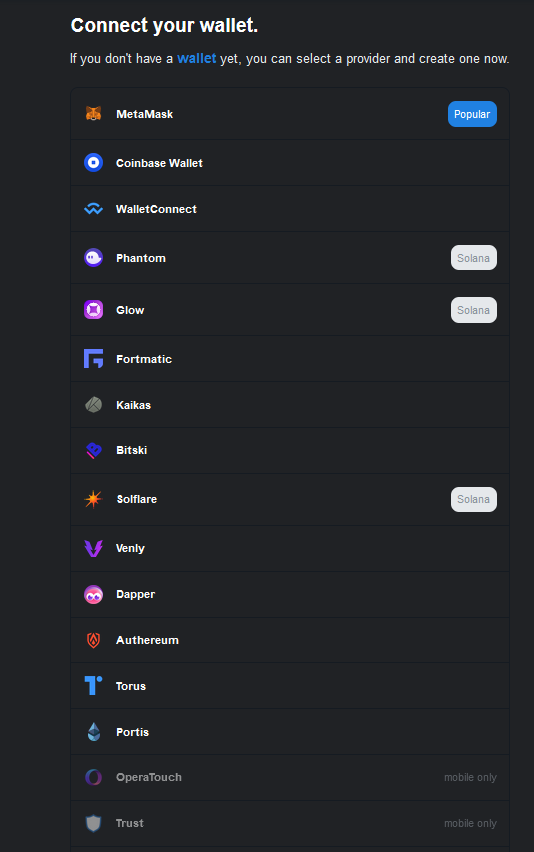
Full list of compatible wallets
2. Before you upload your art, you'll want to create a collection. Otherwise, OpenSea will put it in an unnamed collection called "Untitled Collection #XYZ" (where XYZ is a string of digits). To do this, click on your account/profile (top right) and choose "My Collections" from the drop-down menu. Then, create a collection and give it a name and custom URL fragment to easily identify it.
3. Next, click on "Create" from the top-right menu. Upload your artwork and fill in the fields as appropriate. Click the button to freeze metadata.
4. Go back to your profile and customise it to your liking. (You will only need to do this once.)
5. From your profile page or the collection page, find the file you have uploaded. Hover over it and find the "More" link button at the bottom of it. Click it and choose "Sell" from the menu. Choose the network on which you want to sell it (ETH mainnet or Polygon, in my case). Set a price (no less than $5.00) and click on the "Create Listing" button.
6. Repeat steps 3 and 5 for all your other artworks.
The process is pretty similar for Rarible, should you want to use that instead. Be warned, however, that you will need to document your process with screenshots (similar to the ones I've included above) if you go that route, since Rarible wants to eliminate plagarism/theft and has decided on that approach in order to do so. (There's no guarantee that they won't reject your artwork, even with them.) Rarible also had an issue with creating and updating my profile the last time I used it. YMMV, of course.
Congratulations; you now have a collection of NFTs for sale on OpenSea! Don't forget to flog them to friends, family and random strangers everywhere you can think of.
If you would like to check out what I've created, here's the link to my profile on OpenSea. If I have some success there, I might make more tracks and release them as NFTs, too.
Thumbnail image: Blogger's own artwork


