
Well, this might sound not the greatest news for the most expert (so if you are one probably you don't need to ready the article) but finally I managed to deploy my custom ERC20 Token on mainnet. So I thought I would briefly share the process with you guys.
You will find the link to my custom token at the end of the article, just in case.
What do you need?

- Patience? -> A lot
- Installed tools? -> Nothing, just Brave Browser
- Money? -> 10$ would be more than enough. Obviously on a crypto wallet, stored as ETH
- Your idea
The idea
Let's start from the very basic (and probably hardest part). You should figure out what you want from your token and what you want to use it for.
Can you do all of this even without a specific idea? Yes, but apart from deploying it on mainnet don't expect it to be "fully verified" since the team from Etherscan will request you main infos in detail about the project in order to "customize" your token (for example adding a logo).
Remember you want to create an ERC20 token so, as the name says, has to be ERC20 standard compliant. Long story short, it means that its code should include the following functions (so that users can interact with it as follows)
- totalSupply: Will tell you how much is the total supply of that token
- balanceOf: Will return the balance of a specific wallet address
- allowance: Will tell how much can an address spend on behalf of another address
- transfer: Will transfer a certain amount of tokens to another address
- approve: Will allow an address to spend a certain amount of token on behalf of someone else (will trigger the allowance function)
- transferFrom: Will transfer a certain amount of token from one address to another, if allowance has been set
Where to start from
If you are totally new to the topic and you want to learn just some basics (for example how does Solidity, the code of a smart contracts, looks like in terms of syntax, what can you do with it and so on), I suggest to visit https://ethereum.org/en/developers/ which has amazing documentation but in particular to do the suggested course https://cryptozombies.io/en/course/
This course will throw you directly on the field in a "funny way" but will make you understand at least the basics of what you are doing.
Remember that you need patience (which means also time) and won't be something you learn in 1 hour.
The tools
Remix
As I mentioned before, you don't need anything particular installed.
Smart contract in Solidity can be written on Remix (https://remix.ethereum.org) which will allow you to compile your .sol code and deploy it too. This is how it looks like, but I will let your navigate through it.
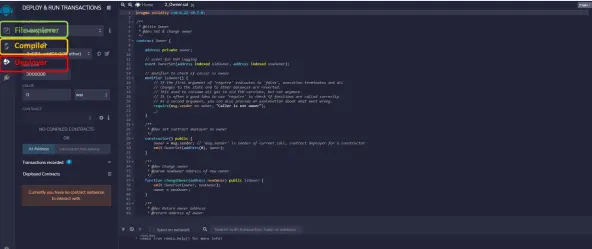
You will be able to install plugins (I didn't go through many of them) and most interestingly will allow you to deploy your code on "test accounts" with 100 eth each (select JavaScript VM on environment option in Deployer Tab).
Other option is to deploy by Injected web3 which will basically connect to your Metamask Wallet and try to deploy on the network you are connected to (I suggest to try your code on Ropsten or Runkeby first. You can get some free ETH from their faucet to test out how it really works without spending a cent).
Github
It's not really required to have a Github account, but strongly recommended. Apart from the connection option which you will have on Remix, you will find lot of useful material on it.
I can suggest to visit https://openzeppelin.com/contracts/ and in particular their GitHub repo (https://github.com/OpenZeppelin/openzeppelin-contracts) where you will find the "ready to use" code for ERC20 standard and much more. Of course in order to make your custom token you will still need to work them out a bit. For example most of them are compiled with Solidity 0.6.0 which you might want to upgrade.
Etherscan
Again, it's not properly a tool and it's not required, but I suggest you to create an account on https://etherscan.io/ since you will need it in case you want to go deep and validate/add details about your token.
Metamask
I guess it was abvious, but yes you will need metamask plugin for your browser. If you are using Brave (hopefully), no problem.
Code, optimize, deploy
I won't be too long here since a book could be written about the topic.
Let's assume you copy/paste the ERC.sol code from the repo I indicated before into Remix.
You compile the code (make sure you choose the same Solidity version that it indicated in the first row of your code). And you deploy it (selection Javascript VM). Something like this will appear.
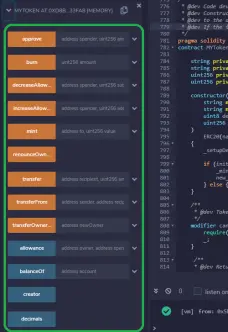
Your code is successfully deployed on a test environment and you can interact with it. Orange buttons are the "write" functions (basically you input something in your contract). Blue buttons are the "read" functions (they will return info from your contract).
And this is exactly what people will see and will be able to do when the contract is deployed on mainnet.
You might ask : "What? everyone can use the function mint or transfer of my token?"
Well not really. In the code you will add some modifiers to these functions (such are onlyOwner and so on) which basically allow a user to use that function only if that user is the contract owner?
What does it mean?
- You login into your Metamask account
- You deploy your contract while logged in (with your account connected to Remix)
- That account (yours) will become the owner of that deployed contract
- You will be able to use those functions only if you are logged in with that account
Optimize
Obviously, deploying on the mainnet is a transaction and therefore will cost you some gas (you can see the gas required in the debug tab even when you deploy on test accounts - times the gas price you will know how much the deploy cost).
That is why it's important to optimize your code. Keeping it very simple, I feel giving these basic advice (of course there are more advanced ones):
- Keep your code short by making it do only what you need - more lines costs more gas
- Store in your contract less constants as possible. For example, you don't need to store in it your token name, you can just choose to give it as input when you deploy it. Well if you still like to store something in it, you can do it (I did it too even if it's probably wrong, I am still learning :) )
- Don't blindly copy paste the code from other sources. What I mean is to take some time to at least understand what the code you are using does so that you can remove unnecessary portions.
- Don't use "import" but rather copy the code you want to import interely. I am suggesting it just because, deploying it with Remix and trying to validate the code on Etherscan will give you problems if there are "import" lines in it. Of course there are solutions and workaround but I like it the easy way.
Deploy
So now your code is ready. It works on the test account.
Login your Metamask (on Ethereum network), switch the Remix environment to "Injected Web3" (it will ask you confirmation for connection to Metamask) and repeat exactly what you did until now.
The difference will just be a warning popping out about the gas you are going to pay. So you need a minimum amount of ETH on your wallet.
I did it with my token (find more about it at the end of the article) and since it's a very simple one, it costed less than 10$ (I also waited the moment in which gas price was really low, so be patient about it).
Validate on Etherscan
Once the transaction is approved, you will be able to see it on Etherscan.
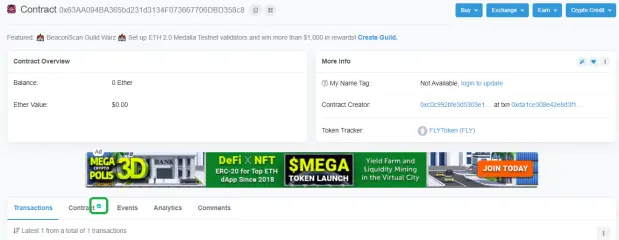
Your contract code however is not validated, which means you will not be able to see the green V.
How to do it? It's quite simple. Go to that tab and click "Verify code" and you will be redirected to a new page were you need to add some data:
- Owner address
- Solidity version you used
- You will need to copy your code
- You will need to copy your code Encoded ABI
About this last point, here is how to get it the simple way. From Remix compiler, select your contract from the drop down menu and click on ABI button (be sure the code is compiled).
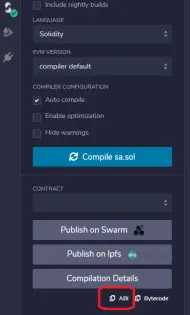
Visit https://abi.hashex.org/ and paste what you copied into the first window and click on "Parse".
Just above it, will appear a list of parameters (if your contructor function requests some inputs). Add the same you used to deploy you contract and scrolling down you will find the ABI Encoded output which you can copy paste on Etherscan.
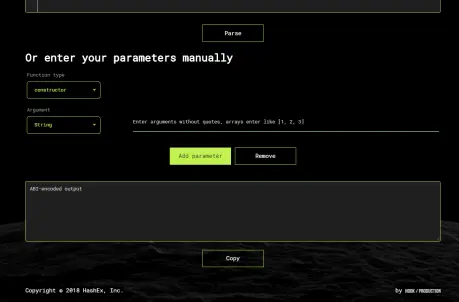
Once you input all these data and complete the process, verification is immediate and the green symbol will appear in Etherscan and you will be able to interact with the contract as you did in the test environment.
Final steps
As I said in the beginning, you can proceed by providing Etherscan a logo of your Token as well as some social infos. But this requires you to have a proper project to use it. So I won't be talking about these steps here. Now that you have your token you might also want to decide to add it to UniSwap or a decentralized exchanged, provided that you have some liquidity. And since your code includes the approve() function and is ERC20 compliant theoretically you might be able to list in on any other exchange who accepts it.
The end
There are so many more things to be said but I will stop here.
The aim was just to give you a summary of the main steps and light up some curiosity about the topic.
The procedure works quite smooth. As I said I deployed my token that I want to use on a website/blog I built.
If you are interested you can find more about it here https://flytalia.com/fly-token/ where you can also find the Etherscan link (social verification ongoing by the Etherscan team).
Probably it's going to be a worthless token but I wanted to try out the whole process so I did it.
PS. Yes there are many faster ways of doing all of this, but apart from having your token ready won't make you understand much about it. And I always prefer to understand what I am doing rather than going blindly.
Comments, critics and questions are well accepted, either here or on https://flytalia.com/contatcs/
Cheers






