
I love simplicity, minimalism and.. I love JavaScript, there I said it. So it will come as no surprise, that as soon as I discovered Nimiq, just a few days ago, I felt immediately connected. And the pun is intended as I actually was, in a few minutes, already running a node and owning some NIM coins, right there in the browser of my little outdated Android device.
Blockchain never felt closer. I didn’t need to go to my laptop, setup packages, development environments, wait for testnet tokens, etc, etc. I could just write a completely functional blockchain application, right there from the comfort of my bed.
It’s a wonderful time to be a developer.
Nimiq has been introduced in the summer of 2017 as the first ever browser-oriented blockchain. It's Node.js-based technology, and this is its summary:
Nimiq is a frictionless peer-to-peer payment protocol for the World Wide Web. It is a third-generation Blockchain protocol combining elements of Bitcoin and Ethereum, streamlined for the web platform. And without a doubt, it is open source and fully decentralized.
Browsers are first-class citizens in the Nimiq distributed network. They are able to establish consensus with the network, and enable true peer-to-peer payments from within, all without a trusted third party. In comparison to conventional cryptocurrencies, this browser-first approach lowers barriers of entry by orders of magnitudes for developers, customers and merchants.
I was immediately convinced, so I played around with it and decided to write a few articles with ideas and mini examples. I hope, in doing so I will spread the word about the power and super-fast time-to-market of this lovely technology.
Good engineering is all about reusing. The typical blockchain use-case is a transaction ledger, but if we add transaction metadata then it becomes a large sequential database, free unlimited number of reads included. We do pay per-write of each transaction, and this prevents us from piling up large amounts of duplicated data and burning the earth on the way. So the blockchain is not a database replacement, yet there are so many cases where it can replace the backend, the database and maybe even deem smart contracts unnecessary.
Today, we’ll see how to create a single-page app where users can pay a subscription fee in order to unlock extra features. And all that available in around 42 lines of JavaScript code.
The app is just a bare-bones react page, so that it’s easy to grasp and reuse the code. Additionally, as already mentioned, no backend will be used in the making of this article, except for the blockchain.
We will uses the Nimiq test network. This means that you can test out the code, but you will not be dealing with real money.
User scenario:
- The user logs in by just entering an email address
- A hash of the username is generated to identify the payment
- The app queries the blockchain for a payment with this id
- Free or premium content is displayed, depending on the result
- If there is no payment, the user can click Subscribe
- A prompt to pay the subscription is shown
- As soon as the payment is finished, the premium content is shown
- On next load, the app will detect the payment on the blockchain and display the content
So let’s get down to business:
1. First things first. Go to https://wallet.nimiq-testnet.com/ and follow the steps to create a wallet.
Another reminder, this is the testnet wallet, so it won't contain real coins. After finishing the steps, it will be stored in your browser cache, ready to perform payments.
2. Create two addresses, one for receiving and one for sending.
3. Find and click the Receive Free NIM button.
You are entitled to some free testnet NIM once in every 24 hours.
If you open a wallet in the real network, you will still get a small welcome tip in real NIMs.
But now, let's go on with programming. You can:
- directly checkout the example code from Github
- view, test and play around with the code directly on Code Sandbox
- or follow the steps to recreate it on your own:
4. Install node and create a new react app:
npx create-react-app nimiq-react-example
cd .\nimiq-react-example
npm start
5. You should now have the rotating React logo in your browser.
6. Clean up react-scripts demo code
Delete App.css, index.css, logo.svg and remove their imports.
7. Install the Nimiq Hub API:
npm install --save @nimiq/hub-api
8. Replace App.js with the following code:
import HubApi from '@nimiq/hub-api';
import { useCallback, useEffect, useState } from 'react';
const hubApi = new HubApi('https://hub.nimiq-testnet.com');
const hashCode = s => s.split("").reduce(function(a,b){a=((a<<5)-a)+b.charCodeAt(0);return a&a},0)
const App = () => {
const [userName, setUserName] = useState('');
const [signedIn, setSignedIn] = useState(false);
const [subscribed, setSubscribed] = useState(null);
return signedIn
? <div>
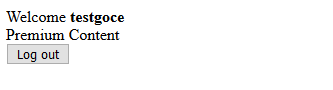
Welcome <b>{userName}</b><br/>
{
subscribed === null
? "Querying membership status..."
: subscribed === false
? <>Free Content <br/><button onClick={purchaseMembership}>Purchase Membership</button></>
: <>Premium Content <br/></>
}
<button onClick={() => setSignedIn(false)}>Log out</button>
</div>
: <div>
Please enter your username:
<input onChange={e => setUserName(e.target.value)}/>
<button onClick={() => setSignedIn(true)} disabled={!userName}>Log in</button>
</div>
}
export default App;Let's go through this code.
- hubApi is our connection to the Nimiq blockchain. Note that we are initializing it with the testnet.
To make a production-ready app, just change the URL tohttps://hub.nimiq.com - hashCode is the first hashing function I could google. Obviously, for a more serious application you would use a nice library.
- The React App initializes three self-explanatory state hooks:
- username
- sign in status
- subscription status
- Then it returns the view, basically mapping the state to JSX elements.
- You can notice that, as soon as the user enter any non-empty username, the Log in button is enabled.

- On click, it sets the signed in status to true. This is to keep the code and logic as simple as possible.
Once the user is signed in, the page shows the content appropriate to the subscription status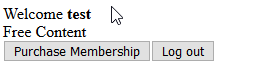
- You can notice that, as soon as the user enter any non-empty username, the Log in button is enabled.
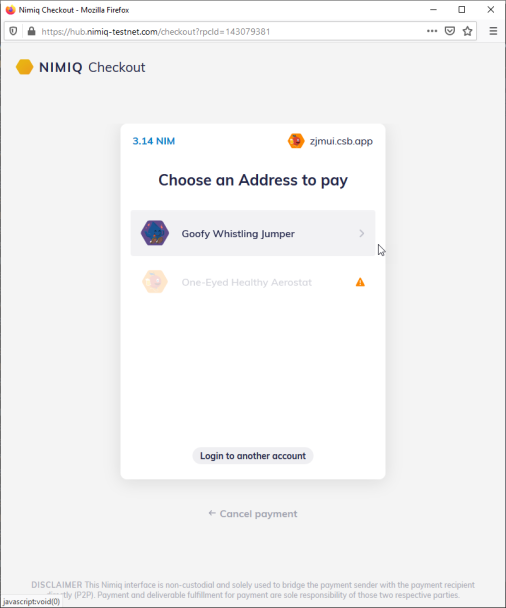
Now comes the interesting part. Clicking the Purchase Membership button, triggers the purchaseMembership function.
9. Add the following code inside the React component function:
const purchaseMembership = useCallback(() =>
    hubApi.checkout({
          appName: 'Nimiq React Example',
          recipient: 'NQ96 LFM4 S13H 7HU5 2UX1 AQQD L2F4 CNRQ YPJ5',
          value: 3.14 * 1e5, // 3.14 NIM
          extraData: String(hashCode(userName))
        }).then(signedTransaction => signedTransaction && setSubscribed(true))
  , [userName])
The hubApi.checkout function, gets our app name, recipient address, amount to be paid and the hash value of the username.
You can replace the address with one of the two addresses you created earlier (the one without funds).
The payment process is then taken over by the Nimiq Api Hub.
If the user performs a successful payment, the subscribed value is immediately set to true, and the premium content is immediately shown.
But what happens, after we close the page? How will the app find out the subscription status on the next start? After all, we don't use a backend to store the subscription nor do we save it in the browser storage.
Well, you might guess where we are headed.
10. Add the following code inside the React component function:
  useEffect(() => {
    signedIn &&
      fetch('https://test-api.nimiq.watch/account/NQ96LFM4S13H7HU52UX1AQQDL2F4CNRQYPJ5')
        .then(res => res.json().then(account => {
          setSubscribed(account.transactions.some(t => atob(t.data) === String(hashCode(userName))))
        }))
  }, [userName, signedIn])
Whenever the signed in state becomes true, the app queries the Nimiq blockchain with a simple REST API call, passing our receiving address. This API call returns a list of all transactions that involved this address. So all we have to do is find if any of them contains the username hash inside its data field.
This code accepts a one time payment in order to enable the subscription. To create a monthly subscription, we can search for this transaction in the last 30 days.
Important: The official API interface to the Nimiq blockchain is api.nimiqx. In this example however, we used the API from the nimiq-watch explorer tool, because it also worked with the testnem. Needless to say, even though both are free to use, you should contact the authors if you want to include them in your projects.
So, if you haven't done already, go ahead and try out the app by using your newly created test wallet.
Choose any username to log in, but bear in mind that some usernames may already have a "subscription". For example, test1, test2 and test3 are among the ones that got the subscription during the writing of this article.
In order to make a more serious application, we would need a more serious hash function, and a more specific transaction identifier, for example one that would include the app name, version and username.
Some more Mr. Obvious remarks:
- Most likely a serious application will have a backend to store user data, and this will be the obvious place to manage payments and query the blockchain. But the code to do this will be equally simple to implement.
- The purpose of this article was to pin-point the simplicity and quick time-to-market for an app developed with Nimiq.
- A frontend-only progressive web application may be an equally good solution, for example by using 3rd party authentication and storage solutions.
- The same idea can be used with almost any blockchain that supports transaction metadata, and has an appropriate API interface.
Maybe I’m all new to this crypto-world, but this to me looks like the most-seamless developer experience ever.


