You like free stuff. You entered my NFT giveaway contests. Maybe you won (did you check the updates?). Now you need to claim your NFT, and you want more. OK - LFG!

You want an NFT for free - take the time and complete the steps below. Then you're in the game friend.
Hint, I guarantee you a free NFT and win in a future post if you take the steps herein to prepare. Also hint - I'm going to be doing some BIG-TIME NFT giveaways soon.

Only champions allowed here.
Get ready to plant some NFT success seeds by taking the steps below.
Soon, after a little tending to them, you'll be an NFT master.

Today - on your way to getting free NFTs or claiming your Cyberpunk #1120 NFT, Junky Monkey NFT, or Lux-Lady NFT (if you won) you are going to:
1) install Metamask;
2) add the Polygon network, and;
3) connect to Opensea.
Let's roll. Read from top to bottom and don't skip ahead unless told to.

Know this - I am a man of detail.
I won't leave you hanging, but, that means reading the text closely, and going in order.

Let's get this done THE RIGHT WAY. I have provided ample instruction for you to do so. Beyond me, doing this, if your new to NFTs will ROCKET-LAUNCh you into this space (it's all free, just takes time). Follow in order.
- Enough detail here to succeed.
- Don't be scared by text and length. Read carefully. It's tailor-made to complete, for free.
- Remain focused, undistracted, and set other tasks aside while doing this and it won't take long.
- If ten year old's and grandmas can do it, you can too, especially with all my detail.

Be at a laptop or desktop computer for this primarily.
- At first, this is important.
- If you've already installed Metamask on your cell phone, it's OK - we'll address that below.
- A tablet or device otherwise running an operating system akin to an above platform, e.g., Windows or MacBook platforms, probably is OK.
- You can later install apps on your phone, link your devices together, and operate from the device of your choice.
- If you're on your phone here now, come back here when you are on a desktop or laptop (but keep your phone handy).

Keep safety in mind and don't share personal information.
- Have a pen, paper, and other places to capture, print, and store important passwords. Stop now and get these ready!
- Never share passwords with ANYONE. PERIOD.
- If needed, use only official channels for help on platforms we'll use.
- Many fake customer service reps out there will DM you on Twitter.
- Triple check official platforms for official accounts. The fakers are good.
- Always use the precautionary principle with any personal information.
- I'll highlight stuff with NFTs to watch out for in future writeups on PublishOx
Relax though.
- What we'll do today is straightforward, and easy. Just takes a little time.
- Many people trust these platforms and use them regularly.

Make sure your internet connection is good to go while doing this.
The three parts are as follows to get your first free NFT:
-
PART 1) Install Metamask as an app on desktop/laptop (the longest step, just push through).
-
PART 2) Add Polygon Network (relatively simple, just some clicks).
-
PART 3) Connect with Opensea (short, simple, just a couple clicks).

PART 1 - START HERE DON'T SKIP AHEAD
Installing Metamask - follow these instructions

Step 1 to getting your first free NFT: Install Metamask as a web browser app on desktop or laptop computer, or similar OS.
-
NOTE: If you already installed MetaMask on a mobile cell phone app first start here as well and don't skip ahead.
-
NOTE: You may have already installed the Metamask app for a DESKTOP OR LAPTOP COMPUTER WEB BROWSE LIKE CHROME OR BRAVE. Maybe to get your PublishOx tips. If so go to that browser and skip ahead to PART 2.
- Getting free NFTs requires installing Metamask as an app on a desktop or laptop web browser.
- If you have not installed the Metamask app on a desktop or laptop computer's web browser start here.
- Use direct links provided below based upon which web browser you normally use.
NOW BEGIN HERE for Metamask
On a desktop/laptop or tablet with a similar OS, go to the corresponding link below in your preferred web browser.
- Or copy/paste the link in.
- The picture below the links is what you should see.
-
Chrome: https://chrome.google.com/webstore/detail/nkbihfbeogaeaoehlefnkodbefgpgknn
-
Firefox: https://addons.mozilla.org/en-US/firefox/addon/ether-metamask/
-
Note: here is a direct link for Firefox, the download will start automatically using this one (the above site's download link did not initiate for me prob. because my Firefox is old). https://addons.mozilla.org/firefox/downloads/file/3910319/metamask-10.9.3-an+fx.xpi
-
-
Brave Browser: https://chrome.google.com/webstore/detail/nkbihfbeogaeaoehlefnkodbefgpgknn
-
Microsoft Edge: https://microsoftedge.microsoft.com/addons/detail/metamask/ejbalbakoplchlghecdalmeeeajnimhm?hl=en-US
-
You only need to install the Metamask web browser app on one platform. Use your main go-to browser.
-
All links are from https://metamask.io/ Visit here. It recognizes your browser & gives you an optimal download link. THE OFFICIAL SITE.
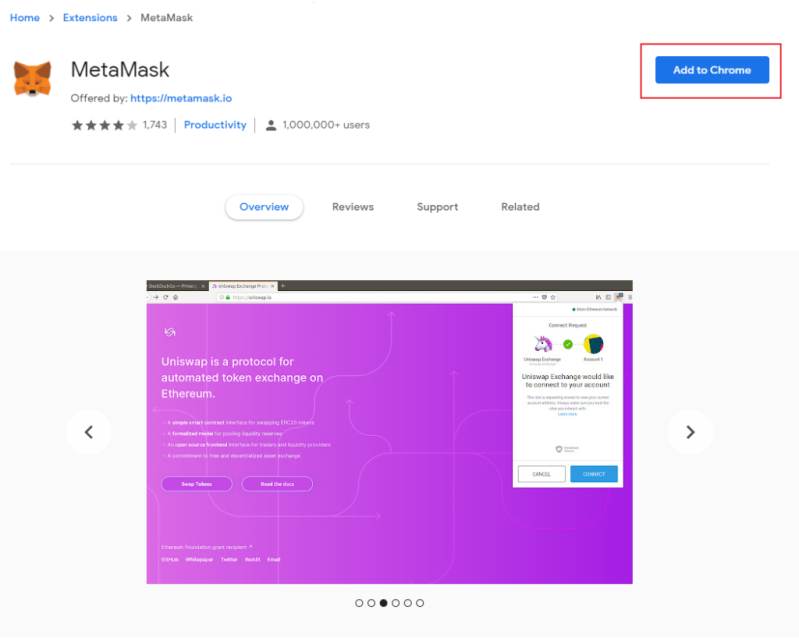
The picture below is what you'll see at the links above.
This is where you initiate installing MetaMask as an app for your preferred web browser. Click the "Add to Chrome" button.
- The landing page pictured is to install the Metamask app in Chrome, and is for Chrome, but will look similar for other browsers, i.e., Brave, Firefox.
-
After clicking "Add to Chrome" box (or similar), allow any installation to take place.
-
NOTE: "Add to Chrome" will also appear for Brave Browser despite the name difference of browsers for users because Brave's built off Chrome code - same for all Brave apps.
-
This prompt below should show next.
Click "Add extension" when prompted.
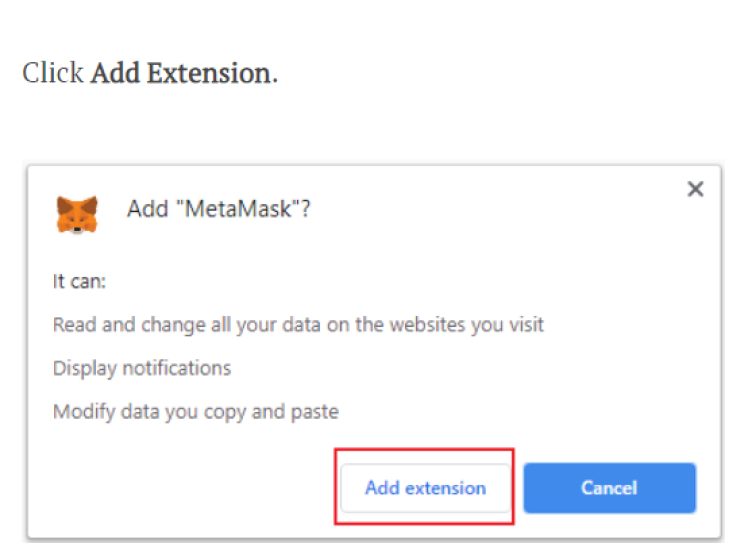
Basically the prompt above that will look the same for Firefox (below).
- Should look the same for Brave as well and similar for any other browser.
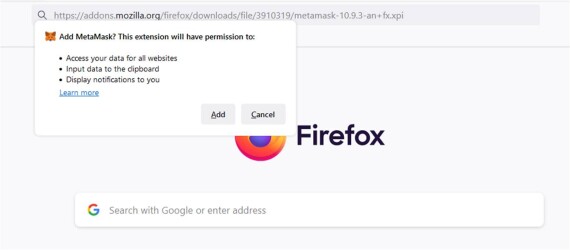
-
Metamask permissions are a little scary sounding.
-
But Metamask is good enough for the leaders at PublishOx to support and for hundreds of millions to use.
-
This is the first step to getting your PublishOx Statera tips.
-
If you've ever installed an adblocker or an eBay or amazon app, or other "web-browser app," the same is happening here. You're adding Metamask as an app in your web browser essentially.
-
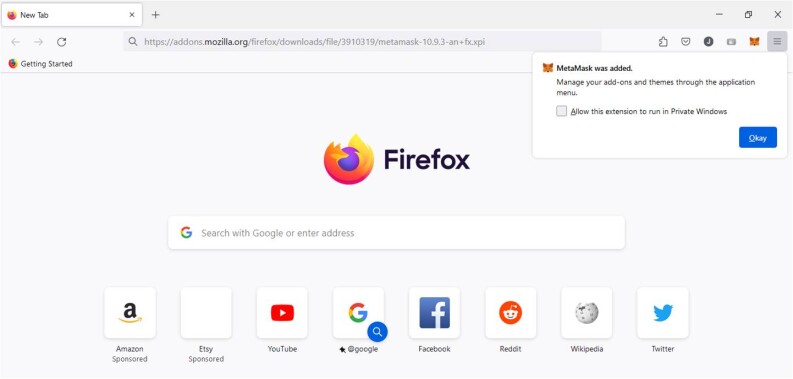
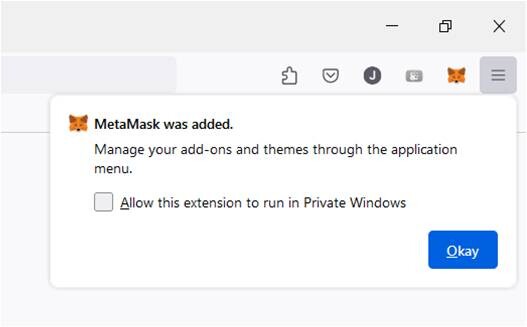
After you have clicked "Add extension."
You'll get a notification that the Metamask app. was added like the one in the upper right corner of the pictured web browser below. You will also see a little Metamask Fox button added to the upper right of your browser window also like in the picture below.
- Below is for Firefox Browser, but it should look essentially the same in Chrome and Brave, and other browsers.
NOTE:
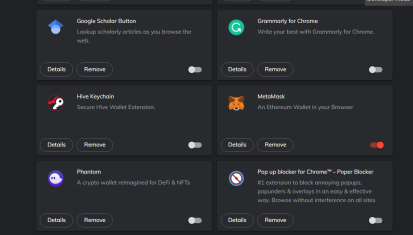
- If the little fox button does not immediately show in the upper right part of your web browser, like in Chrome, you may need to manually add the "button" for the application to be viewable. If it does not appear in Chrome or Brave look for the puzzle piece-shaped button at the end of the web address bar in your Chrome browser. Click that and pin it to your browser toolbar. If it does not appear under the puzzle piece you will need to manually allow the extension to run by going into your application extension settings for your browser.
- In the options for Brave or Chrome, the extensions options will look like the picture below - you may need to turn on the Metamask app. manually
- Also, note per the above photo that you can select the option to allow Metamask to run in a private in your browser but is otherwise it is not required. If you need more reading on what a "Private Browsing Window" is, read here: https://www.computerworld.com/article/3356840/how-to-go-incognito-in-chrome-firefox-safari-and-edge.html
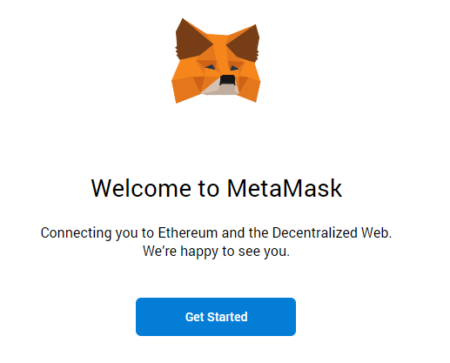
Now that you have the app installed on your browser, you will create a Metamask account.
You should get automatically prompted with a screen that looks like the picture below.
Click the "Get started" button.
-
(Note) You may need to first click the little Fox in the upper right of the browser to initiate this pop-up window for some browsers / because of your web browser settings.
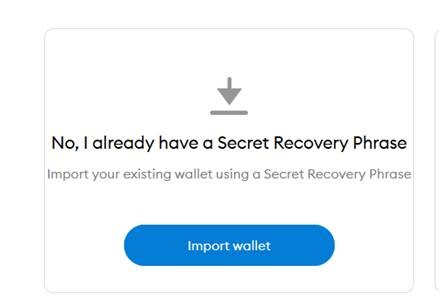
After clicking "Get Started" you will see a screen that looks like the picture below with two choices.

METAMASK NEW ACCOUNT: LEFT SIDE OPTION (Import wallet)
-
Choose this If you have already installed Metamask anywhere else
-
Such as on your cell phone, and you have the 12-word auto-generated password key, you'll want to choose the option on the left.
METAMASK NEW ACCOUNT CHOOSE THE RIGHT SIDE OPTION (Create a wallet)
-
If you have not installed Metamask as an app anywhere yet
-
If you installed Metamask and lost the 12 key master password, choose the RIGHT SIDE option
FOR RIGHT SIDE skip ahead to RIGHT SIDE instructions that start below LEFT SIDE instructions which immediately follow (note labels).
METAMASK NEW ACCOUNT LEFT SIDE START HERE
If you have already downloaded Metamask on your phone, or on another computer's browser, click "import wallet" on the left side.
(Left side) The next screen you will see will look like this below (will look the same in Chrome, Brave, Firefox). Make your choice (I chose no thanks):
(Left side) The next screen you will see will look like this below (about the same in Chrome, Brave, Firefox).

(Left side) The "secret recovery phrase" is the twelve words in a [particular order that were auto-generated when you created the Metamask already.
- Note: You were reminded to write these down.
- When you did that, you created a password as well.
- You can create an entirely new password here or use the same one that you previously created.
- The self-created password is specific to the application on the particular browser you are using.
(Left side) The (self-created) more simplistic password here can be unique to any others you have already set up.
-
The secret recovery phrase applies across devices and browsers like a master key to your Metamask and wallet
-
The password here however is browser-specific and your choice.
- If you can no longer find the twelve-word password, or can not enter it correctly - back up a page in your browser using the back arrow. Then, instead, choose the right side option and follow the instructions given below for that option.
END LEFT SIDE OPTION, SKIP RIGHT SIDE OPTION BELOW IF JUST COMPLETED LEFT SIDE OPTION ABOVE
IF YOU SKIPPED LEFT SIDE OPTION ABOVE START RIGHT SIDE OPTION JUST BELOW FOR NEW METAMASK INSTALLATIONS
SKIP TO HERE IF CHOOSING RIGHT SIDE OPTION (Create wallet) FOR NEW METAMASK INSTALLATIONS.
RIGHT SIDE INSTRUCTIONS START HERE:
- Entirely new Metamask users click RIGHT SIDE and start here to follow prompts.
- If you have not yet created any kind of Metamask account beyond what you have done so far in this article, click on "Create a Wallet" on the right and as seen below.

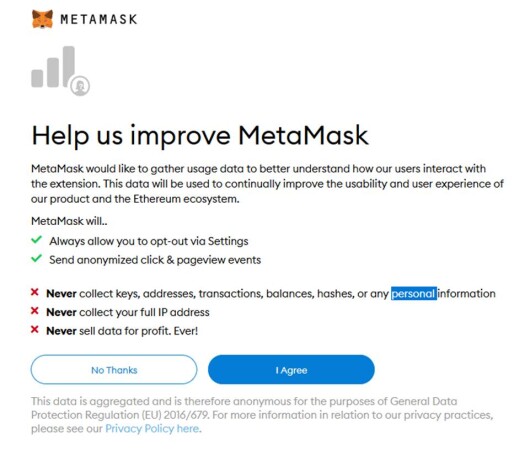
(Right side) You'll get a screen for privacy-related choices like the one below. I chose "No Thanks."

(Right side) You will next be asked to create a password of your choice for the browser-specific logins you will later do.
- (Note, this is not the infamous 12-word password which is auto-generated for you in the next step).
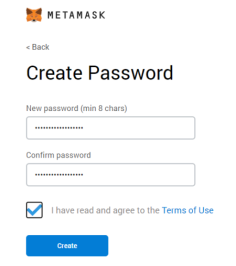
(Right side) Choose a good password!
- After you do this, the 12-word master key is auto-generated as seen in steps that follow.
(Right side) Once you create your password, you will see the screen below
- (Right side) Here, you will be presented with your secret backup 12-word master key phrase.
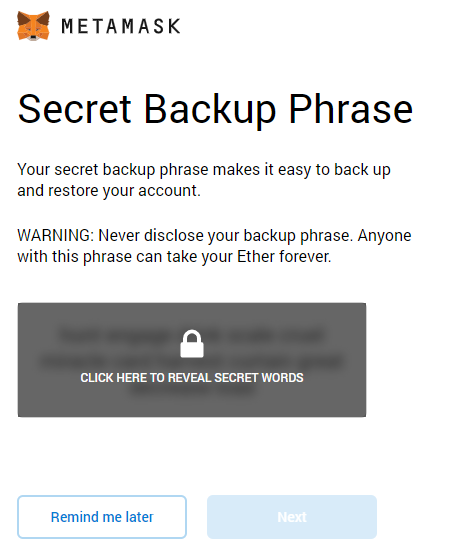
(Right side) The 12-word phrase is really important and it's usually not a good idea to store digitally, so take your time and write it down, print it out, etc.
- After writing it down, or printing it, be sure to store it in a safe place.
- You will need this 12-word phrase to restore your wallet in the event that you cannot access your wallet.
- Do not let anyone know your secret phrase, or else they can gain full control of your wallet and access your funds or your NFTs.
Once you have recorded your secret phrase, click ‘Next.’ Go through the confirmation by re-entering the phrase in the correct order in the box that Metamask provides to do this.
- No caps and a single space between the words when you enter them.
YOU"RE DONE INSTALLING METAMASK!

Enjoy Your New MetaMask Installation
- You have created your brand new MetaMask account successfully. A new Ethereum wallet address has been created for you.
I've also embedded a Youtube video below for Metamask installation.
- It might be easier to follow the video or help confirm what you are doing.
Hallelujah - you've got Metamask!
PART 2
Adding Polygon Network in Metamask
You're here for PART TWO because you have successfully per above steps, or have already had Metamask as an app in your dekstop / laptop web-browser.
PART TWO IS SPEEDIER than PART 1 was!

You've done the hard one first.
You are about 1/2 way there.
Keep going!
Congratulations, now let's roll.

Adding the Polygon network is a step that should be relatively fast to complete, just follow the steps below in order.
- We will connect your new Metamask wallet to the Polygon network.
- Polygon operates on top of Ethereum and can be a more cost-effective version serving a couple of specific purposes.
- Polygon helps people send NFTs to friends for free essentially.
- For sold NFTs Polygon helps keep transfer seller to buyer fee at minimal/zero costs.
- Compared to the Ethereum network Polygon can get backed up, and is not the best choice for the most expensive NFTs because of safety concerns.
- Polygon is still relatively safe and very widely used for a variety of NFTs and will be great for us.
Now that you have your Metamask installed as an app in your Web Browser, open the app by clicking the little Fox button in the upper right of your opened preferred web browser.
- Once you have the screen for the Metamask app where you can see your ETH balance (of zero, don't send ANY ETH for now, a balance of zeo is just fine) you know you're signed in.
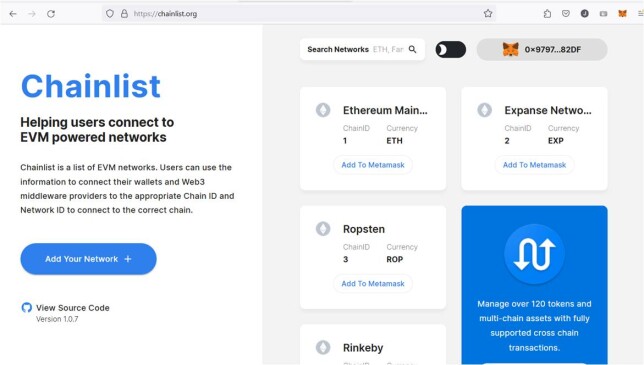
Next, Proceed to this website, https://chainlist.org/ in the web browser.
This is the landing page for Chainlist which will exactly look as it does below.
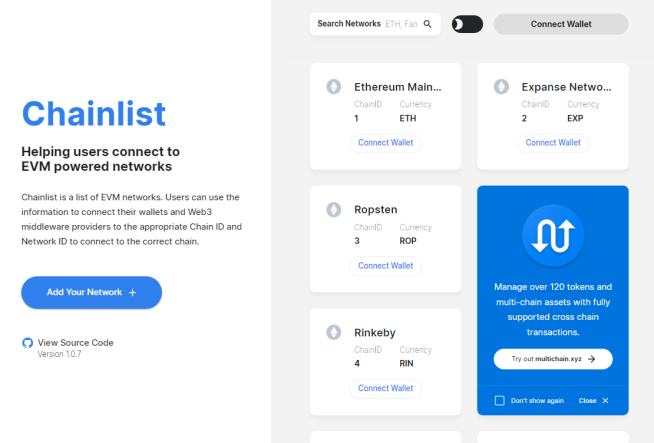
No email or logins are required here, but we will "connect" your wallet for a moment.
This is good practice because you will be prompted a lot to allow certain websites you might visit to "connect" to your wallet as you get to know what Metamask can do.
-
In part three below, we'll do the same with Opensea, and instead of email use the wallet connection as the login. Get to know what "connecting" wallet is like and do some of your own research on red flags during this step to watch out for out there.
On the Chainlist landing page as seen above, while signed into your Metamask, click the "Connect Wallet" Button as seen in the upper right of the web page.
You will get a prompt pop-up window from your Metamask asking if you want to allow the website to "Connect" to your wallet that will look like the image below
- Note - yours will be without the blue rectangle, I added for my own privacy on one of my wallets.
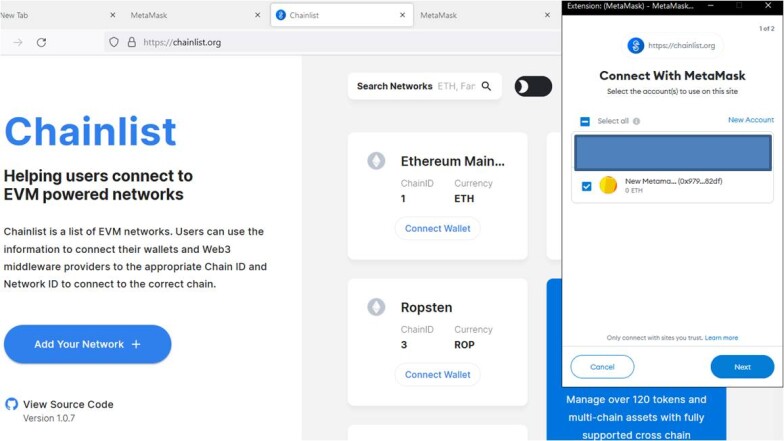
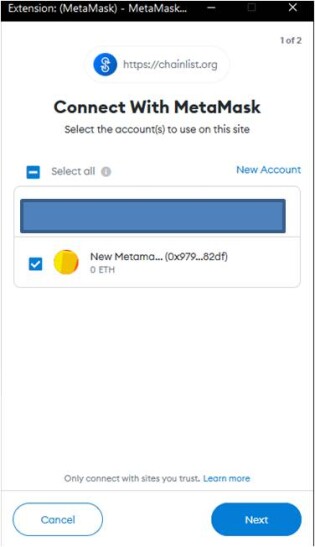
Click "Next" (don't close any browsers active underneath).
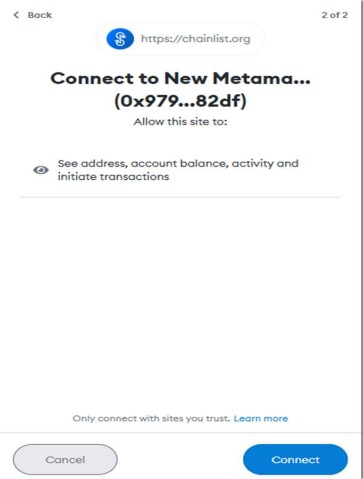
Then, you should see the pop-up prompt change slightly to look like what's pictured below.
- NOTE: Instead of my own (Ox979...), your wallet number and respective information for it will be in the abbreviated part.
Click "Connect"
After you click connect, the prompt will disappear, and you should remain on the Chainlist landing page as you were before.
Now instead of saying "Connect" in the upper right, it will now have the Metamask logo and abbreviated part of your wallet address.
- As with the "Ox" seen below. Your wallet is now "connected" to Chainlist.
This is a cool site, but today we're here just to do one quick thing - add the Polygon network to Metamask.
Doing that next is easy. Remain on the Chainlist webpage while now signed in with your wallet.
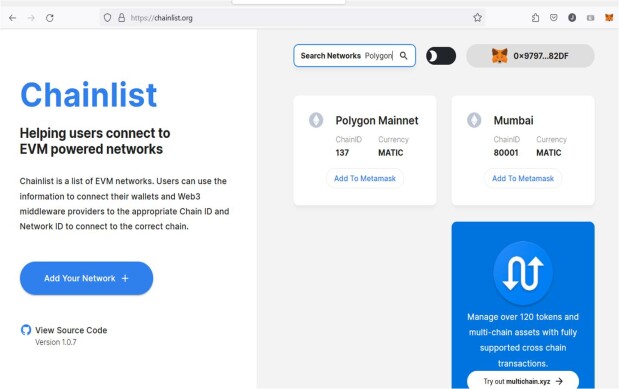
Click in the "Search network" box on the Chainlist webpage. When your cursor flashes, search "Polygon" (without quotes).
The resultant screen should look like below upon whence you stop typing "Polygon" in the search box (without having to hit enter). Note the "Polygon Mainnet" box that appears. Make sure the chain ID says 137.
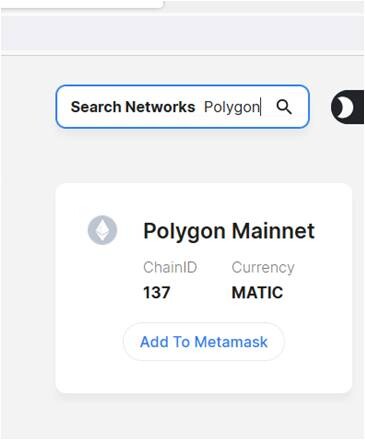
You want to click the "Add to Metamask" button in the "Polygon Mainnet" section that appeared, which I have enlarged for reference below.
When you click "Add to Metamask" your screen will show a prompt and look like the image below:
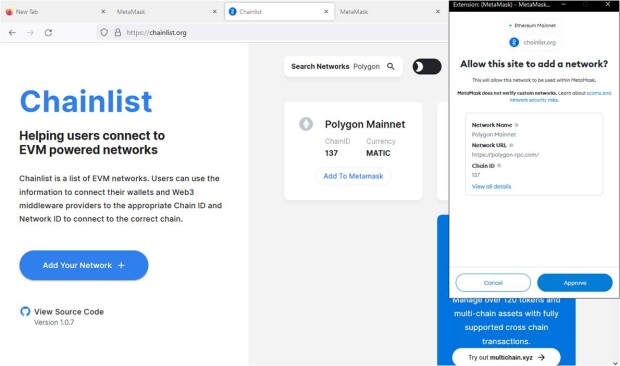
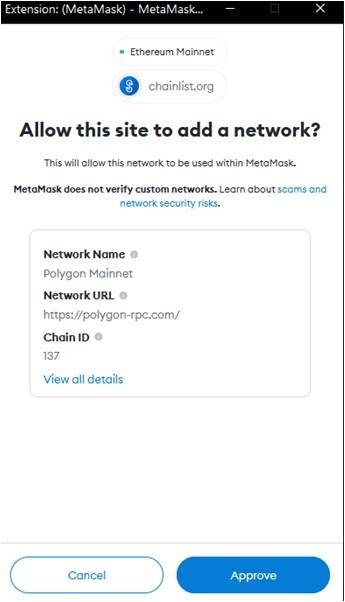
Click on "Approve" to allow Chainlist to add the Polygon network to your Metamask.
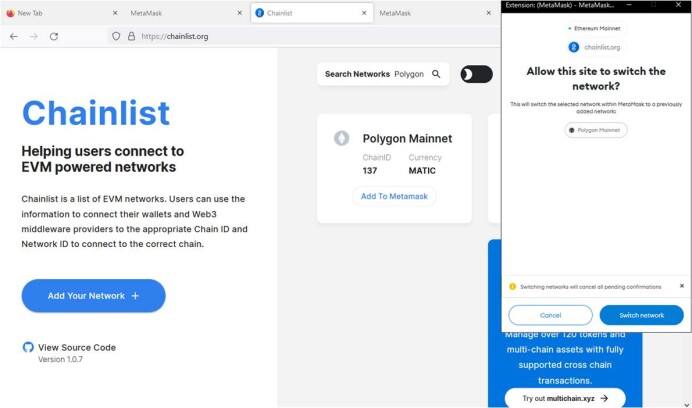
Next, you'll see this pop-up prompt below appear from Metamask asking for permission to switch to the Polygon network.
Click the "Switch Network" button.

After clicking the "Switch network" button, the prompt should disappear and you should still be on the Chainlist landing page.
Now click the Little Fox logo we identified earlier in the upper right portion of your browser for your Metamask App.
When you do you should see something like what appears in the upper right corner in the picture below as a pop-up.


Notice a couple of things and changes from before.
- One, at the top it reads "Polygon Mainnet." You now are on the polygon network. Before it read "Ethereum Mainnet."
- You can click that dropdown and manually switch back and forth between the Ethereum network and the Polygon network.
- Polygon operates on top of Ethereum. Thus, you'll notice that your wallet address is the same for both networks - this is OK!
- You'll notice the currency depicted in your wallet is now MATIC, and that when you switch back the Ethereum network, the currency depicted becomes ETH.
That's it for PART 2! You are done adding the POLYGON network!
Before you leave the Chainlist webpage though you may want to disconnect your wallet.
- The Polygon network addition will remain within your Metamask once disconnected from Chianlist.
- To disconnect your wallet from Chainlist (or any other site in a similar way) before leaving, first click the little fox Metamask application button in the upper right of your browser.
- When your wallet screen comes up, click on the green light where it says "connected" in the upper left portion.
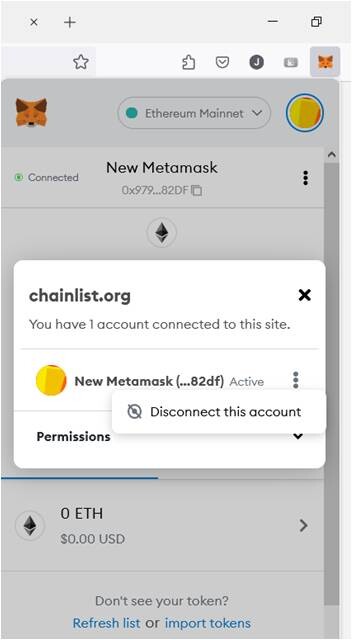
- You will see a prompt like the one in the image below after doing the above.
- Click the three dots on the pop-up prompt. You'll then see text that says "disconnect this account." Click to confirm.
- Another similarly small popup will confirm that you disconnected.
- And, the green light goes off and it will then read "disconnected."
- You'll "disconnect" your wallet from other websites you have connected to in the same fashion as needed in the future for reference.
- You probably won't be back to Chainlist a while. So I would disconnect from the site after adding the Polygon Network.
- It's a great site to add additional networks to Metamask as you need them in the same way as you just did for Polygon. Confirm info.
- You'll know you've disconnected if you refresh the Chainlist webpage and it goes back to reading "Connect wallet" in the upper right.
THE NEXT AND FINAL TASK (PART THREE) IS FUN BECAUSE YOU'LL GET TO SEE SOME ART ON OPENSEA AND IS THE FASTEST OF THE THREE PARTS TODAY!
PART THREE. THE FINAL STAGE TO GET FREE NFTS.
You are in the homestretch friend. Don't give up now.
PART THREE: CONNECTING YOUR METAMASK WITH OPENSEA.
Part Three
First step: Click on the little Fox application button for Metamask in the upper right part of your preferred web browser nest to the web address bar.
- Sign into Metamask if you need to.
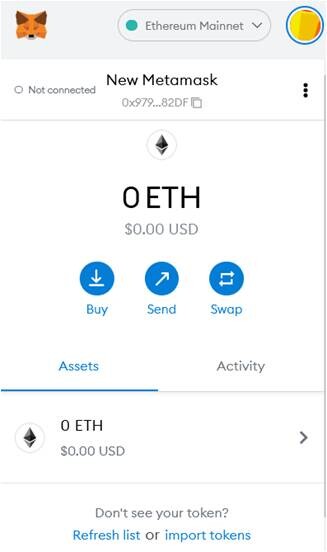
Make sure you are on the Ethereum network in your Metamask app. You may still be on the Polygon network per PART TWO steps.
- It should read "Ethereum Mainnet" at the top of the Metamask Browser Application window, as pictured below. Use the dropdown to switch this network if needed.
Next, within your web browser of choice while signed into the Metamask app. for that browser, search "Opensea."
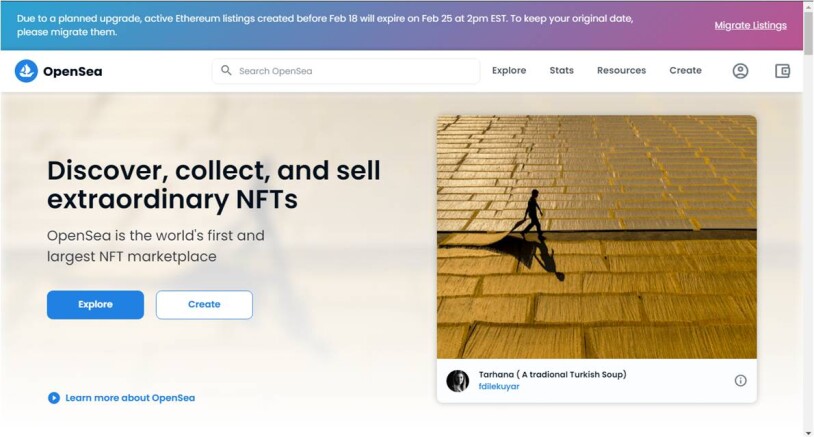
The first link that comes up should be the result you want. But always confirm you are going to https://opensea.io/, or copy this link into your browser.
- THIS IS THE OFFICIAL OPENSEA WEBSITE! ALWAYS MAKE SURE THE ADDRESS MATCHES THIS IN YOUR OPENSEA NFT QUESTS!
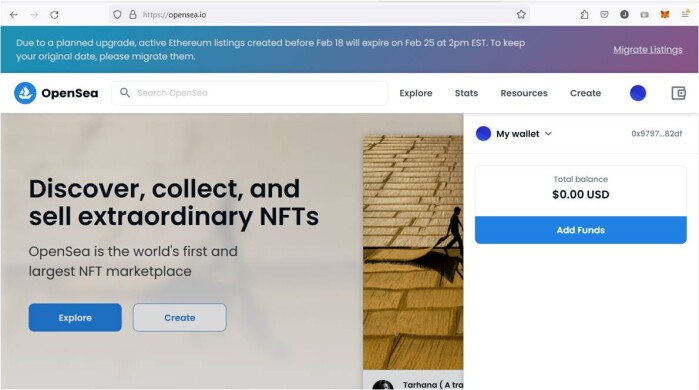
You should land on a page that looks like that pictured below. Click the symbol in the right uppermost portion of the web page that looks like a wallet next to the blank profile picture. You will now connect your Metamask wallet to Opensea.
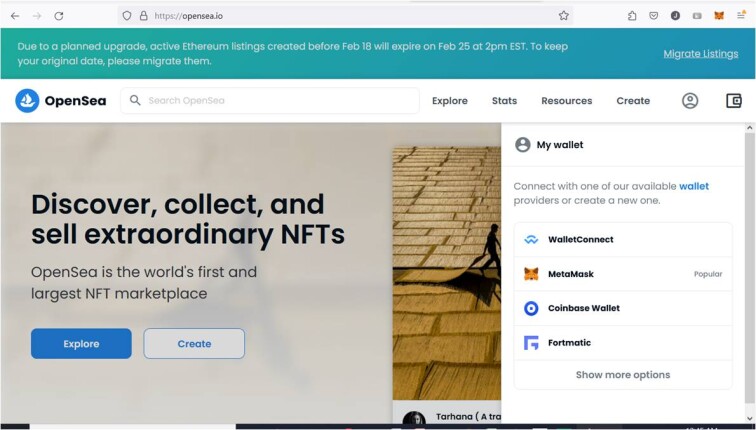
When you click the wallet icon, follow the prompts below I provide in pictures and text that follow to complete the login.
After clicking the wallet symbol, you will see this prompt on the right side of your screen as in image below. Click "Metamask" making sure you are already signed into the web-browser' Metamask application.
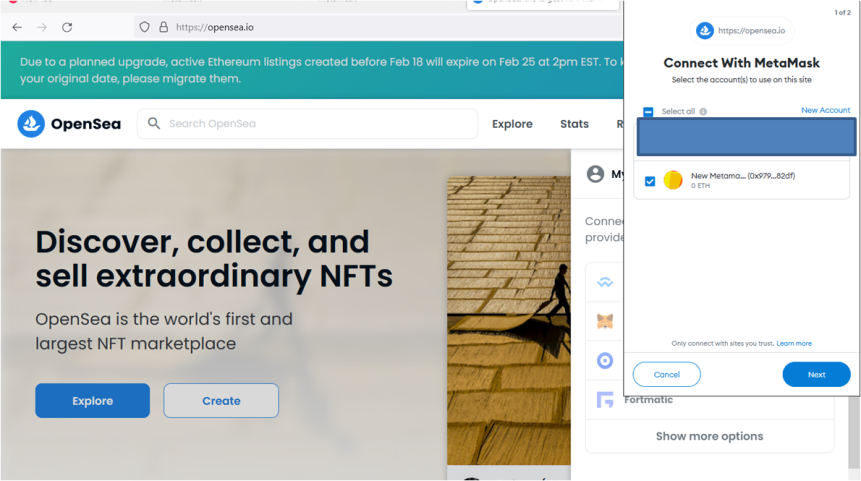
When you click "Metamask" the prompt below will appear (without the blue rectangle). Your own Ox wallet numbers will be reflected in the information. Click "Next"
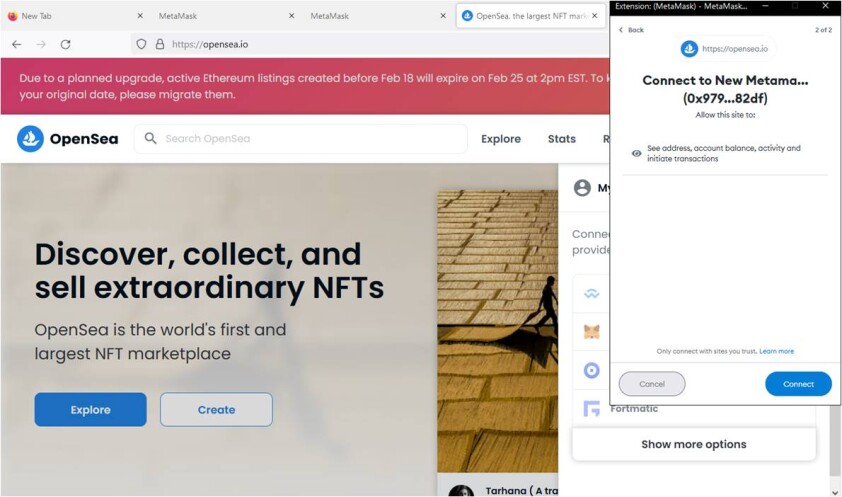
After you click Next" there will be one final prompt as seen below to connect Opensea with Metamask. Click the "Connect" button.
After hitting connect, you'll notice that the originally blank profile photo has changed and matches that of your Metamask wallet (Mine in example turned from black white above, to blue below).
Now you're Opensea is connected to your Metamask!
This is now how you login into Opensea each time. Essentially just connect your Metamask and your wallet of choice within it.
You'll want to click on the blue circle and follow the drop-down menu that looks like the one below to adjust your profile and settings.
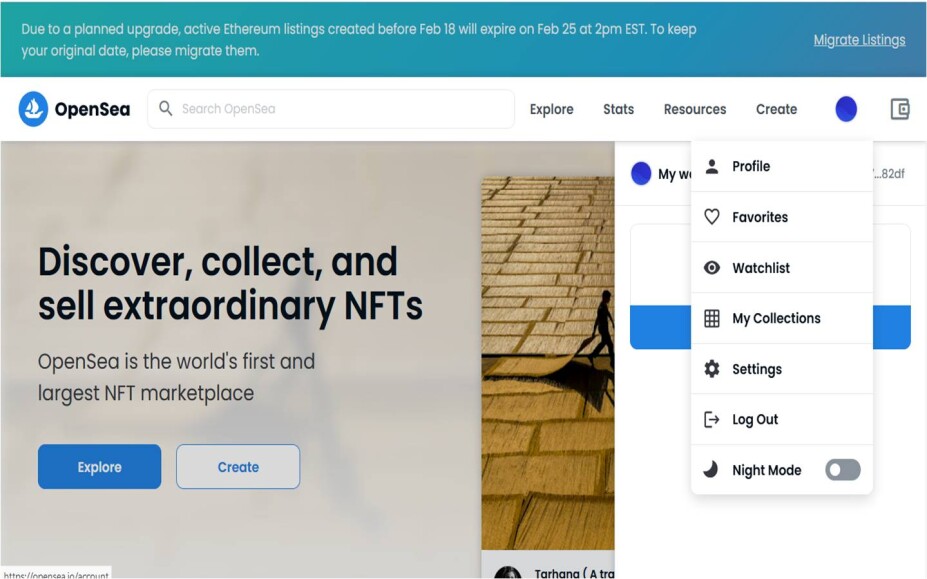
Click on "Profile" under the dropdown menu.
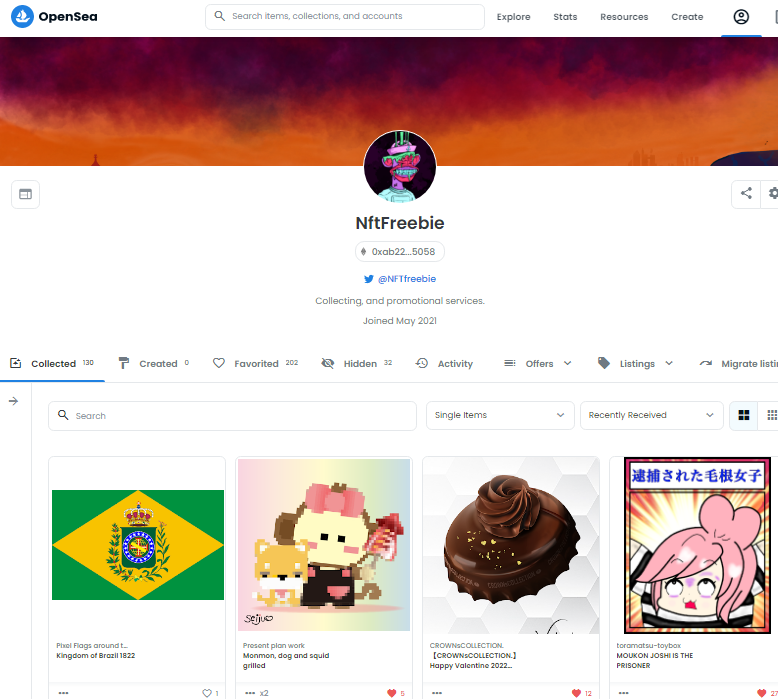
You'll go to your profile page for Opensea. My own page is pictured below and has some NFTs in it already. Yours will be empty as you do not yet have NFTs. But as you get some they will be here for you in your respective Opensea.
- Note, NFTs first show up under the "hidden" tab where you have to unhide them if you want them in your public portion of your collection (because NFTs are on the blockchain). As I have done, you can do things like customize your banner and profile picture, connect your Twitter account, and create watchlists and such for NFTs and projects you like. Find cool NFTs and projects by using the main search bar. There are 30 million or so NFTs that are for ale on Opensea.
Congratulations!
The address that is now your Ethereum / Polygon address in Metamask and that you connected to Opensea is all you need to give someone for them to send you a free NFT by way of a transfer.

You can share your wallet address with the Ox for NFTs relatively safely. BUT read some of the things I mention below before doing so.
- If you win an NFT giveaway contest, this makes it so simple, you just give the wallet address, and someone can send it to you.
- You'll notice you can easily copy the address from Opensea, or from your wallet.
- Each platform provides a convenient "copy" button right there for you to copy your wallet address.

So you might want to ask me:
"Netzien, I actually did all that, can I now have my free NFT?" I feel you. Free NFTs are addicting and you have not even started yet.
Sure.
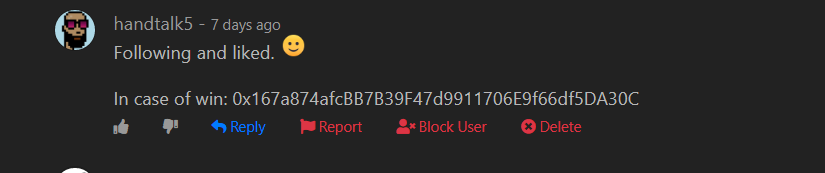
Pictured below is an "ideal entry" on a future PublishOx NFT giveaway I will do.
-
This was one of the responses and comments from my previous NFT giveaway for CyberPunk #1120. You can see in the comment on the post that the entrant actually put his wallet address.
-
EVERYONE (including YOU) who posts a comment with a wallet address like the comment below will win a FREE NFT in a FUTURE NFT giveaway contest that will be exclusive to PublishOx.
You are ready for the new World Neo.
- If someone asks you for your ETH / Polygon wallet address to send a "free NFT," the address you just created is what you can give. Only give the address, no other personal or password-related information.

Note also, you can create multiple addresses in Metamask so that you can have a Free NFT giveaway address that is more shared than other more private addresses.
- For example, you might set up a wallet strictly for other things, like your extra girlfriends and boyfriends and secret projects, haha.
- You might also create multiple wallets in your Metamask with one just for "free NFT giveaways."
- Making additional wallets is very easy.
- If you've come this far, just look up how to do it on your own. It's one or two clicks in your Metamask app.
- If you do this a lot on Twitter, I suggest a Twitter account only for NFT giveaways because usually people doing the NFT giveaways ask that you follow them - you'll mess up your follower count ratios on a personal Twitter account pretty fast.
- Note that many giveaways only ask for your address in a private message if you win to help protect privacy.

Having done all this, keep in mind, you can also now easily participate in a TON of free NFT giveaways and similar contests on Twitter. Some with serious prizes.
- Yea, many NFT giveaways on Twitter are fakes - most are just looking for new followers, but plenty want you to do other crap. Block them.
- Never share information beyond your wallet address and if it smells rotten, just stay away.
- There are some are really great opportunities right now that only require simple entry with a wallet address essentially, like retweeting, liking, and following. Some offer a chance to win very valuable prizes or NFTs. Some of the odds on winning are interesting enough to have a look imho.
- Like elsewhere, if entering contests, always use the precautionary principle with respect to your safety, personal and private information.
You can see a post for a typical Twitter NFT giveaway and entry below for my own Twitter account where I do cool giveaways https://twitter.com/NFTfreebie.
- If you are on Twitter and in doubt about whether or not something is a real giveaway, just DM me there. Happy to help.
As seen below some people entering NFT giveaways contests share their wallet addresses in their reply-tweet without being asked (much like the above screenshot for my PublishOx Cyberpunk #1120 NFT giveaway).
-
It makes things so much easier for guys like me.
- His "official" entry below required liking, retweeting, following a couple people on Twitter, and tagging a friend in reply comments seen below.
- That qualified him, but he simply left his wallet address to make it easier or because he's just copying and pasting into as many entries as possible.
It's established as very common practice in free NFT giveaways, to share the wallet address as above.
But, be careful with any unexpected things that may arrive at the wallet address.
- There are scams and Nigerian Princes (no offense my for-real Nigerian bro's and aspiring princes on here) that have $1 million ready to transfer to your bank account. As creative as good NFT artists are, so are the scammers.
There are people spamming NFT addresses, such as below. Though I've only got one ever.
- For example, check this tweet out below about a spam NFT found in a wallet. In many cases, until you know what it is, you should remain "hands-off" and don't click or follow any associated links, etc. Usually, I don't get unsolicited stuff. People are just too busy in the space.
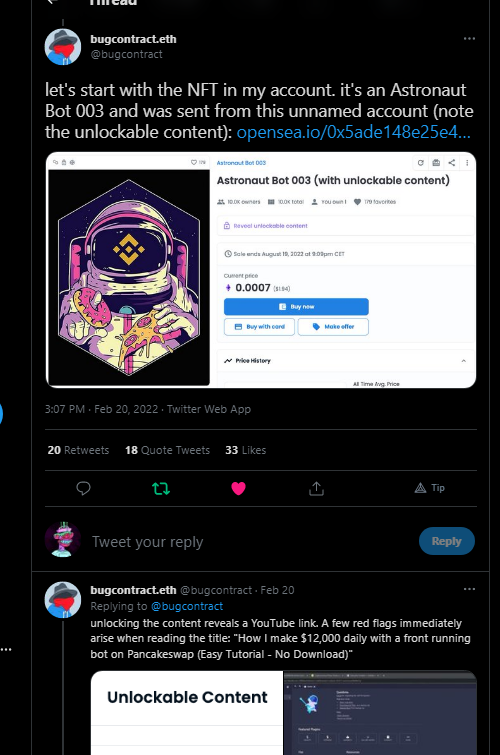
One good reason to maybe MAKE MULTIPLE WALLET ADDRESSES WITHIN YOUR METAMASK (see info. above).
This article will actually greatly facilitate future PublishOx giveaways I will do because PublishOx has no direct message system (I don't blame them, too hard to monitor spam, seriously).
FINALLY
PLEASE KEEP THIS IN MIND ABOUT METAMASK FEES (HIGH!) FOR CRYPTO MIGHT SEND TO YOUR NEWLY CREATED WALLET:
-
High fees may apply for crypto leaving the place you hold when sending to Metamask. High gas fees will for sure apply.
-
It will cost you to get crypto to Metamask, especially ETH.
-
-
There can also be especially high fees for Metamask when you withdraw the funds from Metamask to somewhere else, in addition to any gas fees.
-
A lot of people have some ETH stuck there because of this!
-
Remember, we are just focusing on Metamask for receiving free NFTs right now, no fees for that on Polygon /ETH as you now have it set up.
- With ETH / Polygon networks and wallet address(es) set up like you now have, you can get NFTs transferred to you for free and transfer to friends for free.
Did you make it this far friend? Wow. I'm impressed. We can hang out any time.

This really did take some time to write - and is one reason I was a little less active here since the last giveaways. I wanted this READY 100 for upcoming NFT giveaways I have planned that are going to be WILD!
ALL this perfectly sets you up to get your first free NFT and a whole lot more in the world of NFTs
Your NFT game is now on a WHOLE NEW LEVEL.

Welcome aboard this ship friend. Soon, you'll be an NFT HODL'er.

After a while, you'll know what I mean and why I will now sign off with encouragement for you in the form of: LFG and WAGMI.
See you at the next PublishOx NFT giveaway.

Netzien