
Every application created will definitely have updates. This shows that the application is widely used and useful for many people. Likewise with PFSense, one of the router firewall applications with the largest community, it always updates almost every year, sometimes even releasing the latest version. Every update process carried out by PFSense covers the version it releases. This aims to increase the depth and benefits of the system for many people. With the update process, it assures us that the developers have been actively monitoring the use of PFSense. PFSense, which is part of the Netgate product, regularly and continuously releases the latest version which contains new features, updates, bug fixes and various other changes. In some cases, the PFSense update process is very important, because it really overcomes the shortcomings of the features of the latest release released by Netgate. PFSense always updates using the same software edition as the firewall router you are currently using. Considering the importance of the update process on PFSense, in this post we will explain a little about how to update PFSense version 2.7.2-RELEASE (amd64). Writing this article is based on the author's experience in using PFSense for the WIFI Hotspot business. To update PFSense, the author used two methods:
- Updates via Web GUI, and
- Update via Command line (shell)
1. Updates via Web GUI
The updating process with the Web GUI is very easy, because you just have to execute the command by clicking on the update menu. To make the first update, you can do it on the PFSense dashboard display, look at the image below.
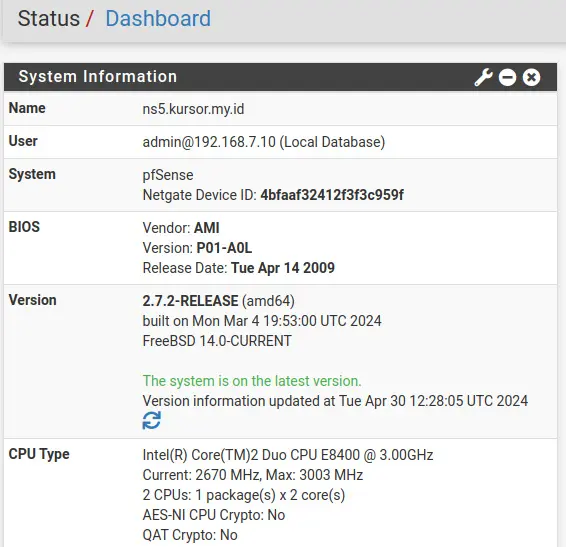
Pay attention to the green writing, you just click on the circular arrow, then the update process will run automatically. Another way you can do this is by clicking the System ->> Update.

2. Update via Command line
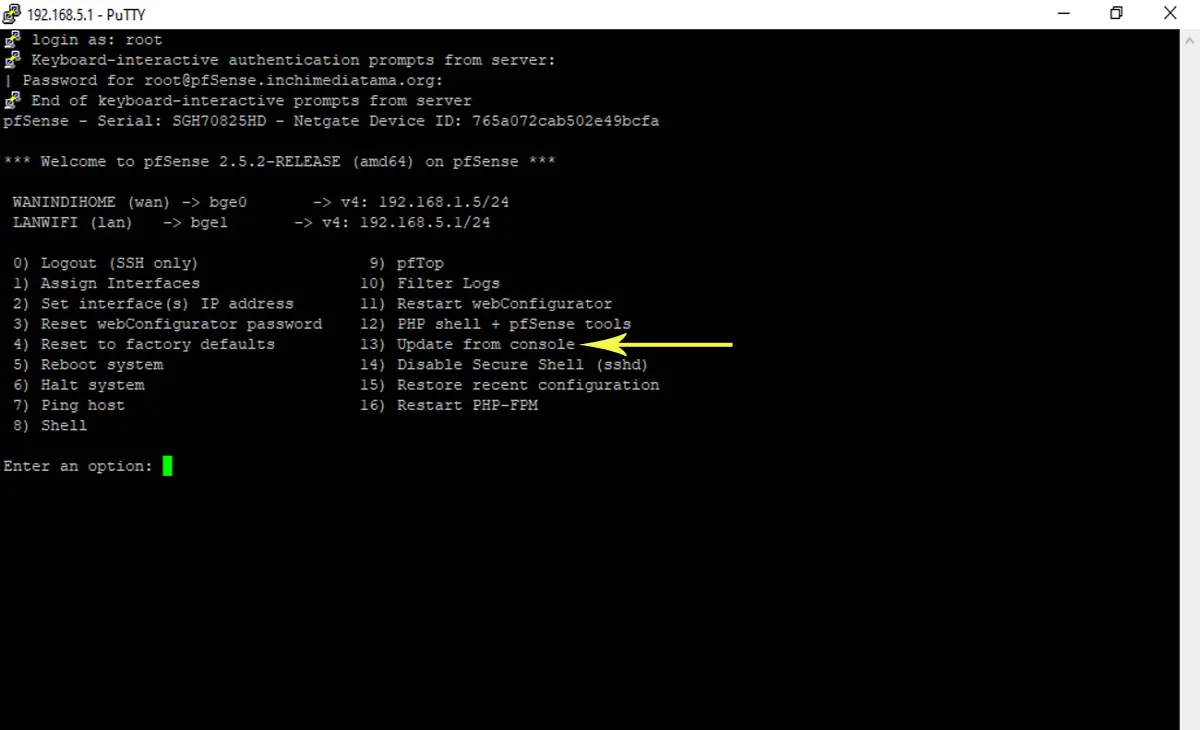
During the update process using the Command line, you must enable SSH in PFSense. Once you have successfully enabled SSH, if you are using a Windows computer you can run Putty. In the Putty menu, type your IP address, PFSense user, and password. After you have successfully logged in, type the number 13 to start updating PFSense using the Command line, see the example below.
Then there is another way to update PFSense using the Command line. This method is the best method and we highly recommend it. Because the update process uses PKG packages like FreeBSD has. In the Putty or Remmina menu if you are using Ubuntu Desktop, select number 8 and you will immediately be shown the PFSense shell command. Because the update process uses the PKG package, the update method is almost the same as FreeBSD. Run the following command to start the update process.
### Example Update PFsense with package PKG ###

[2.7.2-RELEASE][[email protected]]/root: pkg update -f
Updating pfSense-core repository catalogue...
Fetching meta.conf: 100% 163 B 0.2kB/s 00:01
Fetching packagesite.pkg: 100% 1 KiB 1.5kB/s 00:01
Processing entries: 100%
pfSense-core repository update completed. 4 packages processed.
Updating pfSense repository catalogue...
Fetching meta.conf: 100% 178 B 0.2kB/s 00:01
Fetching packagesite.pkg: 100% 157 KiB 160.4kB/s 00:01
Processing entries: 100%
pfSense repository update completed. 550 packages processed.
All repositories are up to date.
After that, you continue with the upgrade process. Run the command below to start the PFSense upgrade process.
### Example Upgrade PFsense with package PKG ###

[2.7.2-RELEASE][[email protected]]/root: pkg upgrade -f
The method above is how to update PFSense with the PKG package. There is another way to update, namely with the "pfSense-upgrade" command, pay attention to the example of using this command.
### Example Upgrade PFsense with pfSense-upgrade ###


[2.7.2-RELEASE][[email protected]]/root: pfSense-upgrade -d -f -u -c
>>> Updating repositories metadata...
Updating pfSense-core repository catalogue...
Fetching meta.conf: . done
Fetching packagesite.pkg: . done
Processing entries: . done
pfSense-core repository update completed. 4 packages processed.
Updating pfSense repository catalogue...
Fetching meta.conf: . done
Fetching packagesite.pkg: ......... done
Processing entries: .......... done
pfSense repository update completed. 550 packages processed.
All repositories are up to date.
You can also use the "pfSense-upgrade" command to install the PFSense package. We will demonstrate installing the Squid Proxy package as an example.
### Example Install Squid Proxy with pfSense-upgrade ###

[2.7.2-RELEASE][[email protected]]/root: pfSense-upgrade -i squid

>>> Installing squid...

Updating pfSense-core repository catalogue...

Fetching meta.conf:

Fetching packagesite.pkg:

pfSense-core repository is up to date.

Updating pfSense repository catalogue...

Fetching meta.conf:

Fetching packagesite.pkg:

pfSense repository is up to date.

All repositories are up to date.

Checking integrity... done (0 conflicting)

The following 2 package(s) will be affected (of 0 checked):


New packages to be INSTALLED:

krb5: 1.21.2 [pfSense]

squid: 6.3 [pfSense]


Number of packages to be installed: 2


The process will require 12 MiB more space.

[1/2] Installing krb5-1.21.2...

[1/2] Extracting krb5-1.21.2: .......... done

[2/2] Installing squid-6.3...

===> Creating groups.

Using existing group 'squid'.

===> Creating users

Using existing user 'squid'.

===> Creating homedir(s)

===> Pre-installation configuration for squid-6.3

[2/2] Extracting squid-6.3: .......... done

=====

Message from squid-6.3:

--

o You can find the configuration files for this package in the

       directory /usr/local/etc/squid.


     o The default cache directory is /var/squid/cache/.

       The default log directory is /var/log/squid/.


       Note:

       You must initialize new cache directories before you can start

       squid.  Do this by running "squid -z" as 'root' or 'squid'.

       If your cache directories are already initialized (e.g. after an

       upgrade of squid) you do not need to initialize them again.


     o When using DiskD storage scheme remember to read documentation:

         http://wiki.squid-cache.org/Features/DiskDaemon

       and alter your kern.ipc defaults in /boot/loader.conf. DiskD will not

       work reliably without this. Last recomendations were:


         kern.ipc.msgmnb=8192

         kern.ipc.msgssz=64

         kern.ipc.msgtql=2048


     o The pre-translated error pages are no longer included into the port.

       If you need them install www/squid-langpack port as well.


     o The default configuration will deny everyone but the local host and

       local networks as defined in RFC 1918 for IPv4 and RFCs 4193 and

       4291 for IPv6 access to the proxy service.  Edit the "http_access

       allow/deny" directives in /usr/local/etc/squid/squid.conf

       to suit your needs.


     o If AUTH_SQL option is set, please, don't forget to install one of

       following perl modules depending on database you like:

         databases/p5-DBD-mysql

         databases/p5-DBD-Pg

         databases/p5-DBD-SQLite


     To enable Squid, set squid_enable=yes in either

     /etc/rc.conf, /etc/rc.conf.local or /etc/rc.conf.d/squid

     Please see /usr/local/etc/rc.d/squid for further details.


     Note:

     If you just updated your Squid installation from an earlier version,

     make sure to check your Squid configuration against the 3.4 default

     configuration file /usr/local/etc/squid/squid.conf.sample.


     /usr/local/etc/squid/squid.conf.documented is a fully annotated

     configuration file you can consult for further reference.


     Additionally, you should check your configuration by calling

     'squid -f /path/to/squid.conf -k parse' before starting Squid.

>>> Cleaning up cache... done.
If you want to remove the Squid proxy package from PFSense, run the command below.
### Example Remove Squid Proxy with pfSense-upgrade ###

[2.7.2-RELEASE][[email protected]]/root: pfSense-upgrade -r squid

>>> Removing squid...

Checking integrity... done (0 conflicting)

Deinstallation has been requested for the following 2 packages (of 0 packages in the universe):

Installed packages to be REMOVED:

pfSense-pkg-squid: 0.4.46

squid: 6.3


Number of packages to be removed: 2

The operation will free 8 MiB.

[1/2] Deinstalling pfSense-pkg-squid-0.4.46...

Removing squid components...

Menu items... done.

Services... done.

Loading package instructions...

Deinstall commands... done.

[1/2] Deleting files for pfSense-pkg-squid-0.4.46: .......... done

Removing squid components...
Before installing the PFSense package, get used to performing the update command first. This is to ensure you will get the latest version of the PFSense package that will be installed.






