
In this article we will explore IPFS, the InterPlanetary File System. Using a copy of the data CID or content identifier, IPFS helps you request data from any IPFS node. This process usually involves a distributed hash table lookup and may also require creating a new connection to the node that holds the content.
IPFS (InterPlanetary File System) is a peer-to-peer protocol that allows users to store and access files on a distributed network. But unlike the Web, IPFS is peer-to-peer based and automatically distributes its content across the network. Go IPFS is an implementation of IPFS written in Golang.
Introducing distributed networks
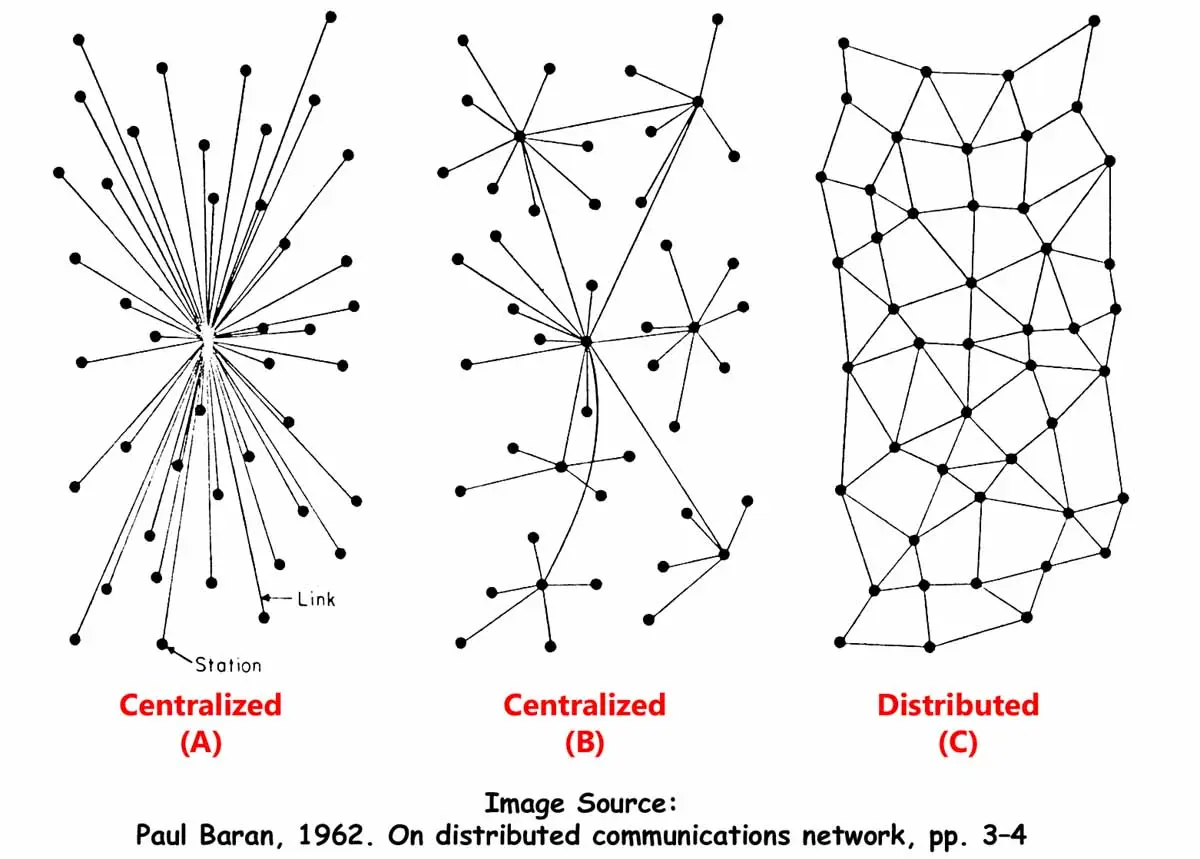
Distributed network architectures have become popular because of their adaptability, reliability and scalability. But every new technology also has its challenges. The interest or users of distributed networks are increasing day by day for several reasons. First, distributed networks allow enterprise architects to build a highly reliable foundation that can be used to run critical applications, even in the event of a major network or server outage.
A decentralized network on the other hand is a network where multiple such hubs exist. There still are central nodes which need to be passed by data packets in most cases, but when these central hubs crash, at least part of the network will continue to function. A distributed network is the most resilient kind of network where any single node can fail while all remaining nodes are still able to communicate with each other.
IPFS Installation and Configuration Process
Before you install IPFS on a FreeBSD server, the GO Lang application must be installed first. Read the article about installing Go Lang on FreeBSD. IPFS on FreeBSD 13.2 can only run with the Go language version: go119.
After you install Go Lang on FreeBSD, we continue by installing IPFS. If you are using PUTTY, type the command below in the PuTTY shell menu.
root@ns1:~ # rm -R -f /usr/local/bin/go
root@ns1:~ # ln -s /usr/local/bin/go119 /usr/local/bin/go
Then we continue by installing IPFS
root@ns6:~ # cd /usr/ports/sysutils/ipfs-go
root@ns6:/usr/ports/sysutils/ipfs-go # make install clean
Create a start up script in the /etc/rc.conf file.
root@ns6:/usr/ports/sysutils/ipfs-go # ee /etc/rc.conf
ipfs_go_enable="YES"
ipfs_go_user="ipfs-go"
ipfs_go_group="ipfs-go"
ipfs_go_path="/var/db/ipfs-go/.ipfs"
ipfs_go_syslog_priority="info"
ipfs_go_syslog_facility="daemon"
ipfs_go_syslog_tag="ipfs-go"
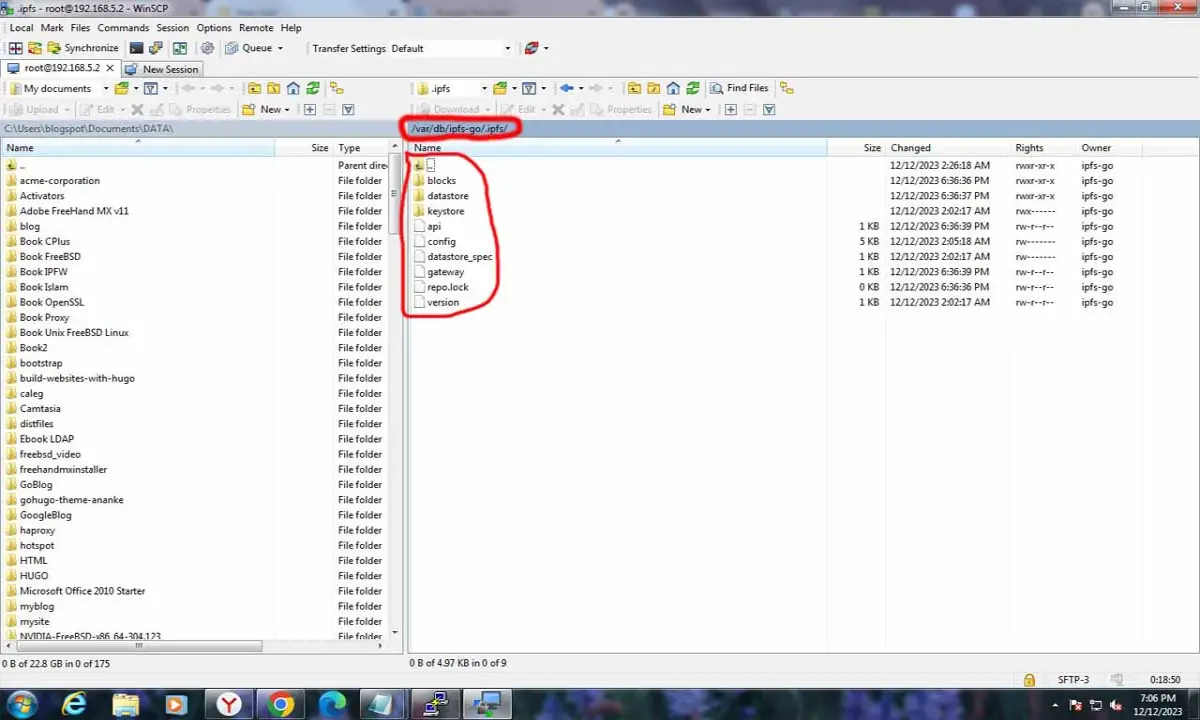
Then you open the configuration file "/var/db/ipfs-go/.ipfs/config", and edit its contents according to the script below.
{
  "API": {
    "HTTPHeaders": {
      "Access-Control-Allow-Methods": [
        "PUT",
        "POST"
      ],
      "Access-Control-Allow-Origin": [
        "http://192.168.5.2:5001",
        "http://localhost:3000",
        "http://127.0.0.1:5001",
        "https://webui.ipfs.io"
      ]
    }
  },
  "Addresses": {
    "API": "/ip4/192.168.5.2/tcp/5001",
    "Announce": [],
    "AppendAnnounce": [],
    "Gateway": "/ip4/192.168.5.2/tcp/8080",
    "NoAnnounce": [],
    "Swarm": [
      "/ip4/0.0.0.0/tcp/4001",
      "/ip6/::/tcp/4001",
      "/ip4/0.0.0.0/udp/4001/quic",
      "/ip4/0.0.0.0/udp/4001/quic-v1",
      "/ip4/0.0.0.0/udp/4001/quic-v1/webtransport",
      "/ip6/::/udp/4001/quic",
      "/ip6/::/udp/4001/quic-v1",
      "/ip6/::/udp/4001/quic-v1/webtransport"
    ]
  },
  "AutoNAT": {},
  "Bootstrap": [
    "/dnsaddr/bootstrap.libp2p.io/p2p/QmNnooDu7bfjPFoTZYxMNLWUQJyrVwtbZg5gBMjTezGAJN",
    "/dnsaddr/bootstrap.libp2p.io/p2p/QmQCU2EcMqAqQPR2i9bChDtGNJchTbq5TbXJJ16u19uLTa",
    "/dnsaddr/bootstrap.libp2p.io/p2p/QmbLHAnMoJPWSCR5Zhtx6BHJX9KiKNN6tpvbUcqanj75Nb",
    "/dnsaddr/bootstrap.libp2p.io/p2p/QmcZf59bWwK5XFi76CZX8cbJ4BhTzzA3gU1ZjYZcYW3dwt",
    "/ip4/104.131.131.82/tcp/4001/p2p/QmaCpDMGvV2BGHeYERUEnRQAwe3N8SzbUtfsmvsqQLuvuJ",
    "/ip4/104.131.131.82/udp/4001/quic/p2p/QmaCpDMGvV2BGHeYERUEnRQAwe3N8SzbUtfsmvsqQLuvuJ"
  ],
  "DNS": {
    "Resolvers": {}
  },
  "Datastore": {
    "BloomFilterSize": 0,
    "GCPeriod": "1h",
    "HashOnRead": false,
    "Spec": {
      "mounts": [
        {
          "child": {
            "path": "blocks",
            "shardFunc": "/repo/flatfs/shard/v1/next-to-last/2",
            "sync": true,
            "type": "flatfs"
          },
          "mountpoint": "/blocks",
          "prefix": "flatfs.datastore",
          "type": "measure"
        },
        {
          "child": {
            "compression": "none",
            "path": "datastore",
            "type": "levelds"
          },
          "mountpoint": "/",
          "prefix": "leveldb.datastore",
          "type": "measure"
        }
      ],
      "type": "mount"
    },
    "StorageGCWatermark": 90,
    "StorageMax": "10GB"
  },
  "Discovery": {
    "MDNS": {
      "Enabled": true
    }
  },
  "Experimental": {
    "AcceleratedDHTClient": true,
    "FilestoreEnabled": false,
    "GraphsyncEnabled": false,
    "Libp2pStreamMounting": false,
    "P2pHttpProxy": false,
    "StrategicProviding": false,
    "UrlstoreEnabled": false
  },
  "Gateway": {
    "APICommands": [],
    "HTTPHeaders": {
      "Access-Control-Allow-Headers": [
        "X-Requested-With",
        "Range",
        "User-Agent"
      ],
      "Access-Control-Allow-Methods": [
        "GET"
      ],
      "Access-Control-Allow-Origin": [
        "*"
      ]
    },
    "NoDNSLink": false,
    "NoFetch": false,
    "PathPrefixes": [],
    "PublicGateways": {
      "https://ipfs.io/": {
        "Paths": [
          "/ipfs",
          "/ipns"
        ],
        "UseSubdomains": true
      }
    },
    "RootRedirect": ""
  },
  "Identity": {
    "PeerID": "12D3KooWQkFkABHUCULXkPyRfrLA81dHXgC8evRhdYHWdMRrVcMX",
    "PrivKey": "CAESQNAw3t1E9zNXln5PV5RsoKpK6ewLYMmkNjm0m+5XRNys3dG3lvylqCjlHt88TbEkZDmu5n71YG9JLGMj1gbm5AI="
  },
  "Internal": {},
  "Ipns": {
    "RecordLifetime": "",
    "RepublishPeriod": "",
    "ResolveCacheSize": 128
  },
  "Migration": {
    "DownloadSources": [],
    "Keep": ""
  },
  "Mounts": {
    "FuseAllowOther": false,
    "IPFS": "/ipfs",
    "IPNS": "/ipns"
  },
  "Peering": {
    "Peers": null
  },
  "Pinning": {
    "RemoteServices": {}
  },
  "Plugins": {
    "Plugins": null
  },
  "Provider": {
    "Strategy": ""
  },
  "Pubsub": {
    "DisableSigning": false,
    "Router": ""
  },
  "Reprovider": {},
  "Routing": {
    "Methods": null,
    "Routers": null
  },
  "Swarm": {
    "AddrFilters": null,
    "ConnMgr": {},
    "DisableBandwidthMetrics": false,
    "DisableNatPortMap": false,
    "RelayClient": {},
    "RelayService": {},
    "ResourceMgr": {
      "Limits": {}
    },
    "Transports": {
      "Multiplexers": {},
      "Network": {},
      "Security": {}
    }
  }
}
Note the blue writing, the number 192.168.5.2 is your computer's local IP address. After that we run the command "ipfs-go init".
root@ns6:~ # ipfs-go init
root@ns6:~ # ipfs-go config --json API.HTTPHeaders.Access-Control-Allow-Origin '["http://192.168.5.2:5001", "http://localhost:3000", "http://127.0.0.1:5001", "https://webui.ipfs.io"]'
root@ns6:~ # ipfs-go config --json API.HTTPHeaders.Access-Control-Allow-Methods '["PUT", "POST"]'
Create an IPFS symlink to "/root".
root@ns6:~ # rm -rf /root/.ipfs
root@ns6:~ # ln -s /var/db/ipfs-go/.ipfs /root
Create the file "/var/db/ipfs-go/.ipfs/api".
root@ns6:/var/db/ipfs-go/.ipfs/ipfs # touch /var/db/ipfs-go/.ipfs/api
root@ns6:/var/db/ipfs-go/.ipfs/ipfs # ee /var/db/ipfs-go/.ipfs/api
/ip4/192.168.5.2/tcp/5001
Continue with the following command:
root@ns6:/var/db/ipfs-go/.ipfs/ipfs # service ipfs-go restart
Check and Test IPFS
Once everything is configured, the last step is to test whether the IPFS server is running or not. Basic proof that 'ipfs is working' locally. The first step is to create a folder "/var/db/ipfs-go/.ipfs/ipfs" to store all IPFS data.
root@ns6:~ # mkdir -p /var/db/ipfs-go/.ipfs/ipfs
root@ns6:~ # cd /var/db/ipfs-go/.ipfs/ipfs
root@ns6:/var/db/ipfs-go/.ipfs/ipfs #
After that we create IPFS data, this data will later be used on the peer to peer network via the IPFS Node.
root@ns6:/var/db/ipfs-go/.ipfs/ipfs # echo "FreeBSD IPFS local server" > TestIPFS
root@ns6:/var/db/ipfs-go/.ipfs/ipfs # ipfs-go add TestIPFS
added QmNeCaGW44nddxLZGQmk6GagSafb8gZwcou8YbvhW1wt5b TestIPFS
 26 B / 26 B [==========================================================================================================================================================] 100.00%
root@ns6:/var/db/ipfs-go/.ipfs/ipfs # ipfs-go cat QmNeCaGW44nddxLZGQmk6GagSafb8gZwcou8YbvhW1wt5b
FreeBSD IPFS local server
root@ns6:/var/db/ipfs-go/.ipfs/ipfs #
root@ns6:/var/db/ipfs-go/.ipfs/ipfs # echo "Test IPFS on FreeBSD" > FreeBSDTest.txt
root@ns6:/var/db/ipfs-go/.ipfs/ipfs # ipfs-go add FreeBSDTest.txt
added QmZiaPkqkAsgcCyc84wLnbQnweSj9s2CuJbBSXVzyihshk FreeBSDTest.txt
 21 B / 21 B [==========================================================================================================================================================] 100.00%
root@ns6:/var/db/ipfs-go/.ipfs/ipfs # ipfs-go cat QmZiaPkqkAsgcCyc84wLnbQnweSj9s2CuJbBSXVzyihshk
Test IPFS on FreeBSD
root@ns6:/var/db/ipfs-go/.ipfs/ipfs #
The final step is restarting IPFS
root@ns6:/var/db/ipfs-go/.ipfs/ipfs # chown -R ipfs-go:ipfs-go /var/db/ipfs-go/.ipfs/
root@ns6:/var/db/ipfs-go/.ipfs/ipfs # service ipfs-go restart
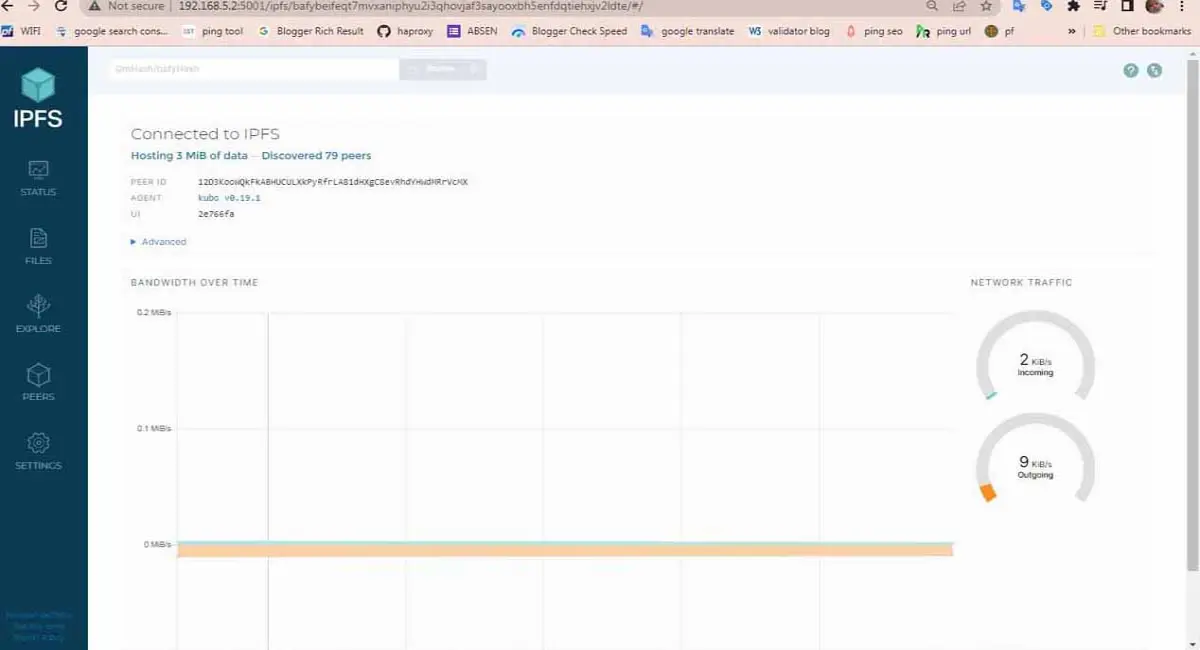
Once you are connected to the IPFS Node, now try typing the CIDS from the "FreeBSDTest.txt and TestIPFS" files we created earlier, notice the CIDS in blue above.
In Yandex Browser or Google Chrome enter the following command:
http://192.168.5.2:8080/ipfs/QmNeCaGW44nddxLZGQmk6GagSafb8gZwcou8YbvhW1wt5b
http://192.168.5.2:8080/ipfs/QmZiaPkqkAsgcCyc84wLnbQnweSj9s2CuJbBSXVzyihshk
In this tutorial, you learned how to install Go IPFS on FreeBSD Latest. IPFS can be a useful tool for storing and sharing files on a distributed network. If you have any issues or questions, refer to the IPFS documentation or the FreeBSD forums.






