
Before we begin making books, there are a few tools that every book binder needs. The list will obviously vary depending on the type of book you want to make, but there are some tools that you will always need, so we will take a look at them here.
NOTE: there are many places online including Amazon that can provide you with the tools you need, but if you're like me and prefer to go to a shop, then Hobbycraft in the UK is definitely the place to go as you can get a lot of useful tools there.
So what do we start with? For me a good, clean place to work is key, so a large A1 cutting mat is first on my list. These can be slid behind a cupboard out of the way when not being used and make for a quick and easy work surface. Get it out and put it on your table if space is limited. If not, then leave it out ready. This will also protect any surfaces you do work on and is easily cleaned.

What next? All books have pages, so the next two items on my list are a bone folder (although no longer made from bone) and an awl or punch. The bone folder is normally made from a hard plastic and is used for creating sharp folds. The awl is for punching holes through your pages to make stitching easier and neater.

Just think, if you use the needle to punch the hole when stitching, then you would need a very good eye to be sure the distance between each hole is the same. It is just easier to measure where you want your holes, then punch through with the awl ready for sewing.
NOTE: Don't worry too much about all the finer details. These will all be covered when we come to make the books. For now, the main thing is getting the right tools for the job.
You will always need knives and scissors, so I recommend investing in some decent ones. If you do get a good pair of scissors, then I can recommend Fiskars. They also sell a sharpening tool for their scissors. As for the knives, I have a mixture of craft knives and more durable knives for cutting board.
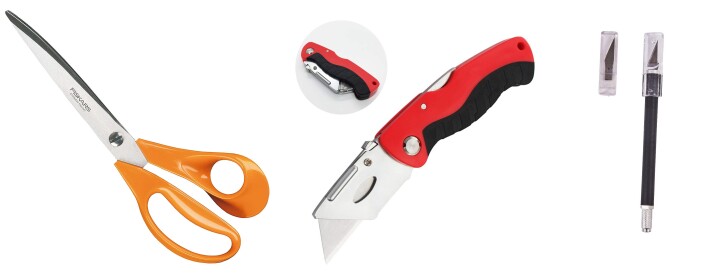
Depending on what you are doing, different knives have different uses. The folding knife is more robust and can be used to cut board for your covers. The scalpel is used for small, more intricate work. A lot of book binders also have a large blunt knife. This is used for tearing paper rather than cutting it.
You may wonder why you would not cut the paper and the answer is simple. For some books, a deckled (ripped) edge is preferred. Especially if you are using handmade paper such as Khadi paper for the pages. Pressed water colour paper also sometimes comes with rough edges and this gives your books a more rustic look.
Rulers are another necessity when it comes to book binding and like most tools, I have several for different reasons. You will need some form of safety ruler so that you can cut paper and board (more importantly board) without slipping and risking your fingers. I also have some smaller rulers that I can quickly pick up to measure paper or distances when making overs. My safety ruler is long and bulky.
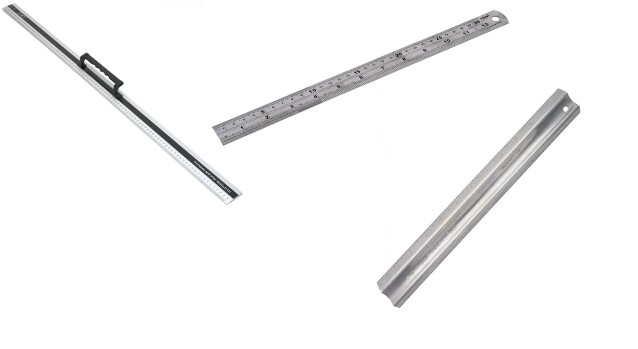
I think blogs like this are good for sharing tips and tricks that you pick up. While we are talking about rulers, I would just like to share a tip with you that annoyed me for sometime.
When I wanted to trim the pages so they all lined up nicely, I would use a folding knife with a new blade and my long ruler. As I repeatedly cut through the stack of pages, I noticed a grey mark appearing on the edges. This was difficult to remove. I tried erasers, even sanding the edges, but nothing. I then realised what the problem was.
As the side of the blade slid along the ruler, the ruler was leaving a grey mark on the blade. This was coming from the ruler itself as it's made from aluminium. When I switched to a steel ruler, the marks didn't appear again.
Another important tool that you will almost certainly use all the time is the needle. It would be difficult to stitch a book without one, but which one do you choose? Isn't a needle just a needle? Online you can get some get sets, but I would always make sure you have some straight and curved needles.

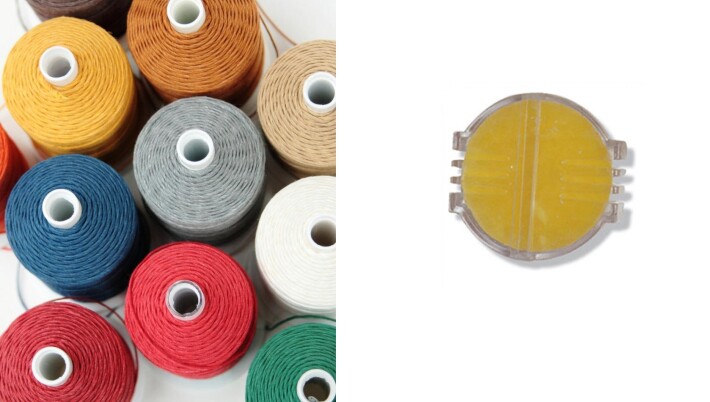
To go with your needles you will need some thread to bind the pages together. This is a difficult area, especially if you are making a book with an exposed spine. As the thread will be on display, you want something that is both eye catching and durable. There is no right or wrong answer to this and I've seen a lot of people suing coloured cotton thread, similar to embroidery floss.
My only concern when choosing thread is the strength. You want the book to last, so a strong thread is essential. For me, I always use a linen thread with as many strands as possible.
Another point to consider is if the thread is waxed or not. You will be feeding the thread through many holes in the paper. Having it waxed will make the process easier and cause less stress on the thread itself. If you cannot find any waxed, then you can buy a block of wax and run the thread over it several times.
Now you have an idea of the tools needed to make books. You can get by with just the minimum, but having a choice of different tools will make sure your books are the best they can be.
The next thing that comes after your basic tools, are the more advanced tools. These are more for people who make a lot of books. These tools make things easier, quicker, but most importantly, give your finished books a bit more of a professional look.
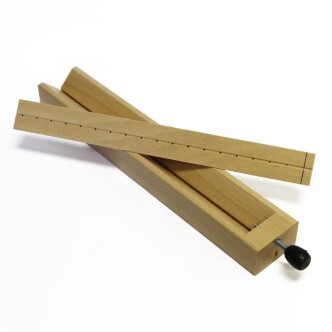
The first of these and my favourite is the punch guide made for evenly spacing out the holes you punch in the paper ready for binding. There are many cheap, homemade alternatives, but using this guide is so much easier.
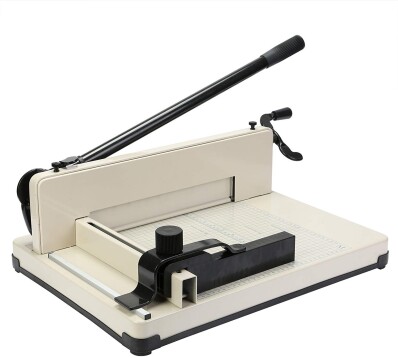
Another favourite of mine is the table top guillotine. While this is an expensive piece of equipment, it allows all your pages to be cut to the same length and in bulk. This makes your books look neater and more professional. The one I use is shown in the picture below.
I also have a smaller, more portable rotary cutter that I can throw in my bag and carry around with me if I'm travelling or anything.
There are many other useful tools when it comes to bookbinding and I have a range of hole punches for making neat holes in the covers. I also have a tool for applying brass corners to my covers.
One of my new toys is a heated pen for my Cricut Air Explore 2. For those of you not familiar with the Cricut, it's an automated tool for drawing, cutting and scoring. You can make cards, books, all sorts with it and is worth the investment for any crafter. The Foil Quill Pen I have to go with it allows you to apply gold foil to your books.
There will be many more tools that I have forgotten about or not come across before, but at least you have an idea of some of the tools that can be used to help with your bookbinding.
The next post is going to show you how to use some of these tools to make a lovely notebook.


