
What is Truffle Suite?
Truffle is the world’s most popular blockchain development suite. Using their own words:
“A world-class development environment, testing framework, and asset pipeline for blockchains using the Ethereum Virtual Machine (EVM), aiming to make life as a developer easier.”
If you’re stuck wondering how to start writing full-stack Ethereum decentralized applications (DApps), consider using Truffle Suite.
Truffle Boxes
Truffle Boxes are boilerplate projects that come prepackaged with a bunch of dependencies installed for you. This saves the hassle of starting a blank Truffle project from scratch and having to install and configure your own.
For example, if you love Vue.js and want to use that in your project, you could unbox the Vue.js Truffle Box.
My favorite is the React Box. Pretty much every project I start begins by unboxing this particular Box.
My issue is that I almost always use Redux and Bootstrap as well, which don’t come with it. I install these and perform the same folder structure housekeeping every time.
After a while, this jiggery-pokery became monotonous and like any developer worth their salt, I saw an opportunity to automate it. So, I created a Truffle Box! Here’s how.
Creating the Box
Truffle has good documentation on how to create a Truffle Box. Each Box essentially revolves around a truffle-box.json configuration file. This file dictates what commands should be run at the point of unboxing so that it’s ready to go.
Because I was so used to starting with the React Truffle Box, I saw this as a good starting point. The code is available on GitHub, so I forked the project and got to work performing the same housekeeping I do every time I start a new project.
Extending React Box
First of all, I’ll explain the folder structure that comes with the React Box.
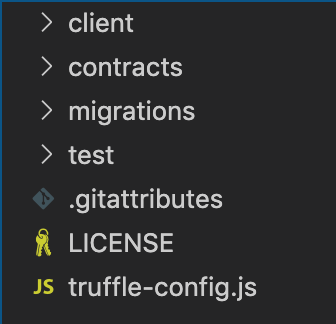 Figure 1: React box folder structure
From the top down:
client/— Where the front-end code lives. All of our compiled contracts and React components go here.contracts/— Code for smart contracts lives here.migrations/— Deployment scripts for migrating your smart contracts to the blockchain live here.test/— Files for testing your smart contracts live in here..gitattributes— Houses some config for Git (don’t worry about this).LICENSE— Box license (again, don’t worry about this).truffle-config.js— The configuration for the project. Stuff like Solidity compiler version and network details live in here.
I don’t ever change the structure of the root folder, so this structure is consistent with the new box. Inside the client/ folder is where I’ve made the alterations.
Adding dependencies
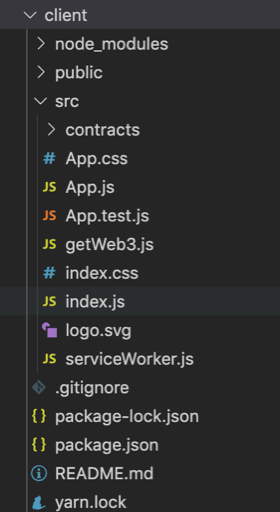 Figure 2: client/ folder
Figure 2 shows what the client/ folder looks like in the React Box, once the contracts have been compiled. (Our truffle-config.js file states that compiled smart contracts are to be stored in client/src/contracts/.)
The existing dependencies that come with the Box are react, react-dom, react-scripts, and web3. It’s bare-bones, which makes the Box flexible.
As I mentioned earlier, I always add Redux and Bootstrap, so after adding them and a few others, figure 3 shows what package.json looked like.
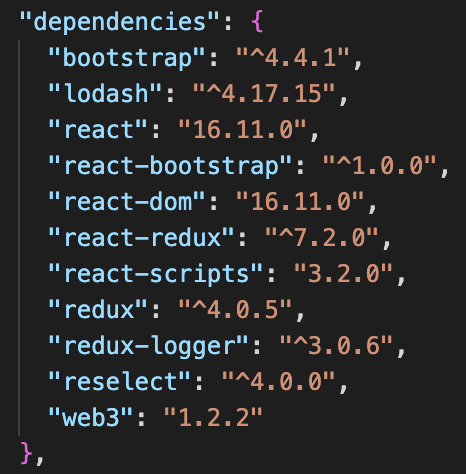 Figure 3: package.json snippet after adding new dependencies
The new dependencies are: bootstrap and react-bootstrap for front-end styling; redux, redux-logger, and react-redux for integrating Redux; and lodash and reselect for selectors (more on this later).
Redux folder
I always place my Redux code in a folder to keep it separate from the component files.
When coding the Redux side of any DApp, I follow the IARS paradigm for structuring Redux code, which comprises of four files: interactions.js, actions.js, reducers.js, and selectors.js.
After adding these, the folder structure looked like this:
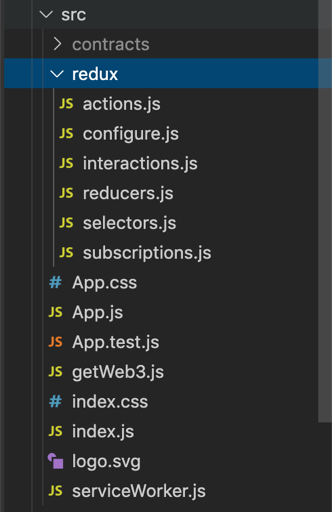 Figure 4: Adding the redux folder
You’ll notice there are two files that I haven’t yet mentioned: configure.js which contains some boilerplate configurations for Redux to work, and subscriptions.js which we’ll get back to shortly.
Load the blockchain
A good Truffle Box should contain enough code to run out-of-the-box (pardon the pun). This allows the developer to tinker with code and examine what changes in the DApp.
For example, the React Box loads the blockchain on loading the page, then retrieves data from the SimpleStorage smart contract, and displays it on the page.
The problem with this workflow is that unless MetaMask is ready for the DApp (the user is logged in and on the correct network), it will result in an error that can spook new developers.
Instead, I wanted the DApp to only load blockchain data when a “connect” button was clicked on the page. This button would call an interaction that would load web3 and the blockchain data.
It would then dispatch an action caught by a reducer which saved the data in the Redux store. Then, a selector could be used by a component to retrieve the data from the store.
The getWeb3.js file contains a listener that waits until the window is loaded before retrieving web3. I deleted this so that it can be called by an interaction, rather than a window event.
Next, I removed everything from the App.js component file and started rewriting my own. All I needed was a button, and a few labels to display web3 and blockchain information once it gets loaded.
 Figure 5: Button code.
 Figure 6: Contents of connectBlockchain() function.
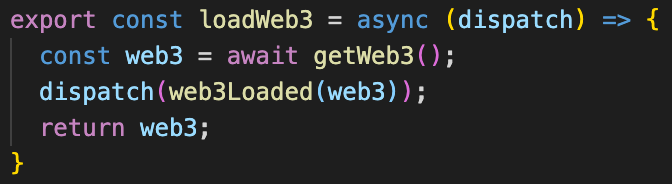 Figure 7: loadWeb3() function in interactions.js.
 Figure 8: web3Loaded() action.
Figures 5, 6, 7, and 8 show the sequence of code that is executed when the connect button is clicked. From the action in figure 8, the reducer stores the web3 instance in the Redux store, shown in figure 9.
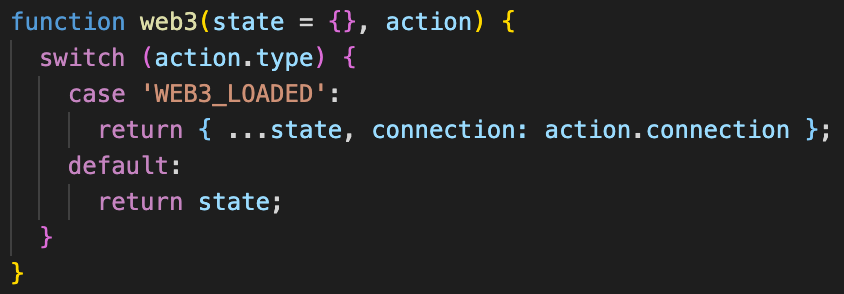 Figure 9: Web3 reducer
Load contract
Since I wanted to make as much use as possible of the existing code provided by the React Box, I kept the SimpleStorage smart contract.
To display data from it, the DApp needs to load the deployed smart contract in the same way that it loaded the blockchain. In the connectBlockchain() function, I added the following lines:
 Figure 10: Load the smart contract data
I then added the subsequent interaction, action, and reducer. The same goes for loading the current account being used by MetaMask to interact with the DApp.
Using selectors
So long as everything is wired up correctly, components will be able to use selectors to retrieve data from the Redux store and display on the page.
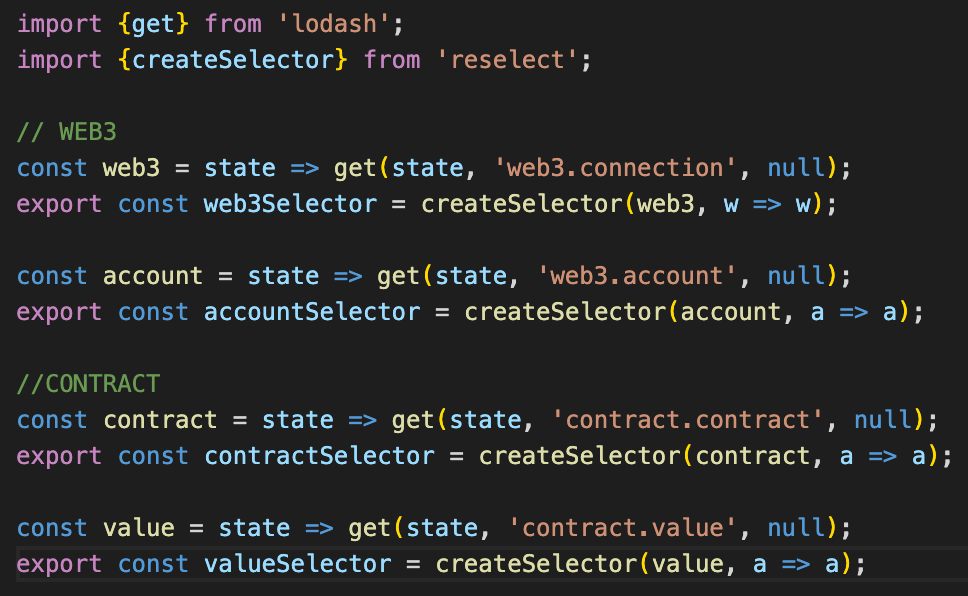 Figure 11: Selectors.js
Selectors.js is where the lodash and reselect dependencies are used.
Subscribe to account change
There’s one last thing I wanted to include in the box before finishing. MetaMask no longer supports reloading the account on the account changing, which means DApps have to listen for when the user changes it.
This is never really implemented by default, and it can take a long time to dig through documentation (especially for new developers) to find how to solve it.
The subscriptions.js file that I mentioned earlier is where the event listening lives.
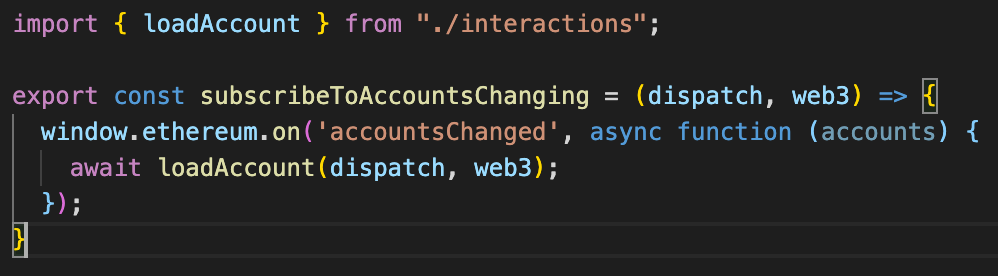 Figure 12: subscriptions.js
By adding this small function, the data in the Redux store will be reloaded any time the user changes their active account.
Final Truffle Box
Having added these features, this is what the page looks like on initial unboxing, running the migrations and starting the client.
Figure 13: Front End
In the video shown in figure 13, the DApp connects to the blockchain when the button is clicked, and loads account information and value from the contract.
When the account is changed in MetaMask, the account displayed on the screen updates, through the subscription in the subscribers.js file and the IARS pattern. The last few seconds show the data stored in the Redux store.
I think this Box does a great job of configuring the scaffolding needed to help developers start coding new functionality very quickly using React, Redux, and Bootstrap 4.
If you want to try it out yourself, follow the installation instructions below.
Installation instructions
First (assuming you have Truffle installed), ensure you are in a new and empty directory, then run the unbox command:
truffle unbox alexroan/react-redux-bootstrap-box
Set up your truffle-config.js file to connect to your local development network, then run the following:
truffle migrate
To initiate the front-end app, cd into the client/ folder and start using these commands:
cd client/
npm run start
Repo
The full repo with in-depth instructions to get up and running is found on GitHub.
If you have any improvement or suggestions, please submit an issue or pull-request on GitHub.
Thanks for reading!
Learn More
If you’re interested in Blockchain Development, I write tutorials, walkthroughs, hints, and tips on how to get started and build a portfolio. Check out this evolving list of Blockchain Development Resources.
If you enjoyed this post and want to learn more about Smart Contract Security, Blockchain Development or the Blockchain Space in general, I highly recommend signing up to the Blockgeeks platform. They have courses on a wide range of topics in the industry, from Coding to Marketing to Trading. It has proven to be an invaluable tool for my development in the Blockchain space.






