
Crypto is implemented so that it is not controlled by a single entity, but instead computed by global networks of participants, considered as decentralized. It exists a lot of cryptocurrencies in the crypto universe, few have been there since the beginning, lots of others have joined since then. In any case, it is very likely that someone who is part of this financial revolution may have a bunch of coins and tokens in his personal wallet. When it is necessary to exchange one to another, most of the time people will tell you that a seller and a buyer have to be matched via an order book to perform such trade. It is possible to do so on a Centralized Exchange (CEX), but in that case a middleman is added to the swapping process, full ownership of the assets is not held anymore and it will lead to be registered in a database so as the need of providing identity. To take full advantage of decentralization and not to involve any other intermediaries, a liquidity pool protocol is used to maintain liquidity and to determine the price on a Decentralized Exchange (DEX), so that assets swaps can be performed. Although it may look a little bit harder for some people to perform such trade, in the end, you will benefit from interacting without needing to find a trusted intermediary, participating without authorization from another entity and having no single point of failure, in other words, Web 3.0 built upon the concepts of decentralization. In order to do so, choosing the right personal wallet is necessary, acting as the bridge to connect to the blockchain network to be operated on and therefore enabling the use of Decentralized Web (dWeb) and Decentralized Finance Applications (dApps). Open-source and bringing greater user utility, one may use the community owned and operated Web3 wallet, Tally Ho!

Getting Started With Tally Ho!
Free, open-source, following a clear roadmap and decentralized Web3 wallet, Tally Ho is built as a browser extension to connect to your favorite dApps. Focussing on true openness and community development, all fees collected by the wallet through the use of in-wallet swaps, are given back to the community through its Decentralized Autonomous Organization (DAO).
Interested in testing the wallet? The following will show you the main features of Tally Ho community owned and operated Web3 wallet!
Download And Install
Follow Publish0x campaign link to be redirected to Tally Ho official download page:
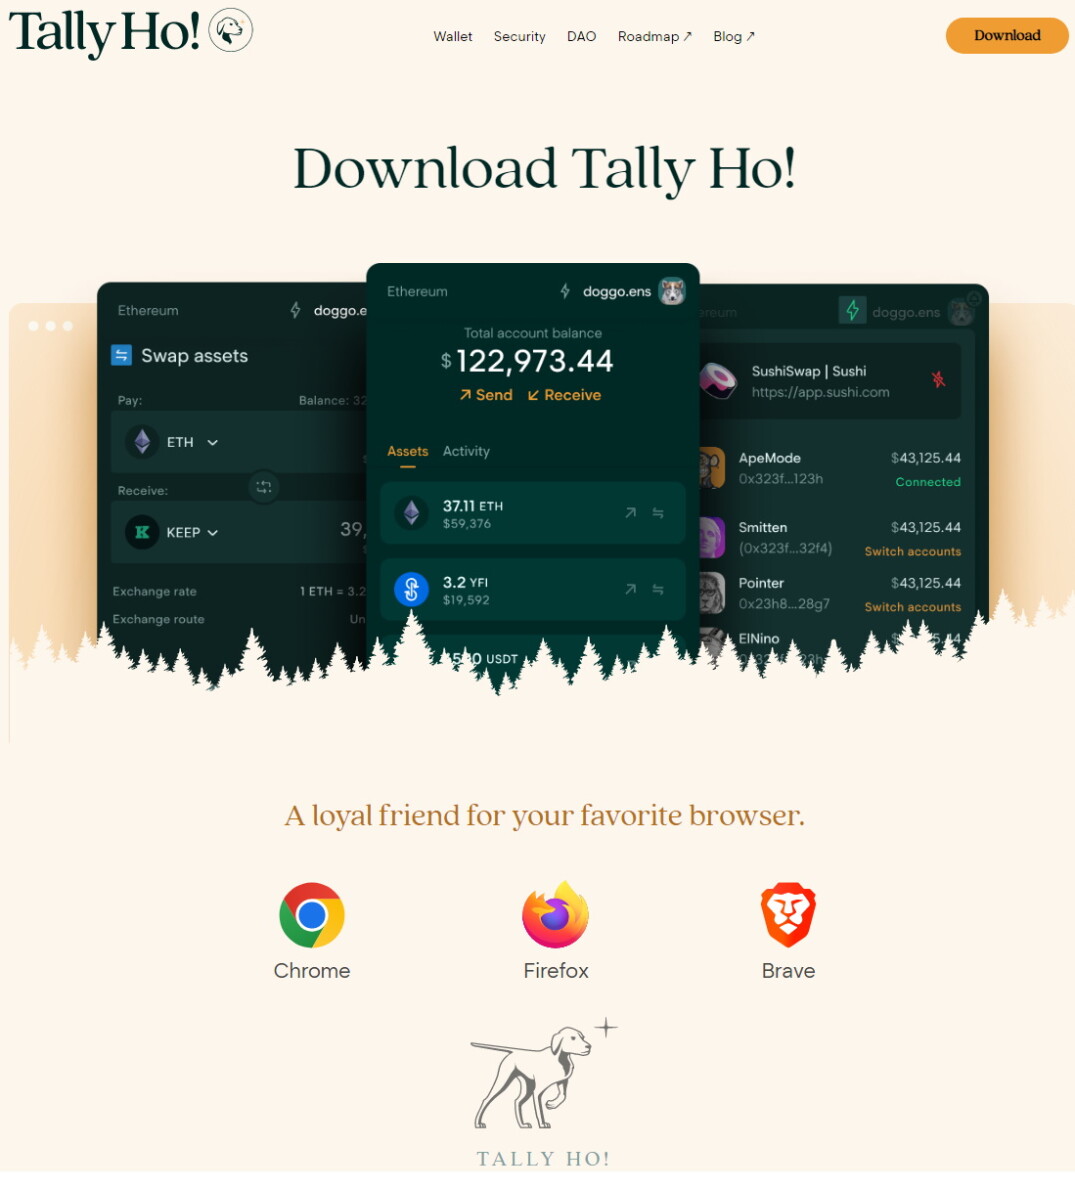
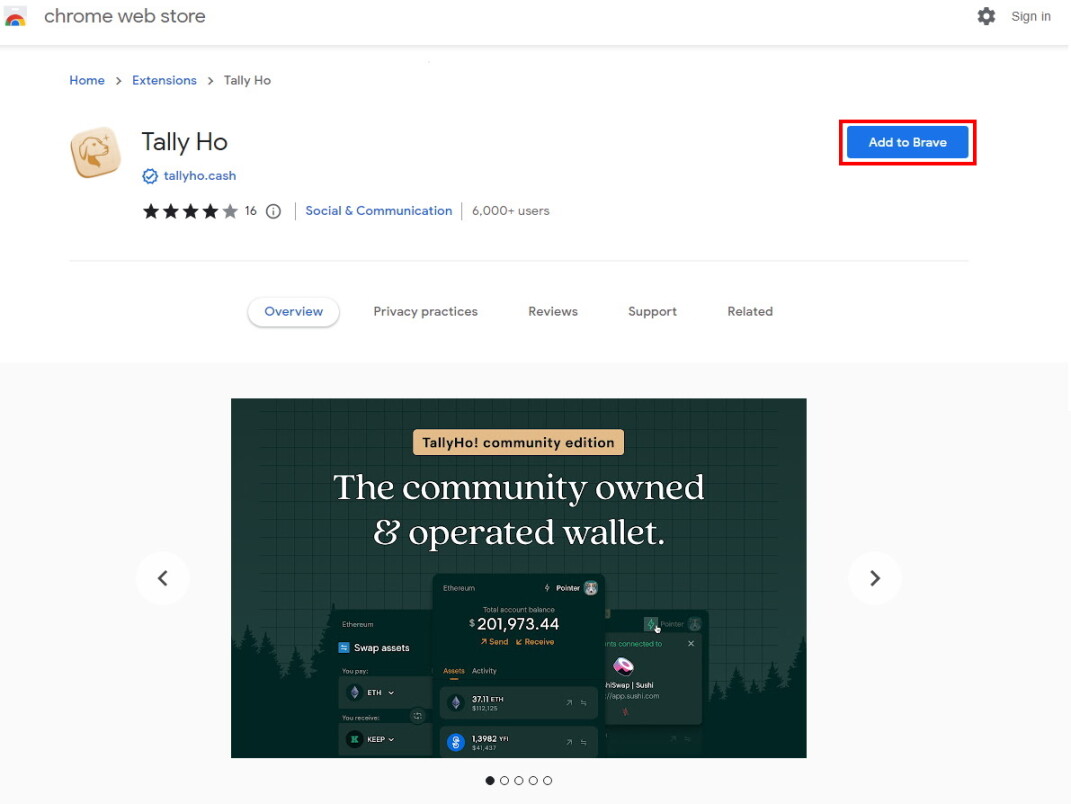
The wallet is available on Chrome, Firefox and Brave. I personally use Brave as my preferred browser and will show you how to get started with Tally Ho wallet on it, but you are free to choose the one you want, the steps are globally the same.
After clicking on Brave Browser, you will be redirected to the chrome web store for downloading the Tally Ho wallet extension. Click on "Add to Brave" to download the extension:
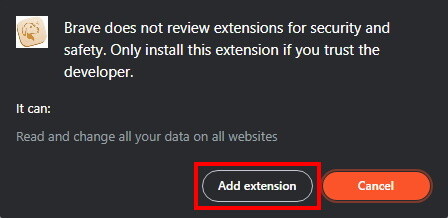
Install the extension in your browser by clicking "Add extension":
After a couple of seconds, a message will be displayed telling you that the Tally Ho wallet extension has been installed in your browser (A) and the wallet will be visible in the extensions section (B):

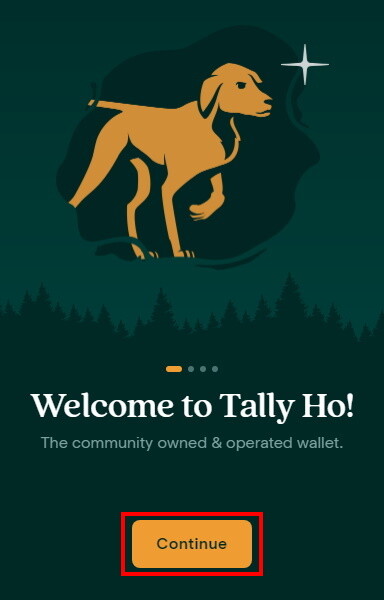
You can now go to the extensions section and click on Tally Ho to open the wallet. Then, click on "Continue":
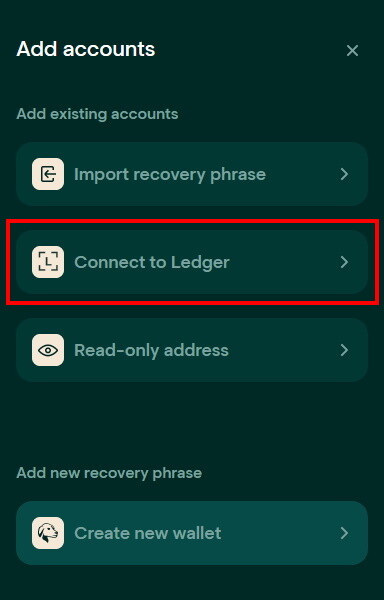
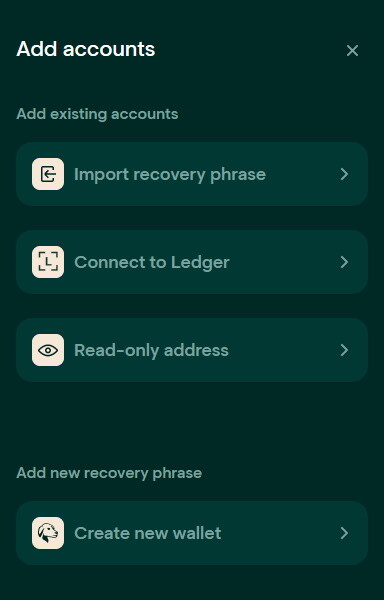
Once the hints and info from the initial splash screens have been read, you will have different ways to access a wallet through Tally Ho:
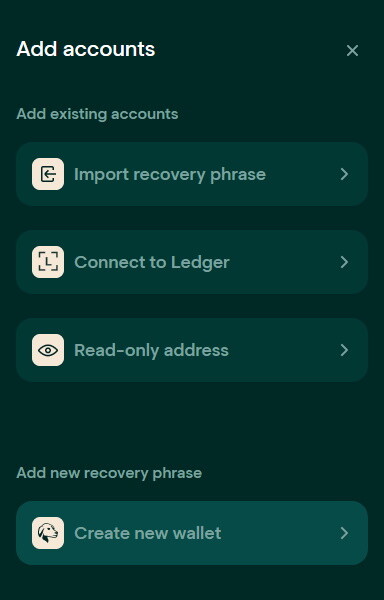
Import A Wallet
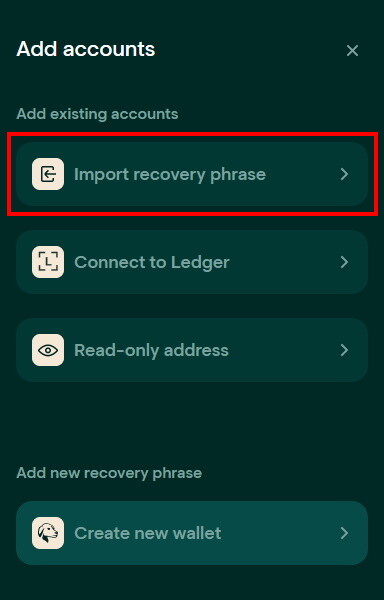
Importing a wallet means getting access to a wallet already existing. This is done by providing the private key corresponding to the wallet you want to access to. To do so, click on "Import recovery phrase":
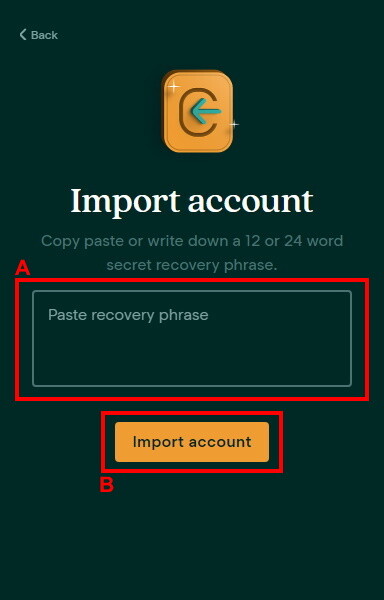
Seed words will be translated to the raw private key so that you can gain access to your wallet and sign transactions. Paste the recovery phrase of the wallet you would like to import (A), then click on "Import account" (B):
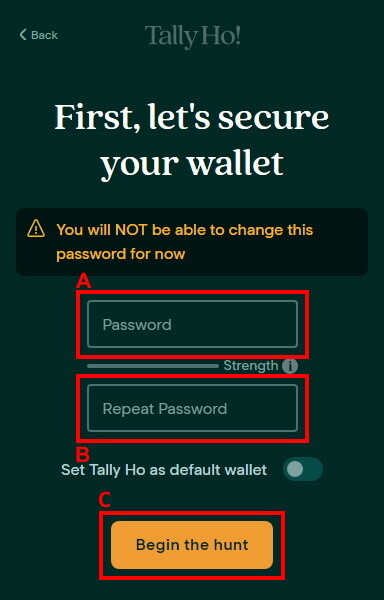
A password is required on Tally Ho wallet, so that after signing a transaction with your private key, an extra level of security is implemented to verify that the user sending the transaction through Tally Ho wallet extension knows the password of the extension. This can be considered as a Two-Factor Authentication (2FA) process set up. Therefore, as usual, provide a strong password inside (A) and (B), then click on "Begin the hunt" (C):
The access to your wallet is now unlocked:
Connect To Ledger
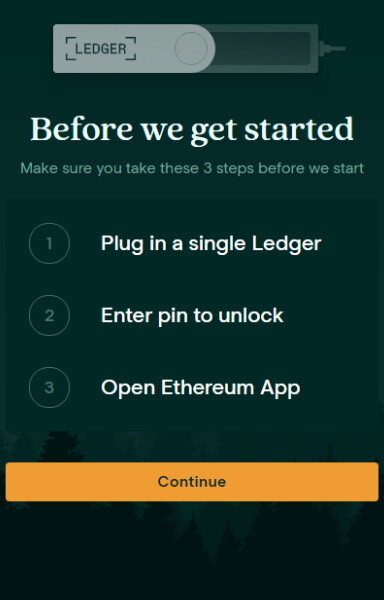
If you have a hardware cryptocurrency wallet made by Ledger, you can connect it to the Tally Ho wallet extension. For that, click on "Connect to Ledger":
Connect your hardware device to your laptop, unlock it and open the Ethereum App. Then click on "Continue" and follow the extra instructions displayed:
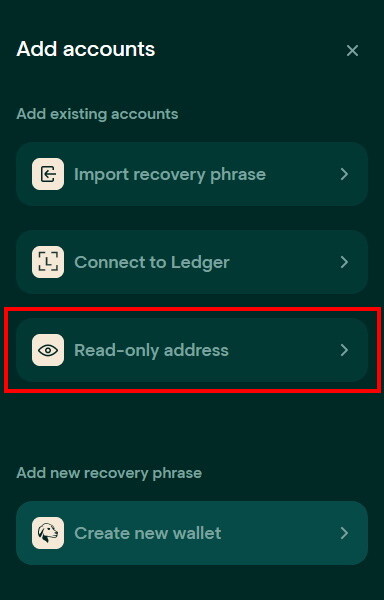
Read-Only Wallet
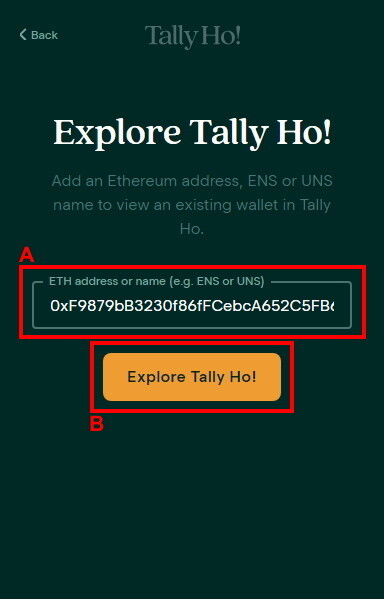
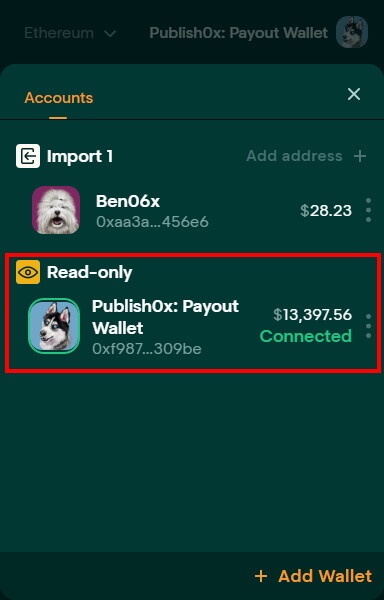
You can access a wallet in a read-only mode, meaning you can use the features of Tally Ho wallet without signing any transaction. For that, click on "Read-only address":
Paste the wallet address you would like to have access in a read-only mode (A), then click on "Explore Tally Ho!" (B):
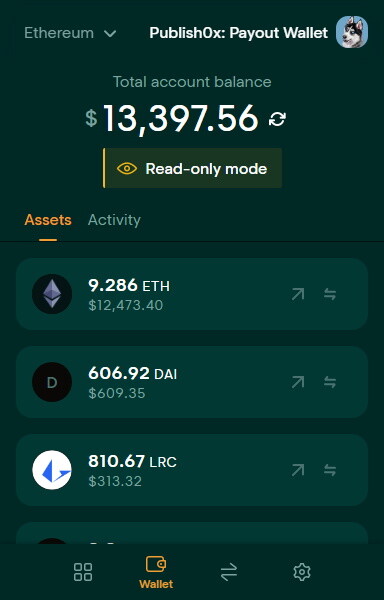
In this mode, you have an overview of the wallet funds and you can try the features of Tally Ho wallet extension:
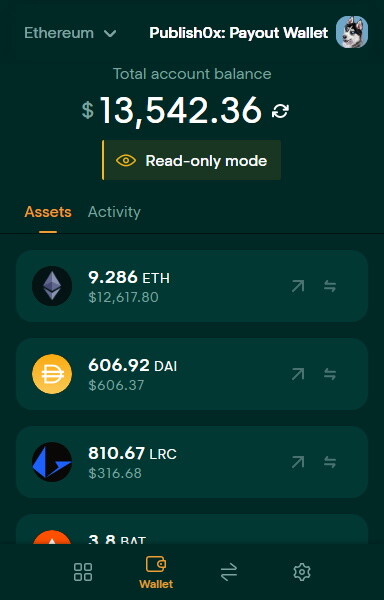
I have to say, it is a bit fun to access in a read-only mode Publish0x's payout wallet through a User Interface (UI).
Create A New Wallet
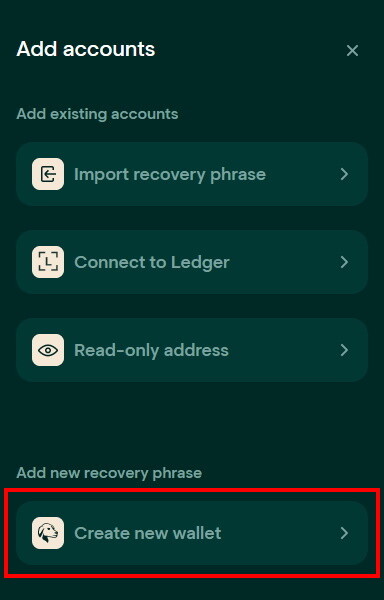
If you have not created any wallet yet, or if you simply want to create a new one, this can be done through Tally Ho wallet extension, by clicking on "Create new wallet":
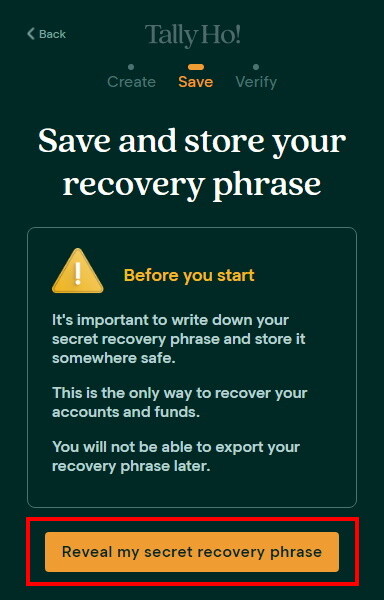
The secret recovery phrase, or seed words, is a unique 12-word phrase or 24-word phrase generated when a wallet is created. It is used to gain access to the corresponding wallet, so that signing transactions can be possible. If you ever lose it, no one will be able to help you recover your wallet. Write it down somewhere safe and never share it to anybody. Once you have understood that, click on "Reveal my secret recovery phrase" to generate your seed words:
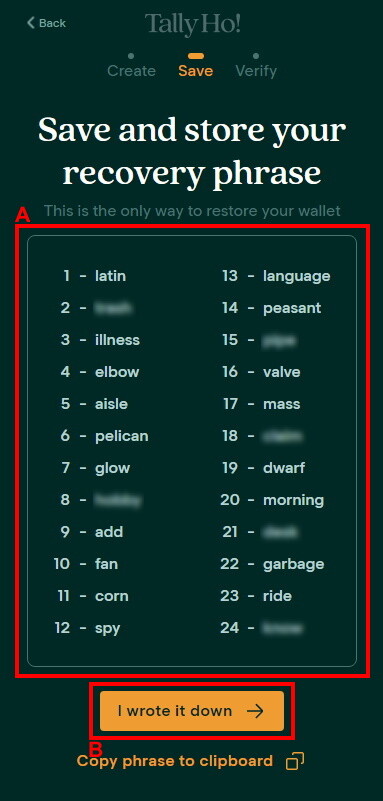
The secret recovery phrase is displayed in the (A) section. Once you wrote it down somewhere safe, click on "I wrote it down" (B):
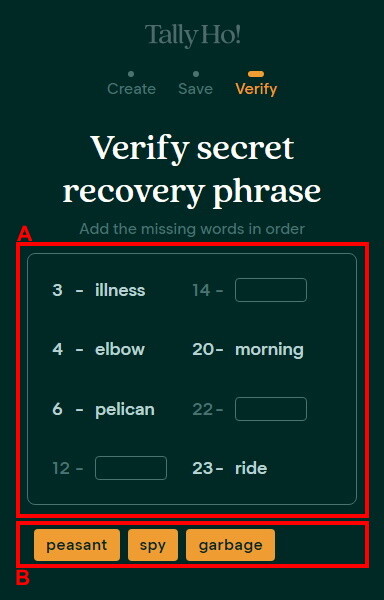
Tally Ho implemented an extra security check to make sure you have correctly back up your secret recovery phrase. Just put the seed words from (B) to (A) in the correct order:
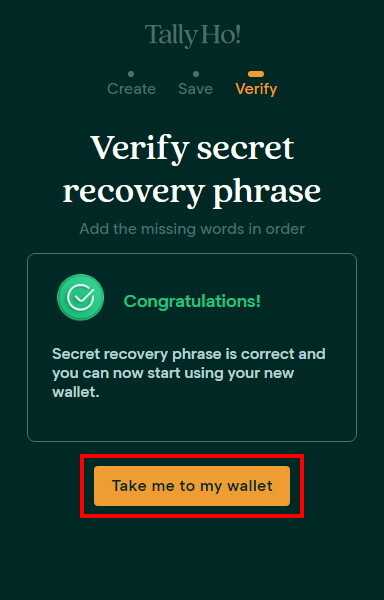
You can now access your newly created wallet by clicking "Take me to my wallet":
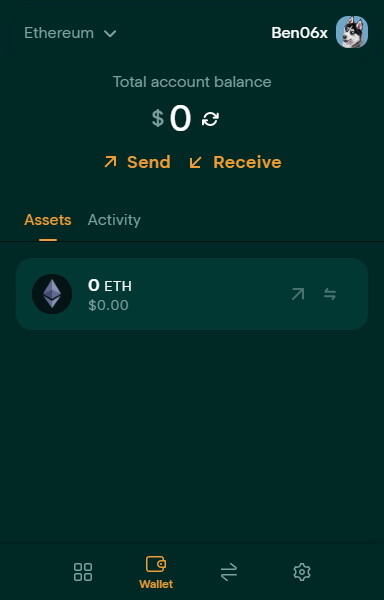
The access to your newly created wallet is now unlocked:
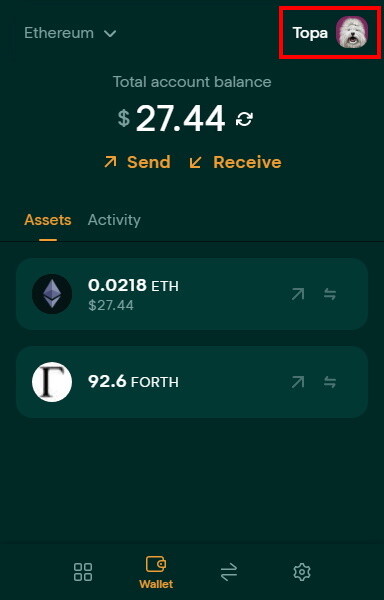
Change The Wallet Name
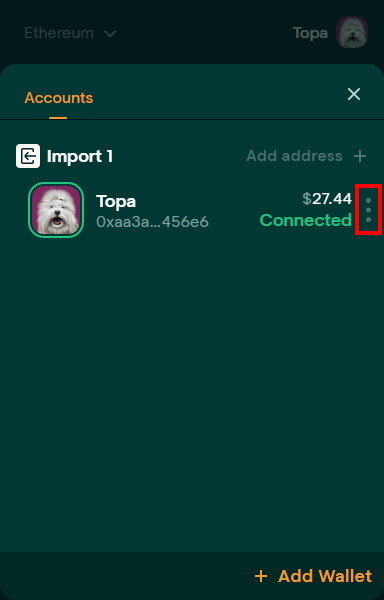
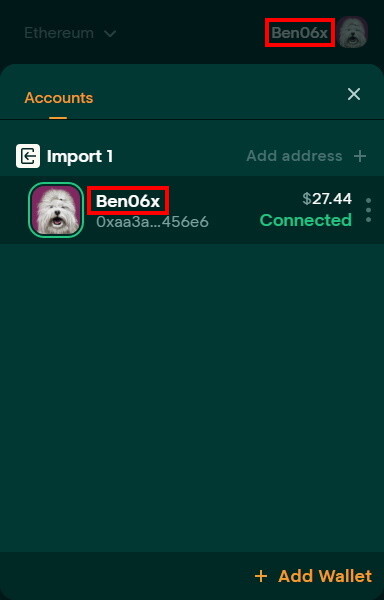
On the top right corner of the screen is displayed the name of the wallet you are connected to. When having several wallets to manage, it may be better to set up a name representing the purpose of the wallet. To change it, click on the current name attributed to your wallet:
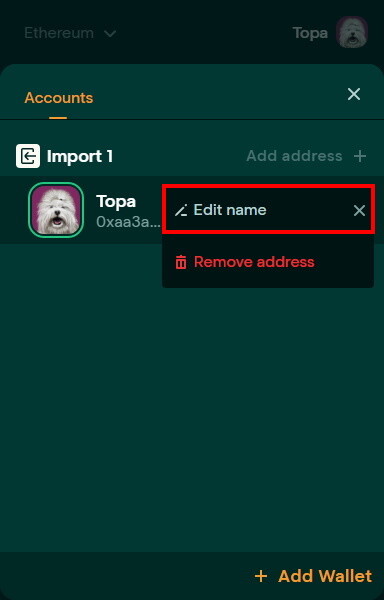
Click on the vertical dots to display extra features:
Then click on "Edit name" to change the name of the connected wallet:
You can now type a new name for your wallet in (A), then click on "Save name "(B):
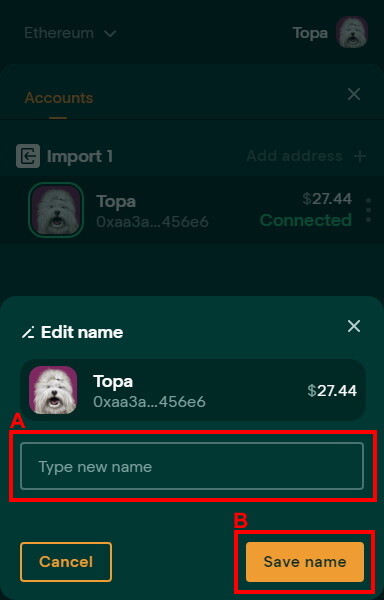
You can notice that your wallet name has changed:
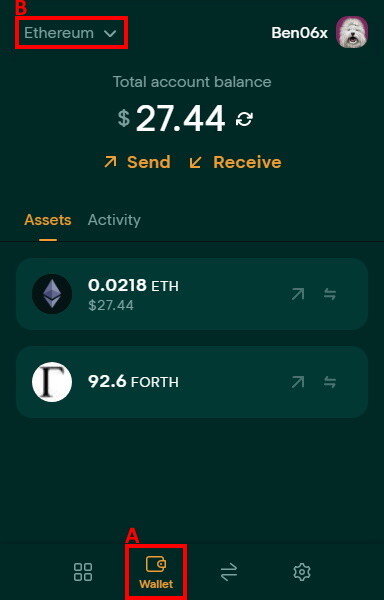
Choose The Network
Tally Ho supports the Ethereum network and is currently building more support for the Polygon network. By default, Ethereum is the main network used in the wallet, but if you want to connect to the Polygon network and load your ENS you are free to do so. For that, in the "Wallet" section (A) click on the current network you are connected to (B):
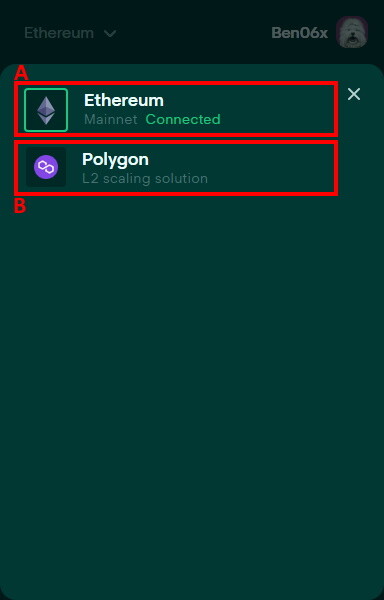
Then switch among the networks available by clicking on (A) or (B):
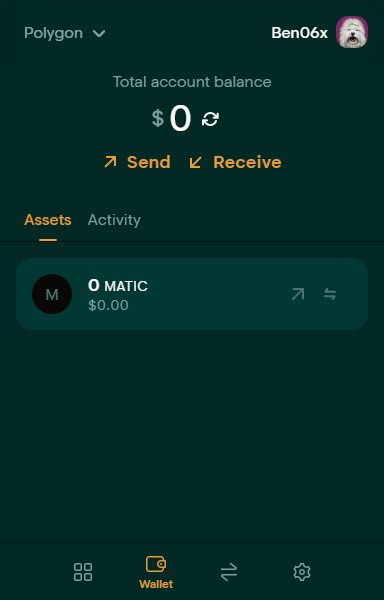
After choosing the Polygon network, your wallet is updated:
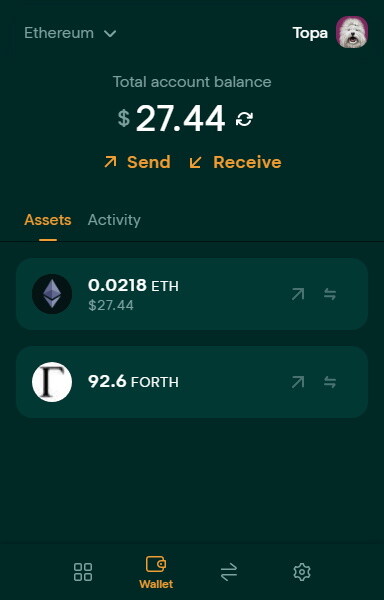
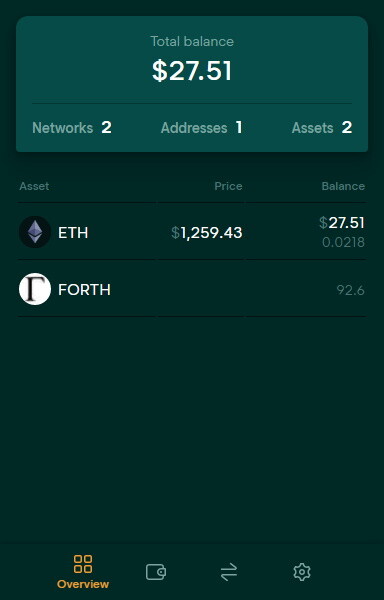
Overview
In the "Overview" section of Tally Ho wallet, you can have a look across all the funds available inside the imported wallets:
Receive Funds
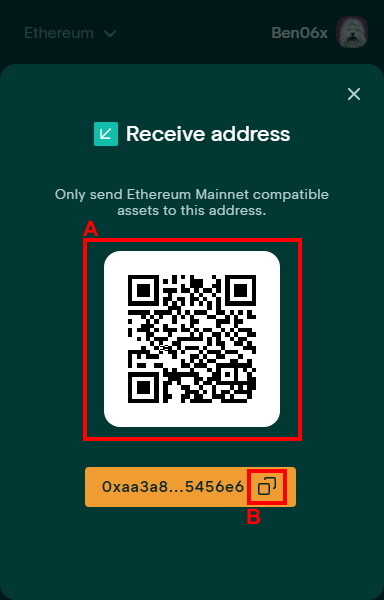
If you have to provide someone your wallet address, go inside the "Wallet" section (A) and click on "Receive" (B):
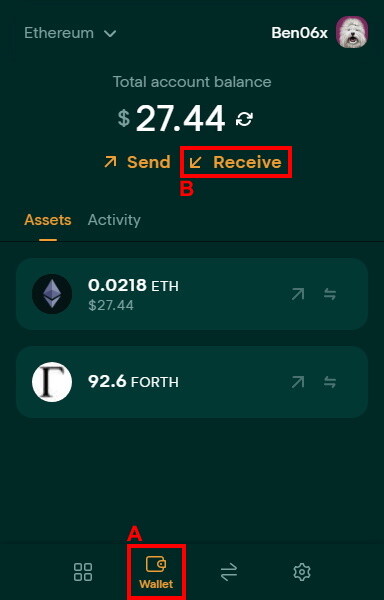
You can either provide the QR Code (A) or the public address (B):
Send Funds
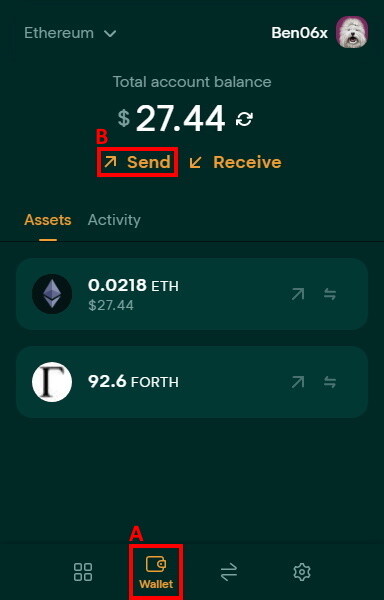
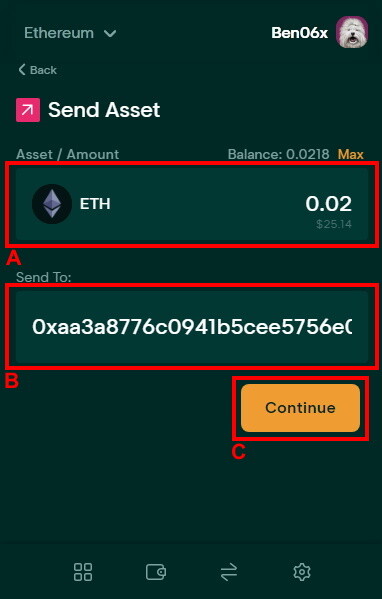
If you have to send some assets to someone, go inside the "Wallet" section (A) and click on "Send" (B):
Choose the asset you want to send (A) and paste the public address of the receiver (B), then click on "Continue" (C) to proceed:
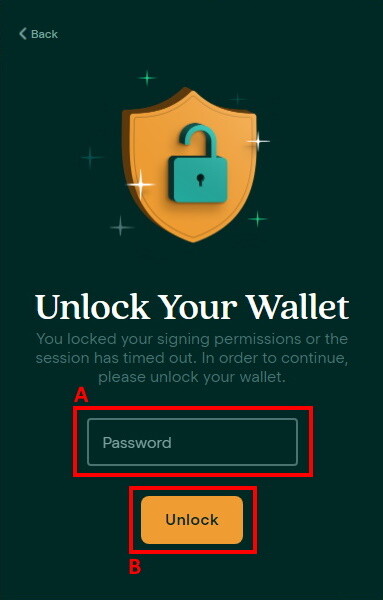
To proceed, you are required to fill the password previously set, to verify that, by sending the transaction through the Tally Ho wallet extension, you know the password of the extension:
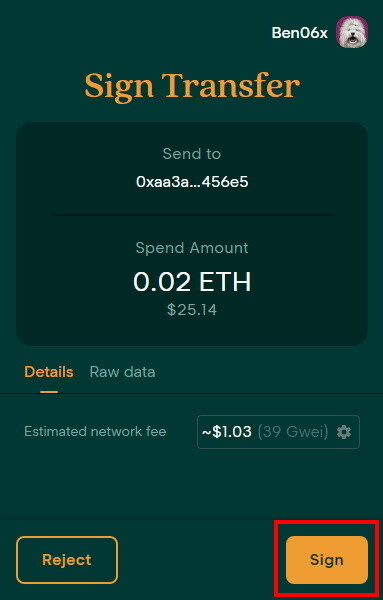
Before signing the transaction, make sure that the amount you have to send and the address of the receiver are correct. Then, in the details section, you can choose to modify the network fee if wanted:
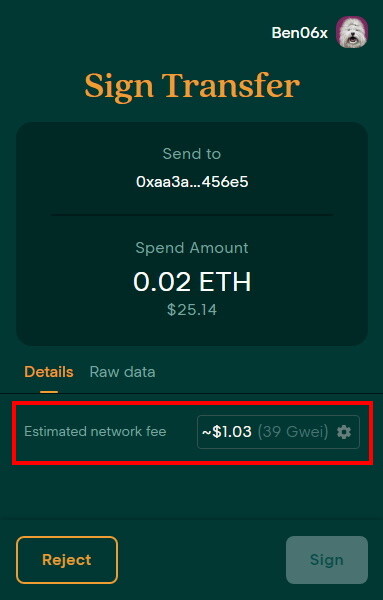
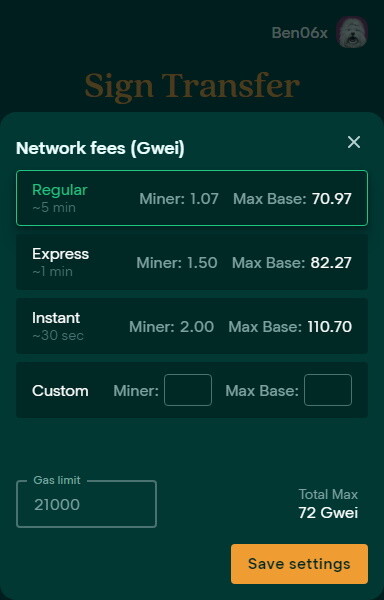
Tally Ho generally sets the best network fee at the moment, but you can modify it if wanted:
When everything is in order, you can sign and confirm the transfer so that the transaction can be broadcast into the network:
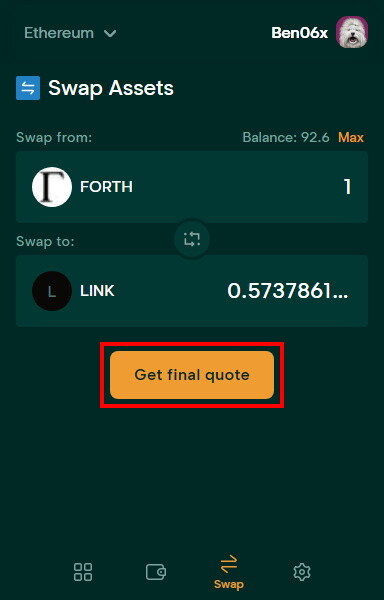
Swap Assets
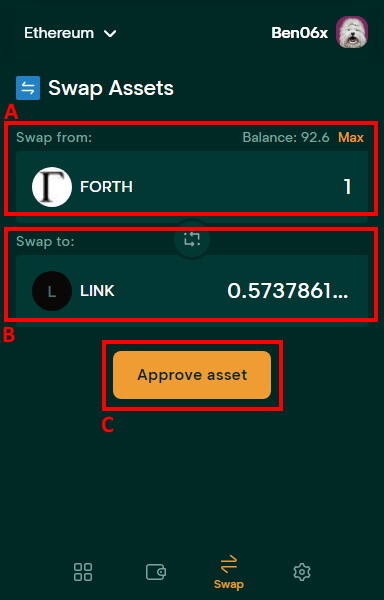
Tally Ho incorporates in-swap features to directly swap assets inside the wallet via decentralized markets such as Uniswap. To do so, go to the "Swap" section of the wallet, choose the asset you want to swap from (A) and the asset you want to swap to (B), then click on "Approve asset" (C) to proceed:
To continue, you are required to fill the password previously set, to verify that, by sending the transaction through the Tally Ho wallet extension, you know the password of the extension:
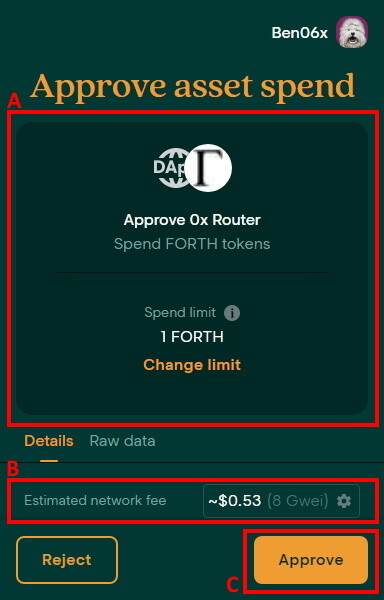
If the asset chosen to swap from is an ERC-20 token, a token approval transaction may have to be sent, to allow the smart contract in charge of the token to manage the ERC-20 you want to send. Moreover, in the (A) section, a "Spend limit" information is mentioned. If you set it to "Infinite", the token balance that can be managed by the smart contract is set to infinite approval, meaning you will not be required to send any other token approval transaction. If set to any other amount, the token balance that can be managed by the smart contract is manually set. Once exceeded, any future transaction will require manual approval as currently shown. Moreover, in the details section, you can choose to modify the network fee if wanted (B), but Tally Ho generally sets the best network fee at the moment. If everything is in order, you can approve the asset spend by clicking "Approve" (C):
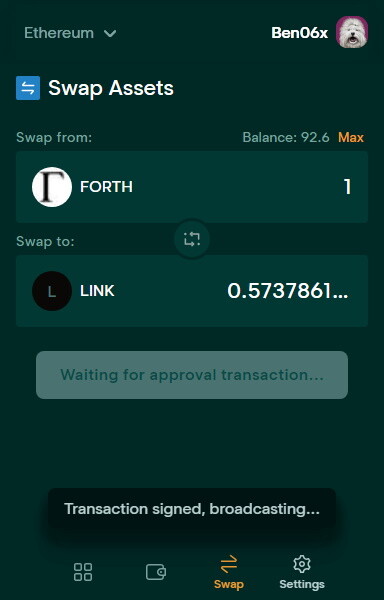
The transaction is being broadcast into the network:
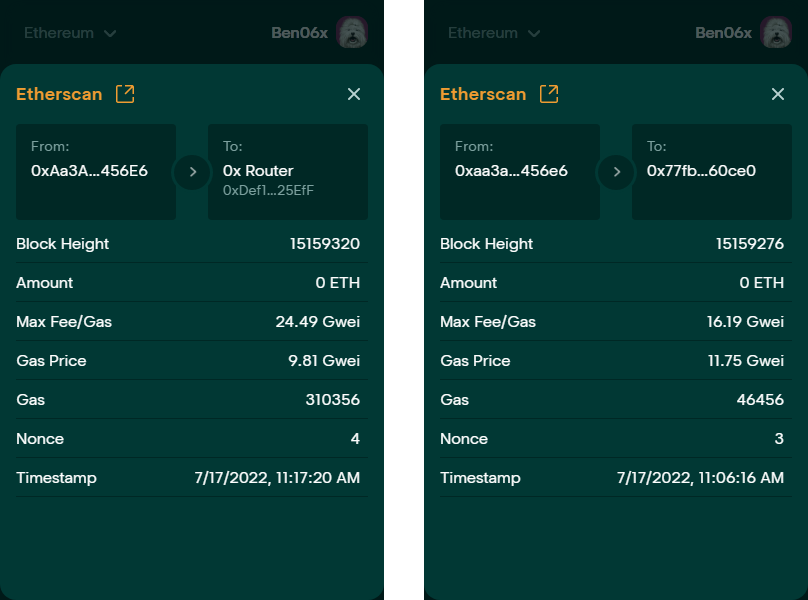
You can also monitor the current transaction on Etherscan:

Once the token approval transaction is completed, you can proceed to the swap details by clicking "Get final quote":
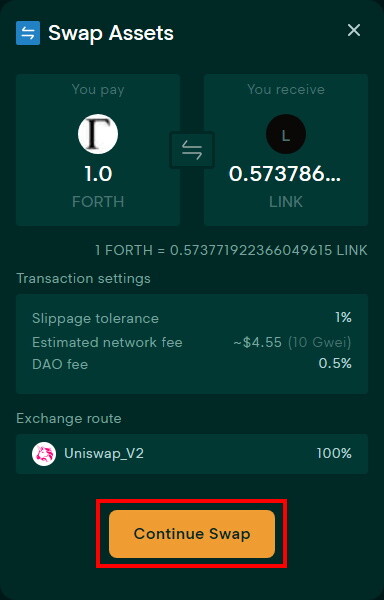
All the details of the swap are displayed. To be noticed that, the 0.5% fee collected by the wallet through the use of in-wallet swaps, which is less than the 0.875% charged by Metamask, is given back to the community through its DAO. If everything is in order, you can proceed with the assets swap by clicking "Continue Swap":
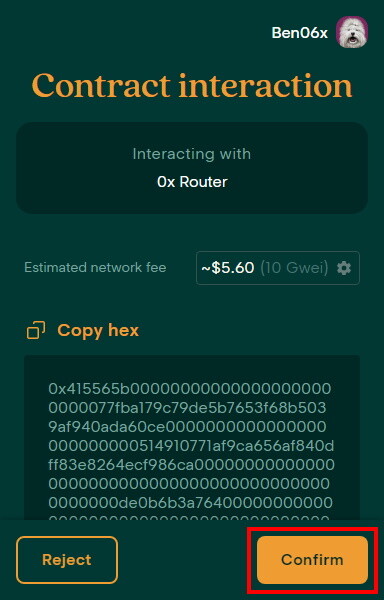
The smart contract in charge of the assets swap uses the 0x Protocol as a highly optimized UniswapV2 Router, so that the transaction cost of trading on Uniswap is reduced. For this swap, the FORTH is swapped for USDT, then the USDT is swapped for LINK. Once again, you can choose to modify the network fee if wanted, then click on "Confirm" to perform the swap:
You can monitor the current swap on Etherscan:

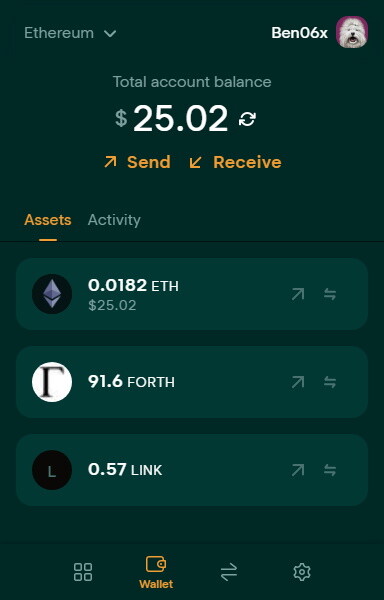
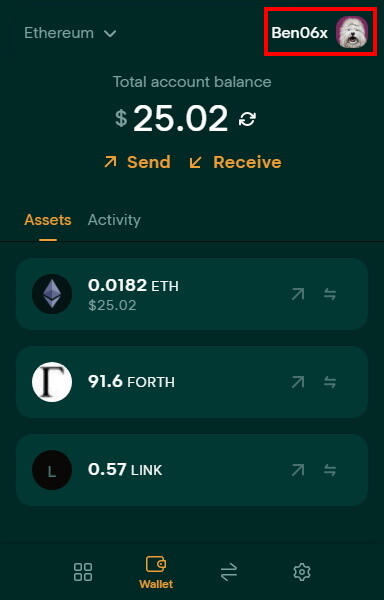
Once the swap is completed, you can see your assets in the "Wallet" section:
Activity
The Tally Ho wallet extension has an activity feed in which is displayed the details of the transactions of the wallet connected to. You can check it by going to the "Wallet" section (B) then clicking on "Activity" (A):
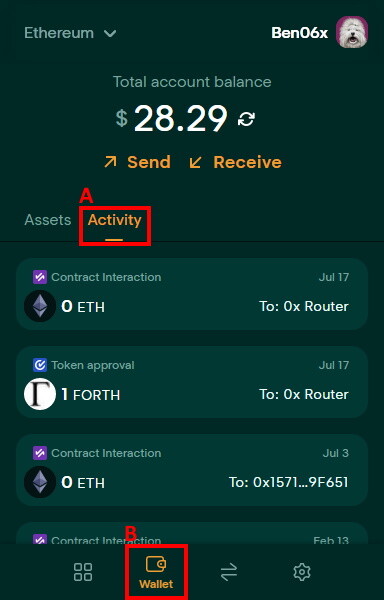
You can click on the transactions displayed to access their details. For instance for the previous contract approval and assets swap made on Tally Ho wallet:
Add A Wallet
It is possible to manage multiple wallets with Tally Ho wallet extension, by simply importing the wallets once. To do so, click on the name of the wallet you are connected to on the top right corner of the screen:
Then click on "Add Wallet":
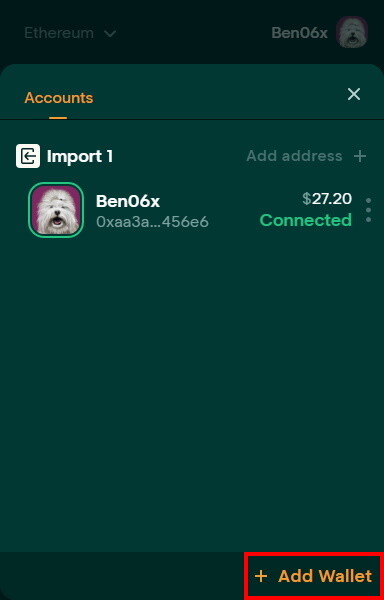
You have different ways to add a wallet, choose the one that best fits your needs:
Once added, the wallet will be visible with the other wallets so that you can switch from one to another with ease. You can connect to the wallet you just added by simply clicking on it:
The access to the wallet is unlocked and you can manage it according to the import you made:
Settings
You can change some features of Tally Ho wallet inside the "Settings" section.
The following settings are currently available:
- hiding asset balances with value under $2 so that your wallet overview is clearer
- using Tally Ho as default wallet so that choosing which wallet to use when trying to connect to dApp will no more be necessary
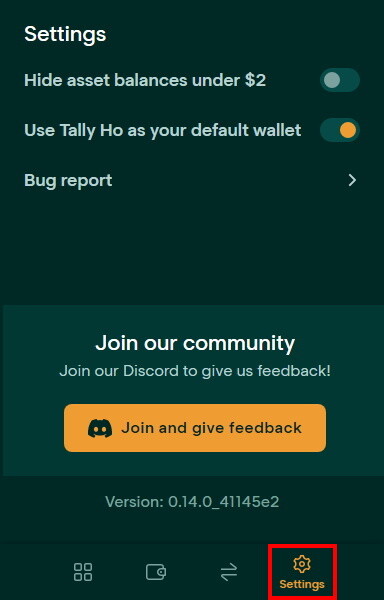
There is not a lot of settings for now, more will be added soon.
To Sum Up
Among all that have been highlighted before, here are the main features offered by the Tally Ho wallet extension:
Key Points
The major key points of using Tally Ho wallet are the following:
- DAO governance
- open source code
- clear and scalable roadmap
- can be connected to Ledger
- usable on Ethereum and Polygon network
- community owned and operated Web3 wallet
- available on well-known browsers as an extension
- access in a read-only mode any wallet through a User Interface
- in-swap features to directly swap assets inside the wallet via decentralized markets at low fees
Useful Links
Be connected with Tally Ho and do not hesitate to be part of the community:
- Check out Tally Ho Official Website
- Have a look at Tally Ho governance
- Read the Tally Ho audit conducted by a third party
- Read Tally Ho wiki on how to use the wallet extension
- Check out Tally Ho's blog to read project related posts
- Stay tuned to the project by following Tally Ho's Twitter
- Use Tally Ho wallet and enjoy your favourites dApps and dWeb
- Join Tally Ho Discord server and do not miss any announcement
- Tally Ho live roadmap is here to give you a clear view of the development
- Have a look at Tally Ho wallet extension open source code on GitHub and help the team to develop even better algorithms
Final Thoughts
Not controlled by a single entity, but instead computed by global networks of participants through its growing community and Decentralized Autonomous Organization, Tally Ho is a Web 3.0 wallet built upon the concepts of decentralization. Acting as the gateway to connect to the Decentralized Web and the Decentralized Finance Applications, Tally Ho is bringing a greater user utility to the crypto universe. With its clear and scalable roadmap, do not miss the opportunity to be an early adopter of one of the potential future world leaders in the community owned and operated Web 3.0 wallet.
Feel free to share your thoughts and any other feedbacks in the commentary section!


