Abstract
pfSense is an Open-Source Firewall based on FreeBSD developed by Netgate.
I used it to build a privacy and security solution for my home and business. The benefit of offloading these on a dedicated device is that the user will not have to worry about configuring each device or about slowdowns due to intense computations. It provides a VPN-protected connection to your entire household, no matter how many devices you connect to it. Also, if you want to protect your children, grandparents, or guests' online data, asking them to use a VPN might be a bit much, depending on their level of tech-savviness.
In the prerequisites section of this article, I'm going to describe the appliance setup broadly; then, we will analyze the specific configuration of pfSense to create a secure but fault-tolerant use of VPN.
(Updated 11th November 2020)
Licenses
 This article is shared under a Creative Commons Attribution 4.0 International License.
A word about Netgate's EULA: you can install pfSense freely on hardware that you purchase separately from the software. It is not possible to buy (or to sell) equipment with the preinstalled software except from Netgate and its affiliates (sg-5100 is their equivalent model). Please refer here.
Prerequisites
Hardware
To create the appliance, I have used a Qotom mini-PC with a dual-core Intel i3 @ 1.70GHz, 4 GB of RAM, and 32GB SSD HD. A key required feature is the Intel AES-NI support to offload encryption from the CPU. My advice is to choose a fanless device to avoid noise in your home and to spend to get six ethernet interfaces from the beginning.
In my experience, avoid WiFi on the device, pfSense is built on FreeBSD, and the latest have few and old chipsets support. Also, there is the real risk to get stuck in some problems like on my Qotom with an Atheros chipset. It reports "ath0: stuck beacon" in the log and the firewall froze after a few hours of operation. Only with a fine-tuning of the "tunable" parameters of the WIFi, I managed to make sure that it didn't freeze, but performance and range are degraded. If you need WiFi, my advice is to connect an external 802.11ac Access Point, for example, I have moved now to UniFi nanoHD.
Installation
Download pfSense, the newest AMD64 (64-bit) version (not the daily snapshot), its name follows this pattern pfSense-CE-memstick-2.x.x-RELEASE-amd64.img.gz, avoid the one with "serial" in the name.
Burn the file in the USB stick following these instructions.
Now you can install, it is quite straightforward, and you can follow these instructions.
At the end of the installation process, your firewall is reachable on the LAN interface via a web browser at https://192.168.1.1/. Default credentials are set to a username of admin with password pfsense.
WAN setup
You have now to configure WAN accordingly to your internet provider settings. The tip to simplify everything is that you should choose a provider that allows you to connect using PPOE. If you are in Italy, avoid Tiscali or FastWeb; I'm using Eolo. If you are on any copper technology like ADSL/VDSL, you still need to buy the corresponding modem (for example). Avoid borrowing it from the provider as these are likely locked versions on which you have almost no control.
Static IP can be useful later in case you want to implement a DMZ or a VPN server, like the one I will discuss in a future article. I have found that unlike in the past, to save addresses, providers manage not to expose the dynamic IP address they assign to you on the internet directly, which makes the use of DynDNS vain.
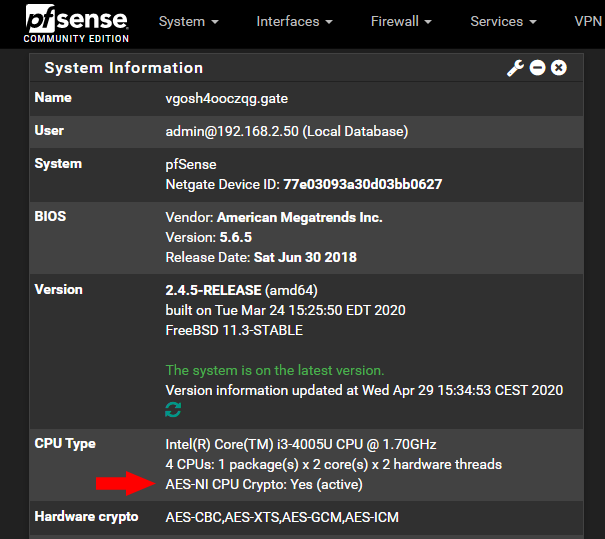
Activate AES-NI Cryptographic Hardware
Go to System > Advanced on the Miscellaneous tab. The fourth box is Cryptographic & Thermal Hardware.

Select as in the previous figure, save the setting, and reboot the device. In the dashboard under System Information, now you will see the cryptographic hardware active.
Download VPN configurations
Go to ProtonVPN account downloads, choose 4 secure core servers (available on paid plans, don't pretend to make advanced configurations with free services, you can pay in Bitcoin), and download the related Router UDP configuration files. Unless you're in a country with serious civil rights issues, my advice is to use your country exit point as primary, so websites that geolocalize by IP are able to deliver content in your language.
Configuring tunnels on pfSense
Now you should have a working firewall, and we can move on to encrypt in tunnels all the traffic from and to your device.
Step One: Adding the ProtonVPN CA Certificate
To be able to use the pfSense OpenVPN Client, we need to add the ProtonVPN Certificate to the system.
- 1. When logged in to the pfSense frontend, go to System –> Cert. Manager and press Add.
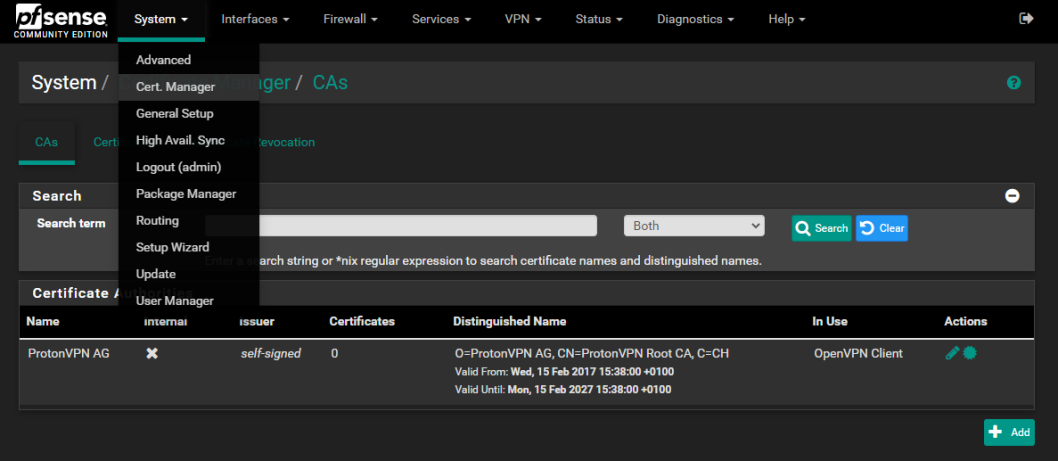
- 2. Choose a Descriptive Name such as ProtonVPN AG.
- 3. Select Import an existing Certificate Authority as Method.
- 4. Open the previously downloaded OpenVPN configuration file and copy the certificate. The certificate starts with —–BEGIN CERTIFICATE—– and ends with —–END CERTIFICATE—–.
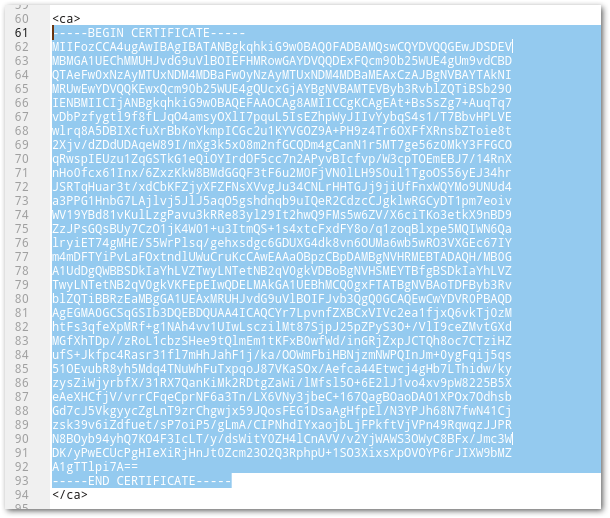
- 5. Paste this certificate in the field: Certificate data.
It should now look like this:
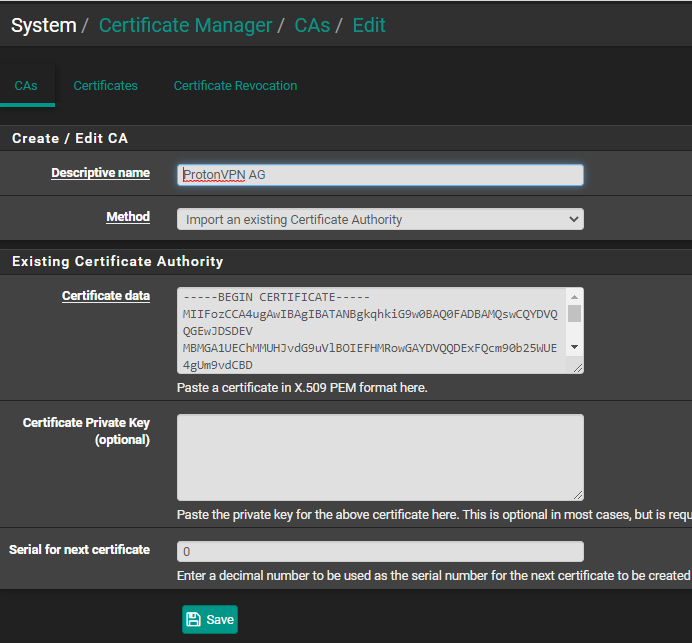
- 6. Click Save.
Step Two: Configuring the OpenVPN Client
This step is about how to configure the OpenVPN Client that handles the encryption and the tunneling of the data itself. This step should be repeated for each of the 4 secure core servers of your choice.
- Go to VPN –> OpenVPN –> Clients and press Add
- Fill in the fields as follows:
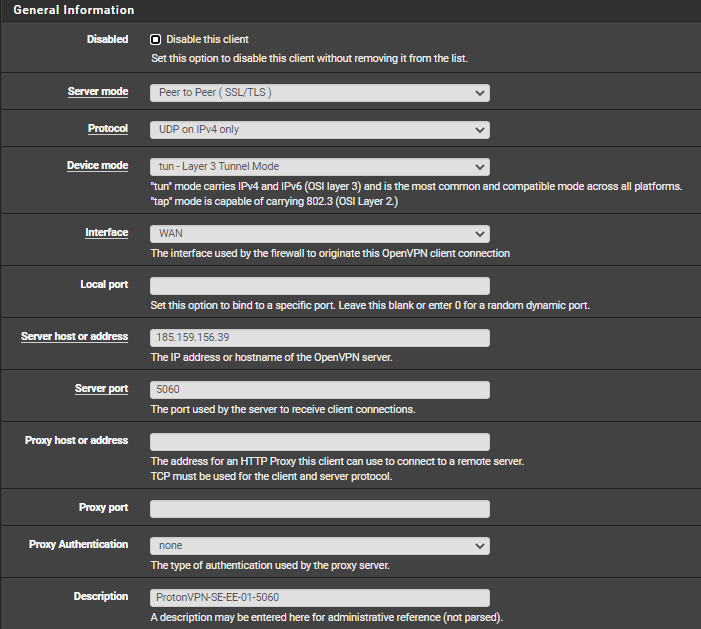
General Information
- Disabled: Unchecked
- Server Mode: Peer to Peer (SSL/TLS)
- Protocol: UDP on IPv4 only
- Device mode: tun – Layer 3 Tunnel Mode
- Interface: WAN
- Local Port: leave empty
- Server host or address: The IP Address of the server you want to connect to. Open the corresponding OpenVPN UDP configuration file. It will look like the following:
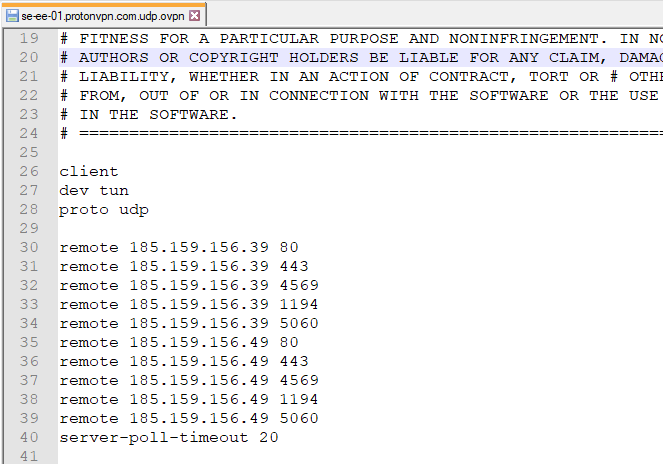
In this example, the "se-ee" (Sweden to Estonia) tunnel's file provides two IPs, 185.159.156.39 and 185.159.156.39. PfSense supports only one endpoint for each client. To provide backup you have to create two clients with fault tolerance configured accordingly.
- Server port: you can use five different ports: 80, 443, 1194, 4569, and 5060. Use a different port for each client you're configuring.
- Proxy host or address: Leave empty
- Proxy port: Leave empty
- Proxy Authentication: Leave empty
- Description: Choose a Display Name for this Configuration. Like ProtonVPN-SE-EE-01-5060
User Authentication Settings
- Username: Your ProtonVPN OpenVPN Username
- Password: Your ProtonVPN OpenVPN Password (enter twice)
- Authentication Retry: Leave unchecked
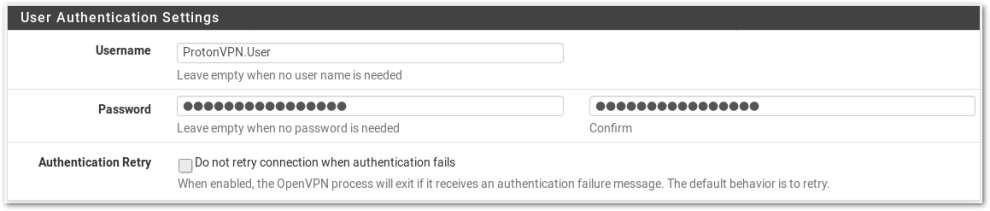
You can find your Username and Password in your ProtonVPN account under Account->OpenVPN / IKEv2 username.
Cryptographic Settings
- Use a TLS Key: Checked
- Automatically generate a TLS Key: Unchecked
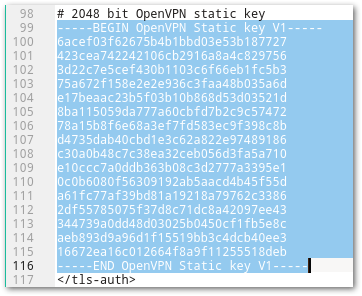
- TLS Key: Paste the Key from the OpenVPN configuration file. The Key starts with —–BEGIN OpenVPN Static key V1—–and ends with —–END OpenVPN Static key V1—–
- TLS Key Usage Mode: TLS Authentication
- Peer Certificate Authority: ProtonVPN AG (or the descriptive name you used in Step One)
- Client Certificate: None (Username and/or Password required)
- Encryption Algorithm: AES-256-CBC (256 bit key, 128 bit block)
- Enable NCP: Checked
- NCP Algorithms: AES-256-GCM
- Auth digest algorithm: SHA512 (512-bit)
- Hardware Crypto: Intel RDRAND Engine.
Tunnel Settings
- IPv4 Tunnel Network: Leave empty
- IPv6 Tunnel Network: Leave empty
- IPv4 Remote network(s): Leave empty
- IPv6 Remote network(s): Leave empty
- Limit outgoing bandwidth: Leave empty, unless you prefer otherwise
- Compression: No LZO Compression
- Topology: Subnet - One IP address per client in a common subnet
- Type-of-Service: Unchecked
- Don't pull routes: Checked
- Don't add/remove routes: Unchecked
Ping settings
- Inactive: 0 (zero)
- Ping method: keepalive
- Interval: 10
- Timeout: 60
Advanced Configuration
- Custom options:
tun-mtu 1500; tun-mtu-extra 32; mssfix 1450; persist-key; persist-tun; reneg-sec 0; remote-cert-tls server; pull; - UDP Fast I/O: Checked
- Exit Notify: Retry 1x
- Send/Receive Buffer: 512 KiB
- Gateway creation: IPv4 only
- Verbosity level: 3 (recommended)
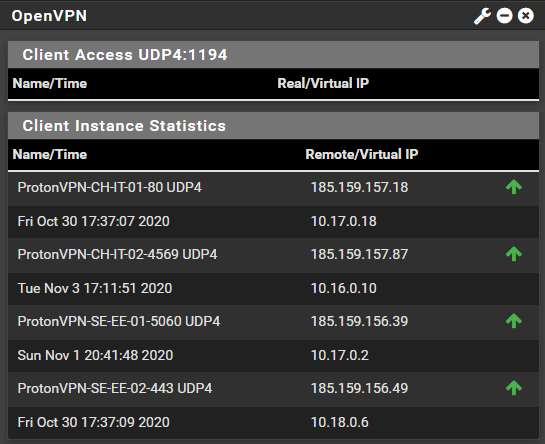
Now, if you add in the firewall dashboard the OpenVPN widget, you should see in Client Instance Statistics all the tunnels, each one with the green up arrow that confirms that tunnels are working as expected.
Step Three: Configuring the OpenVPN Interface
The pfSense VPN setup was done successfully and is already up and running at this point, but it won’t route any traffic through it, yet. To route the whole network through the secure ProtonVPN tunnel, we need to set up Interfaces and Firewall rules first.
- Navigate to Interfaces –> Assignments
- Add the OpenVPN Client as Interface. In our case, this is ProtonVPN-SE-EE-01-5060 as ovpnc1.
- Click on the link on the left corresponding to the name of the newly created interface
- Fill out the fields as follows:
- Enable: Checked
- Description: Name of the Interface (alphanumeric only). We will use VPNSEEE01.
- IPv4 Configuration Type: Not changeable.
- MAC Address: Leave empty
- MTU: Leave empty
- MSS: Leave empty
- Block private networks and loopback addresses: Checked
- Block bogon networks: Checked
You have to repeat steps 2,3,4 for every OpenVPN previously created and available in the combo box, give a meaningful name to each interface according to the entry and exit point.
Navigate to Interfaces –> Assignments and move to Interface Groups. Create a group named "ALLVPN" including only VPN Interfaces.
Step Four: Configuring the Gateways
Go to System > Routing on the Gateways tab; you have to create a gateway for each interface, giving it a name accordingly, like the following:
Disable: Uncheck
Interface: Choose a step 3 created interface for example VPNSEEE01
Address Family: IPv4
Name: for example GWSEEE01
Gateway: dynamic
Gateway Monitoring: Uncheck
Gateway Action: Uncheck
Monitor IP: Empty
Force state: Uncheck
Description: as you like
When done for all VPN interfaces, move to System > Routing on the Gateways Groups tab, and create a group:
Group Name: VPN
Gateway Priority: be sure that the original WAN gateway is set to Never. Assigned your preferred VPN tunnel to Tier 1 while leaving the other as tier 2 and 3 for the backup in case the principal is down/overloaded.
Trigger Level: Packet Loss or High Latency
Description: as you like
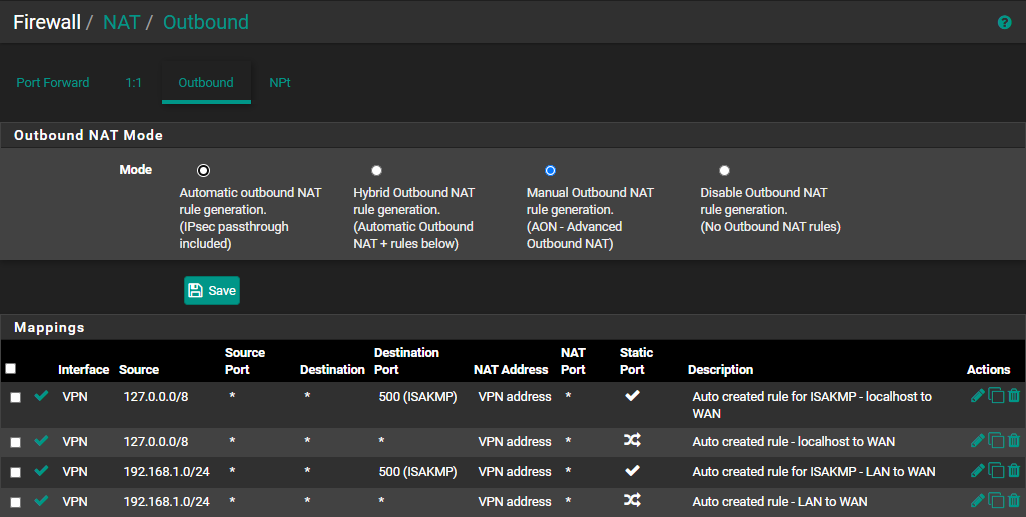
Step Five: Setting up the NAT
- Go to Firewall –> NAT –> Outbound
- Change the Mode to Manual Outbound NAT rule generation, then save and apply changes.
- Now you should see a set of rules under Mappings.
- Change Interface of every rule to the VPN Interface created in the last activity of Step Three. Then Save and apply changes.
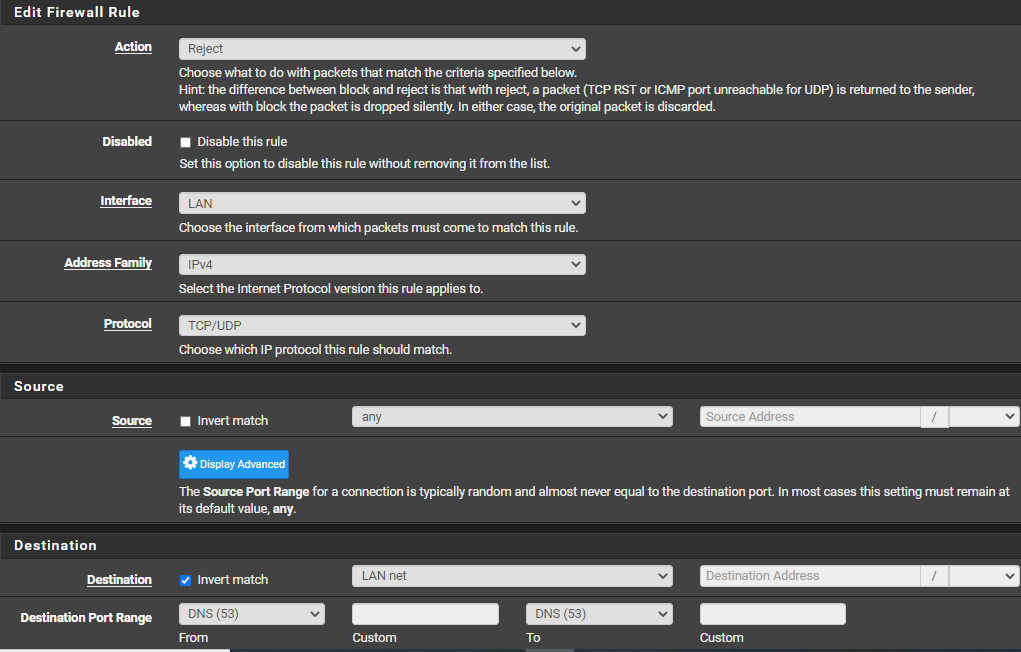
Step Six: Setting up the Firewall Rules
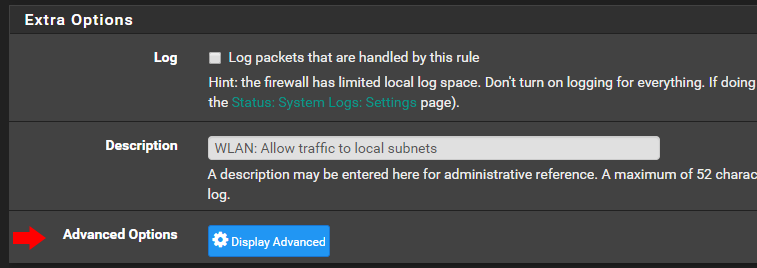
To force outgoing traffic to use the new VPN gateway, the LAN rule that manages outgoing traffic must be changed by setting it accordingly. The option to force the use of a specific gateway is available in the Extra Options section by clicking on the Advanced Options button.
Gateway: VPN (or as you named it at step 4)
Step Seven: Tune to prevent DNS leak
To prevent DNS leak, the firewall should use exclusively internal ProtonVPN DNS servers and LAN clients to exclusively use the firewall "unbound" resolver. As the whole traffic originating from the firewall and network behind it is already routed through ProtonVPN as by NAT settings, the first is achieved by changing the firewall DNS setting to the ProtonVPN server.
- Go to System -> General Setup
- Scroll down to DNS Server Settings
- Fill in the DNS Servers: 10.8.8.1, leave the Gateway on none and Disable DNS Forwarder unchecked.
- Scroll down and save.
- Go to Services –> DNS Resolver
- Check DNS Query Forwarding
- In the Network Interfaces field, select interfaces which outgoing traffic is routed through VPN, including local firewall one (127.0.0.1)
- In the Outgoing Network Interfaces field, select all and only the VPN Interfaces (VPNSEEE01, ...)
- Save and apply changes.
To be sure that LAN clients will use exclusively the firewall "unbound" resolver, a new firewall rule should be added to block DNS connection from a client to an external DNS server.
That is! All the traffic generated locally is now sent over an encrypted tunnel, and even if a VPN tunnel is down, you have a fallback alternative to avoid interruption or worse a leakage on WAN.