
The world of cryptocurrency trading is expanding, and so are the possibilities. However, swapping crypto across networks can still feel daunting for many users. TradeSta simplifies this process, making cross-chain swaps seamless, secure, and cost-effective. In this guide, we’ll walk you through how to swap crypto across networks using TradeSta, step by step.
Why Swap Across Networks?
Different blockchain networks offer unique features, decentralized applications (dApps), and token opportunities. However, assets on one network (e.g., Ethereum) aren’t directly compatible with another network (e.g., Binance Smart Chain). Cross-chain swaps allow you to move your tokens between networks, enabling you to:
-
Access new opportunities on other blockchains.
-
Take advantage of lower fees or faster transactions.
-
Diversify your investments across different ecosystems.
How TradeSta Makes Cross-Chain Swaps Easier
TradeSta eliminates the complexities of cross-chain swaps. With a user-centric design and cutting-edge technology, TradeSta ensures:
-
No Native Gas Tokens Required: Gas fees are deducted from the token being received.
-
Faster Transactions: TradeSta’s batching and optimization processes reduce wait times.
-
Seamless User Experience: An intuitive interface guides you through the entire process.
Step-by-Step Guide to Swapping Crypto Across Networks with TradeSta
Step 1: Connect and Delegate Your Wallet
To start swapping, you need to connect and delegate your wallet to the TradeSta platform. TradeSta supports various wallets, such as MetaMask, Trust Wallet, and 100's of others through their WalletConnect interface. Here’s how to do it:
-
Open the TradeSta app.
-
Click on the "Connect Wallet" button.
-
Choose your preferred wallet from the list.
-
Follow the prompts in your wallet to securely connect and delegate it to TradeSta.

Step 2: Select the Tokens and Networks
Once your wallet is connected:
-
Navigate to the swap section of the TradeSta interface.
-
Choose the token you want to swap from and the network it’s currently on.
-
Select the token you want to receive and the destination network.
For example:
-
From: Ethereum (ETH) on the Ethereum network.
-
To: Binance Coin (BNB) on the Binance Smart Chain.

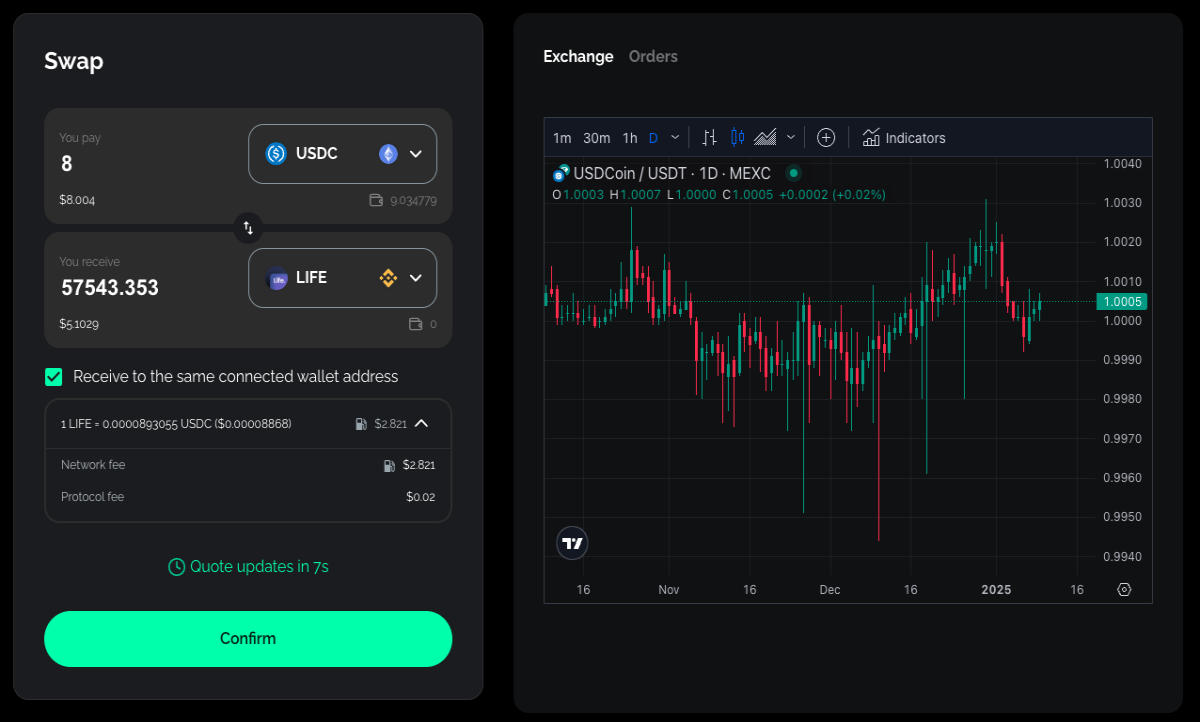
Step 3: Review the Transaction Details
TradeSta will display the transaction details, including:
-
The amount of the token you’re swapping.
-
The estimated amount you’ll receive.
-
Gas fees deducted from the receiving token.
Double-check all details to ensure accuracy.
Step 4: Approve the Transaction
If this is your first time swapping a particular token, you may need to approve the token in your wallet. This step allows TradeSta to interact with your tokens securely.
-
Click on "Approve."
-
Confirm the approval request in your wallet.

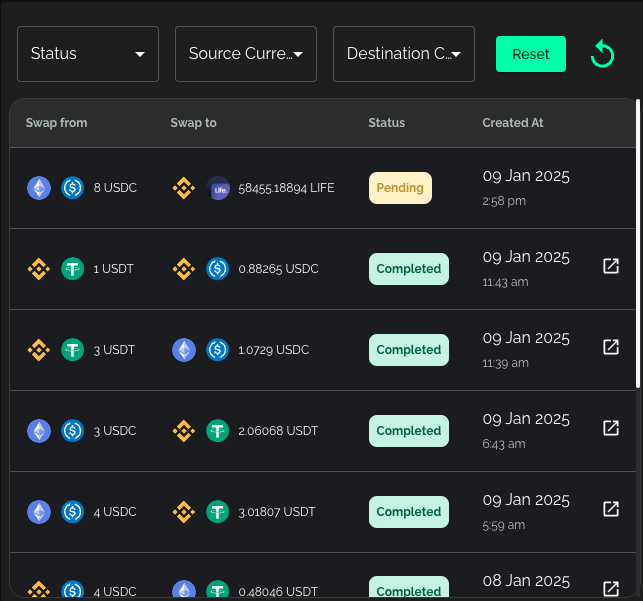
Step 5: Receive Your Tokens
Once the swap is complete, you’ll receive your tokens on the destination network. The entire process is tracked in real-time, and you can view the transaction details within the TradeSta app.
Tips for a Smooth Swapping Experience
-
Ensure Adequate Balances: Make sure you have enough tokens to cover the swap amount and associated fees.
-
Check Network Congestion: During peak times, transactions might take longer.
-
Stay Secure: Only connect your wallet to trusted platforms like TradeSta.
Why Choose TradeSta for Cross-Network Swaps?
TradeSta is more than just a swapping platform. By leveraging advanced technology, TradeSta ensures:
-
Cost Savings: Optimized infrastructure reduces gas fees, saving you money.
-
Ease of Use: A beginner-friendly interface makes swapping simple for everyone.
-
Reliability: TradeSta’s secure and robust platform ensures your transactions are processed smoothly every time.


