There are many, many ways to prove or demonstrate the Pythagoras’ theorem. Our approach here is to be simple, understandable, not overly detailed, use only basic geometry and use colors to make it enjoyable to read and to teach.
To make our explanation clearer, we will proceed in three steps.
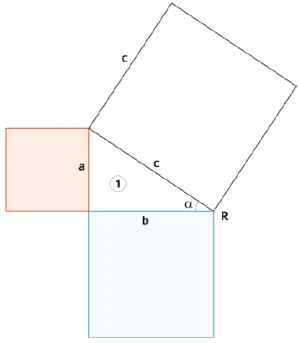
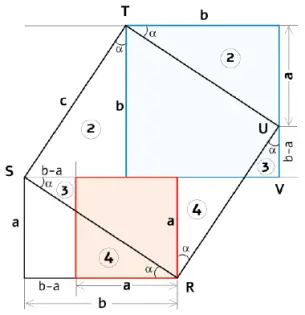
Our right angle triangle is marked with #1.
We oriented our triangle so that the bigger side (b) is at the bottom and the hypotenuse at the top-right.
We want to show that the areas of the red square (a x a) and the blue square (b x b) add up to the area of the white square. We call α the triangle’s smaller internal angle in point R.
Step 1.
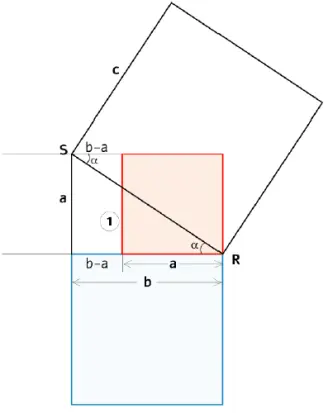
We first move our red square to the right, without changing its orientation, until its right bottom corner reaches point R.
This creates a small right angle triangle on the top-left of the red square. The length of this right angle triangle’s top side is b – a.
Its internal angle in point S is equal to α (the α angles are intern alternates of the square’s parallel horizontal edges intersected by the hypotenuse).
Step 2.
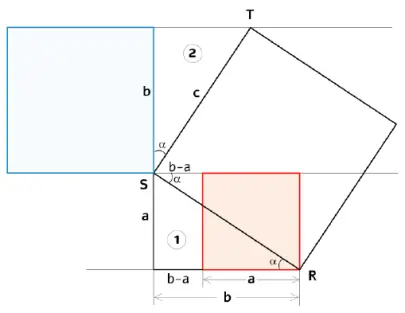
This intermediate step is just to show that the distance between the top edge of the red square and point T is equal to the edge of the blue square (b).
We temporarily move the blue square, without changing its orientation, to the position shown on the diagram, with its bottom right corner in point S.
The red and blue squares are parallel to each other. Two construction lines can be drawn extending the horizontal edges of the blue square to the right.
The bottom construction line obviously goes through the top edge of the red square.
The top one will encounter point T and form a right angle triangle marked #2. This is because we did not change the squares’ orientation and we have formed a second angle with the value α in point S.
Consequently, triangles #1 and #2 are congruent, having two equal angles (α and the right angle) and an equal segment in between (b).
Step 3.
We now move again the blue square to the right until its left-top left corner is in point T.
By the same reasoning as in Step 2, the right-most edge of the blue square intersects point U. We created two other angles α in point T and another one in point U. We also created two new triangles marked #2 congruent with each other.
The vertical edge of the triangle on the top-right has length a. Thus, the leftover segment UV has length b - a.
We can now see that the two triangles marked #3 are congruent as they have two equal angles and an equal edge in between of length b – a.
The triangles marked with #4 are also congruent, as they have two equal angles and the same length edge in between, of length a.
The End
You may have realized that our proof is already completed. To help visualize it, we can swap the color of the areas between each couple of congruent triangles, the #2 couple, the #3 couple and the #4 couple (See the diagram below).
We then see that the area of the white square is exactly covered by blue and red, representing the areas of the two smaller
squares.
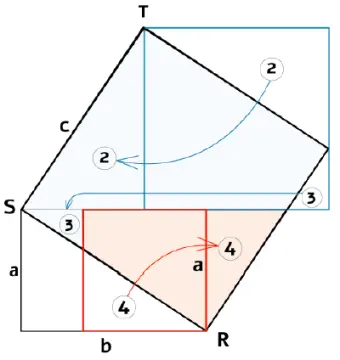
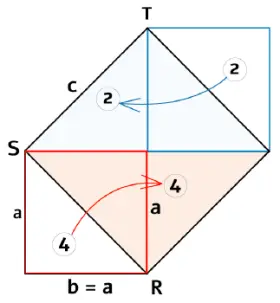
Note that if our right angle triangle was isosceles (b = a), then the couple of triangles #3 disappear and our procedure
would lead to the simpler diagram on the right.