
Configuration vector created by rawpixel.com - www.freepik.com
This post will guide you on how to automate your crypto trading without programming knowledge using KuCoin Trading Bot. KuCoin Trading Bot is a free trading tool which let traders save time by executing automated trading transactions on your behalf 24/7. Its easy-to-use user interface lets traders with no programming expertise to create their own trading bot.
Why Use a Trading Bot?
You might ask why would anyone use a trading bot. One advantage is that it can reduce the repetitive work you need to do when trading. It also gives you a lot of freedom because you don't have to look at the markets closely all the time because the trading bot will do it for you. It also reduces trading risks because they are great for tracking fluctuations in the market.
The KuCoin Platform offers four different types of trading bots. This guide will be demonstrating how to set-up a Spot Grid Trading Bot. It allows users to earn passive income by buying low and selling high. I am using this for now because it is simple making it suitable for beginners. if you wan to learn more about the the other types of trading bots, you can read the article here: Read Here.
1. Open a KuCoin Account. The first step is to create a KuCoin account. If you still don't have one, you can register by using my referral link here: Referral Code: r3WUKKX
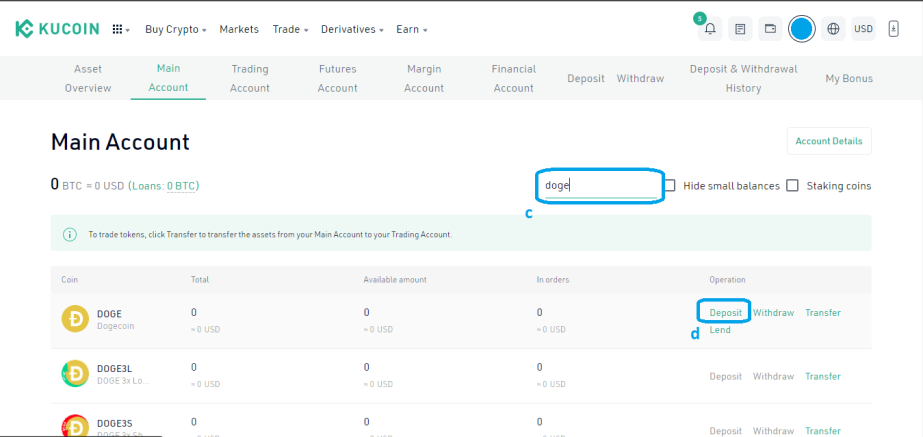
2. Open your "Main Account Wallet". After finishing the registration process, Click on the Wallet Icon (a) on the upper-right menu bar. Once you click this, you will be shown a drop-down menu which will let you choose "Main Account" (b). The Main Account wallet lets you receive and withdraw your crypto into and outside the exchange respectively.

3. Deposit Crypto of your choice. On your Main Account wallet, you will be shown a list of cryptocurrencies available on the exchange. I order to start a trading bot, you obviously need funds. To do this, proceed to the Search Bar (c) located on the right side. This will help you find the cryptocurrency you want to deposit quickly. For this guide, I decided to deposit $DOGE because it has a cheap transaction fee and quick (and also, it is a meme coin so, teehee). Once you type the crypto, click on the "Deposit" (d) option on the Operation column on the right side. I would suggest that you deposit at least $40 USD worth of crypto because this is the minimum amount you will need to create a trading bot. Some trading bots might need more than this amount depending on the trading pair you like so it won't hurt to deposit a bit of extra.
4. Obtain the Deposit Address. After clicking "Deposit", you will be shown be able to obtain your deposit address. Make sure to choose the right token and the network. You must be careful in choosing the network because some cryptocurrencies are already multichain (USDT, MATIC, etc.) and choosing the wrong deposit network might lead to losing your deposited tokens. The deposit address given is where you should send the crypto (in this case $DOGE). You might have to wait a few minutes for the deposited tokens to reflect into your "Main Account Wallet" depending on the required blockchain confirmations (in this case it's 36).

5. Transfer your Deposit to your "Trading Account Wallet". After depositing your crypto, you have to transfer it from the "Main Account Wallet" to your "Trading Account Wallet". The Trading Account Wallet is where you place the crypto you want to trade so you have to put it here. To do this, open your "Main Account" (b) and find your deposited crypto using the Search bar (c). Once you see your deposited crypto, click on "Transfer" (e) option under the "Operation" column. You will be able to change the direction from Main Account to Trading Account. This is the default option so you don't need to change anything on it. Set the amount of crypto to transfer and click "Confirm" (f).

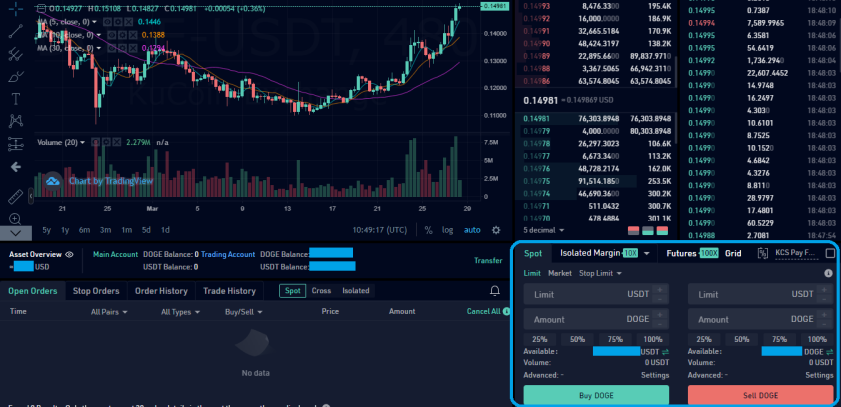
6. Trade your Deposit to USDT. You can skip this step if the crypto you deposited is the one you will directly deposit into a trading bot. For my case, I would like to create a trading bot specializing into the AMPL/USDT pair so I need to trade it to USDT. I would that you trade it into USDT because most trading pairs are denominated in USDT. This will give you more flexibility later on in choosing in case you haven't decided yet. To do this, click on "Trade" (g) and choose a pair with the USDT with it. In this case, it is the DOGE/USDT pair (h).

You will see a user interface similar to the one below. This shows the trading pair's chart and the bid and ask prices. It might be overwhelming at first but we don't need to focus too much into this for now. After all, we are here for creating an automated trading bot, not a being a hands-on trainer. For now, we just need to trade the deposited crypto ($DOGE) into USDT on the lower-right panel below. It is highlighted with blue border on the image below. I would suggest that you do a "Market price" transaction. This will automatically trade your deposited tokens at current market price and is instantly executed.
7. Open Trading Bot. After trading the deposited crypto into USDT, go back to the main page. Click on "Trade" (i) option found ont the upper-left menu bar. This will show a drop-down menu which will let you choose "Trading Bot" (j) option.

8. Create a Spot Grid Bot. You will be given four options on what trading bot you want to create. As stated before, we will create a Spot Grid Bot. Just click on the "Create Bot" (k) button in order to create it.

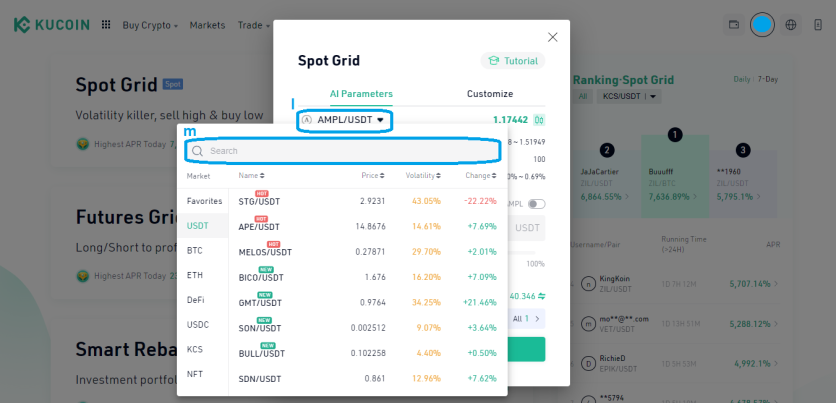
9. Choose your Desired Trading Pair. Once you click the Create button, you will be given the choice to select the trading pair you like on the drop-down menu (l). As you can see below, you will be given a couple of choices. For this guide, I will be using the AMPL/USDT pair. You can also use the Search Bar (m) to find the trading pair you desire. for starters, I would suggest choosing an already established trading pair with substantial volatility.
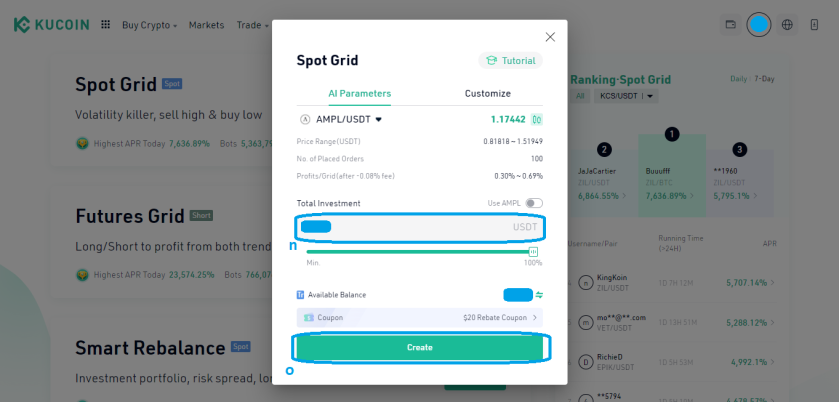
10. Enter Amount to be Invested on the Bot. After choosing the trading pair, you will be shown this dialog box below. Here, you can set the Total Investment (n) on the designated box. This is by default denominated in USDT but you can use the other crypto by activating the 'Use AMPL" slider just above it. In my case, I have received a $20 rebate coupon beforehand so I used it here. Once satisfied with the amount, click on the "Create" button (o).
After clicking "Create", you will be given a final chance to review the trading bot details you will make. Once checked, click on "Confirm" (p).

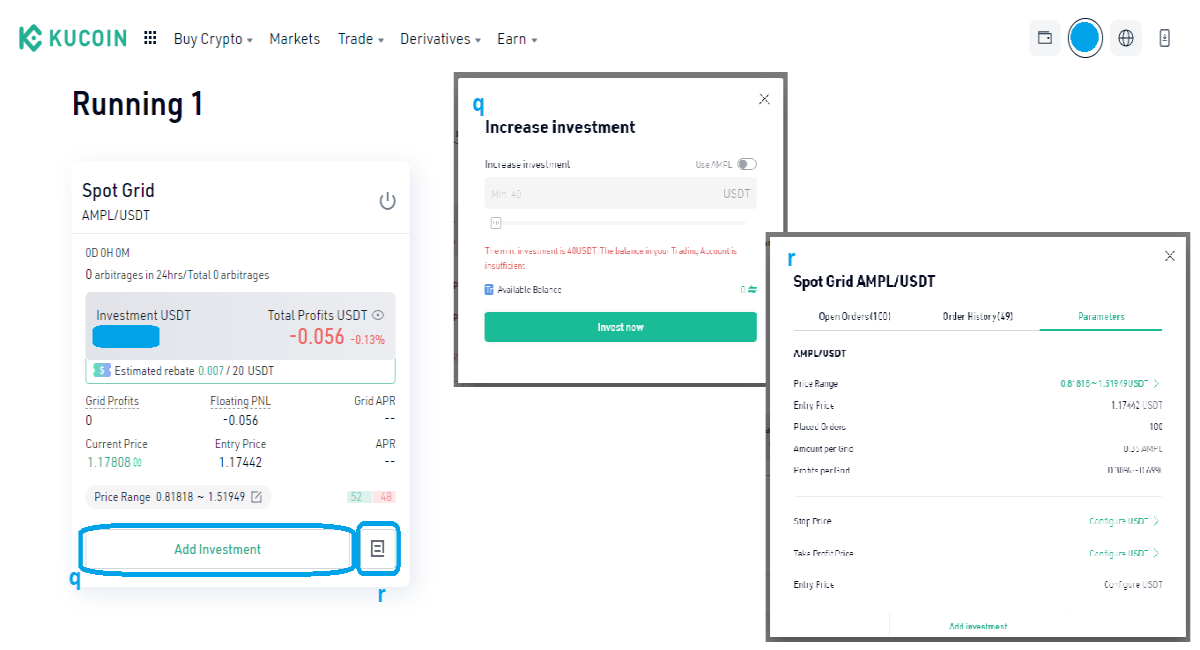
That's it. you have successfully created an automated trading bot that will do all the trading for you 24/7 for free. After creating the trading bot, you will be directed to a user interface similar to the one below. This shows the currently running trading bots you have. On this window, you will be able to "Add Investment" (q) if you want to increase the amount being traded in the bot. You can more details by clicking the small icon (r) beside "Add Investment". This will show you the open orders and the order history executed by the trading bot. You can also set parameters like stop price and target price if you want more control.
This post is created in line with the KuCoin Content Creator Program which will allow more people to participate in the construction of the the KuCoin Ecosystem.
KuCoin is a crypto exchange which supports over 600+ tradable assets. It is also known as the "People's Exchange" built for all classes of investors and is one of the top 5 crypto trading platforms. It is also named the Best Crypto Crypto App of 2022 for enthusiasts by The Ascent. You can learn more about Kucoin here: Read Here
Check more of my content here: https://orbithunter.blogspot.com/
Check out my Twitter: @_orbithunter
Configuration vector created by rawpixel.com - www.freepik.com


