
Ordinal is a scheme used to number satoshi values that allows tracking and transfer of individual satoshis. These numbers are called ordinal numbers. Satoshis are numbered in the order in which they were mined, and are transferred from transaction input to transaction output in a first-in, first-out order. Both the numbering scheme and the transfer scheme rely on order, the numbering scheme depends on the order in which satoshis were mined, and the transfer scheme depends on the order in which transaction inputs and outputs were generated. That is what people call ordinal.
On Ubuntu systems, Bitcoin Full Node has been upgraded to the latest Bitcoin Core V0.25 along with bitcoin-qt, bitcoin-cli, and bitcoin-wallet. This version also comes with the latest Ordinal installed, a numbering scheme for satoshis that allows tracking and transfer of individual satoshis. For more information, please visit the Ordinal Documentation.
In this article, we will introduce three topics:
- GCP(Google Cloud Platform): GCP is a suite of cloud computing services offered by Google company.
- Step by Step guide: Guide on how to set up Bitcoin Full Node on Google Cloud Platform(GCP).
- Why do we need bitcoin full node: Running a Bitcoin node server allows each user to interact with the Bitcoin network individually and more securely. Bitcoin nodes allow users to prove ownership of their bitcoins without relying on any third party.
If you want to save time to setting up an Bitcoin Full Node ON GCP with fully synced environment, you can opt for Techlatest’s Bitcoin Full Node, available on the GCP marketplace. By launching and connecting to Techlatest’s Bitcoin Full Node on GCP users can set up their synced environment in a few minutes, rather than going through a lengthy installation and syncing process which takes days to sync several GBs of ledger data and costs hundreds of dollars in bandwidth cost. Why you should run a bitcoin full node: A full node is a program that fully validates transactions and blocks. Almost all full nodes also help the network by accepting transactions and blocks from other full nodes, validating those transactions and blocks, and then relaying them to further full nodes.
Preinstalled setups include
- Bitcoind & Bitcoin wallet GUI
- Pre synced ledger (till the date of VM publishing)
- Ordinal - a numbering scheme for satoshis
- Leather Desktop App and FirefoxChrome browser extension
- Remote desktop
- Fish shell with auto completion/suggestion
- Visual studio code
Installing and setting up a Bitcoin Full Node on Google Cloud Platform (GCP)
This step-by-step guide describes how to launch and connect to Techlatest’s Bitcoin Full Node on Google Cloud Platform(GCP).
Step 1
Open Bitcoin Full Node Listing on GCP Marketplace.

Step 2
Click on the Launch Button.
It will take you to the agreement page. On this page, you can change the project from the project selector on top navigator bar as shown in the below screenshot. Accept the Terms and agreements by ticking the checkbox and clicking on the AGREE button.
For zone, you must select us-central1-a . The VM can be deployed only in us-central1-a.
Optionally change the number of cores and amount of memory. (This defaults to 2 vCPUs and 7.5 GB ram.). Optionally change the boot disk type and size. Boot disk size should be greater than or equal to 700 GB. (This defaults to “Standard Persistent Disk” and 700 GB respectively).
Optionally change the network name and subnetwork names. Be sure that whichever network you specify has ports 22 (for ssh) and 3389 (for RDP) exposed. Click Deploy when you are done. Bitcoin Full Node Suit will begin deploying.

Step 3
After you complete the steps, the summary page will be displayed when the compute engine is successfully deployed. Click the Instances link to open the instances page.
Step 4
On the instance page, click on the “SSH” button, select “Open in browser window”.
Step 5
This will open SSH window in a browser.
Step 6
Create a password for the user on your Ubuntu server with the following command
$ sudo passwd ubuntu
Step 7
Once the password for the user on your Ubuntu server is done, you can directly connect to the VM desktop environment from your Windows machine using the RDP protocol or if you are using a Linux Desktop you can use the Remmina application to remote the server.
Step 8
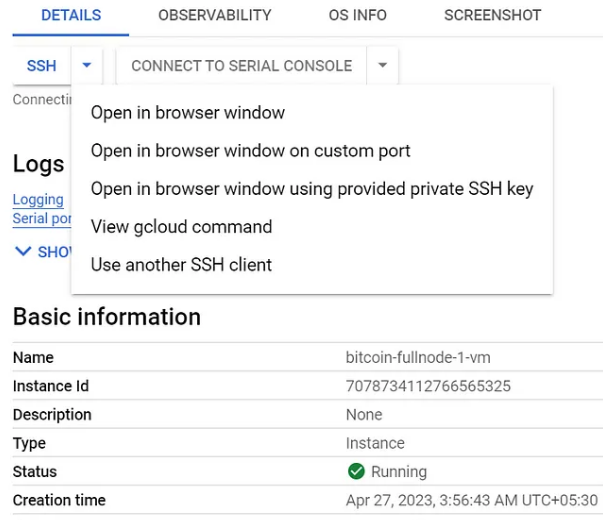
To connect using RDP through a Windows Machine, first note down the external IP of the VM from the VM details page as highlighted below.
For more details, please see the image below.

Step 9
Then From you local windows machine, goto “start” menu , in the search box type and select “Remote desktop connection”
Step 10
In the “Remote Desktop connection” wizard, copy the external IP and click on the connect button.
Step 11
This will connect you to the VM’s desktop environment. Provide “ubuntu” as the userid and the password set in step 6 to authenticate. Click on the OK button.

Now you are connected to the out of box Bitcoin Full Node environment via Windows Machine.
Step 12
To connect using RDP via Linux machine, first note the external IP of the VM from VM details page,then from your local Linux machine, goto menu, in the search box type and select “Remmina”.
Note: If you don’t have Remmina installed on your Linux machine, first Install Remmina as per your linux distribution.
Step 13
In the “Remmina Remote Desktop Client” wizard, select the RDP option from dropdown and paste the external ip and click enter.
Step 14
This will connect you to the VM desktop environment. Provide “ubuntu” as the userid and the password set in step 6 for authentication. Click OK.
Now you are connected to the out of box Bitcoin Fullnode environment via Linux machine.
Step 15
Once VM is provisioned, you can start Bitcoin node either via command line or using the Bitcoin QT GUI wallet.
Go to terminal Remmina and execute below command as ubuntu user to run Bitcoin daemon in background -
$ bitcoind
To verify the command execution or to monitor the daemon, you can tail the bitcoin debug log.
$ tail -f /home/bitcoin/debug.log
Start the Bitcoin sync process
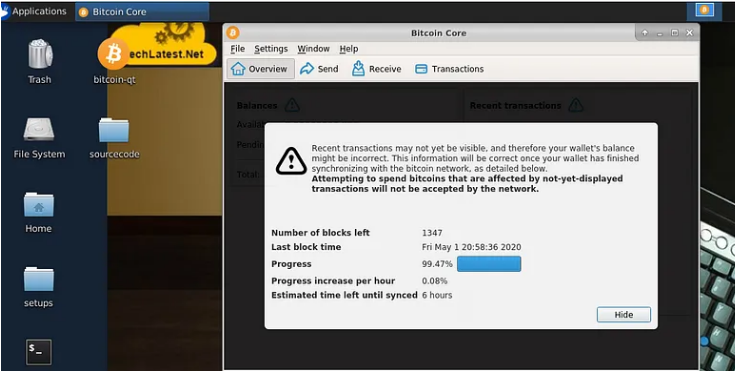
You can also start the sync process by running the Bitcoin-QT GUI wallet. For this, connect to the VM using RDP as explained in steps 8 to 12. Once connected, click on bitcoin-qt to start the sync process. A window may appear asking to mark the executable application. Click the “Mark Executable” button to avoid seeing this window in the future.
If you want to stop the synchronization process, run the command below.
$ bitcoin-cli stop
If you have stopped the Bitcoin daemon, then delete the wallet.dat file
$ sudo rm /home/ubuntu/.bitcoin/wallets/wallet.dat
This article can be used as a step-by-step guide on how to install and set up a Bitcoin Full Node server on Google Cloud Platform (GCP), starting with creating a GCP account and subscribing to the Bitcoin Full Node listing on the GCP Marketplace.

The FreeBSD Handbook - System Administrator
## Table Of Content ##
1. FreeBSD Getting Started Guide
2. PKG and Ports For Managing Software
3. Working with Files and Directories
4. Managing Users And Groups
5. Updating and Building the Kernel
6. Monitor Server Performance
Read Ebook
Author:
Linux BSD Blockchain - publish0x


