
Anaconda is an open source distribution for the Python and R programming languages, which contains many packages for working with big data. The developers of this distribution have compiled these packages to facilitate installation and further use.
Anaconda includes over a thousand different data processing packages. Also included with Anaconda is conda, a small command-line distribution that makes it easier to work with Anaconda.
Before we start the Anaconda installation process, you should first know what Anaconda/Conda is. We quote the definition of Conda from its official website:
"Conda is an open source package manager and environment management system that runs on Windows, macOS, and Linux"
Conda is very easy to install, run, and update packages and their dependencies. Conda easily creates, stores, loads, and switches between environments on your local computer. Conda is designed for Python programs, but it can create packages and distributions of software in any language.
The question arises: why are we suddenly talking about Conda? We all know that this is a package management system used to install and manage application packages written in Python.
This system also has limitations. It can only be used for Python packages, like pip that works with Python and ignores dependencies from non-Python libraries (HDF5, MKL, LLVM) that do not have installer files in their source code. Simply put, pip is a package manager that makes it easy to install, update, and remove Python packages. It works with Python virtual environments.
While Conda is a package manager for any software (install, update, uninstall). It works with virtual system environments. Conda as a package management and installer tool with much more functionality than pip. Conda can handle dependencies of libraries outside Python packages, as well as Python packages themselves.
A. Download the Anaconda bash script
To install Anaconda on an Ubuntu server, you need to download the bash script used to install the latest Anaconda, verify it, and then run it.
First, you need to update your Ubuntu apt package system with the following command:
Update apt packageroot@hostname1:~# apt update -y && apt upgrade -y
Since we are going to download Anacond, we recommend installing the curl and bash packages first.
Install curl & bashroot@hostname1:~# apt install bash && apt install curl && apt install wget
Then you open the Anaconda Package Distribution Page. Find the latest version of Anaconda for Python 3. and copy the link address.
We recommend that when downloading, your Anaconda download file is stored in a temporary folder, such as "/tmp". This right is intended so that the master file is easy for us to delete after the installation process is complete. Or you can move it to another folder as an archive. Okay, let's just download Anaconda.
Download Anacondaroot@hostname1:~# cd /tmproot@hostname1:/tmp# curl -O https://repo.anaconda.com/archive/Anaconda3-2024.02-1-Linux-x86_64.sh% Total % Received % Xferd Average Speed Time Time Time CurrentDload Upload Total Spent Left Speed100 997M 100 997M 0 0 7298k 0 0:02:19 0:02:19 --:--:-- 7887k
or with wget
root@hostname1:/tmp# wget https://repo.anaconda.com/archive/Anaconda3-2024.02-1-Linux-x86_64.sh
B. Install Anaconda with Bash
Once you have finished downloading the Anaconda installer, you can run Anaconda with bash as in the example below.
Install Anacondaroot@hostname1:/tmp# bash Anaconda3-2024.02-1-Linux-x86_64.sh
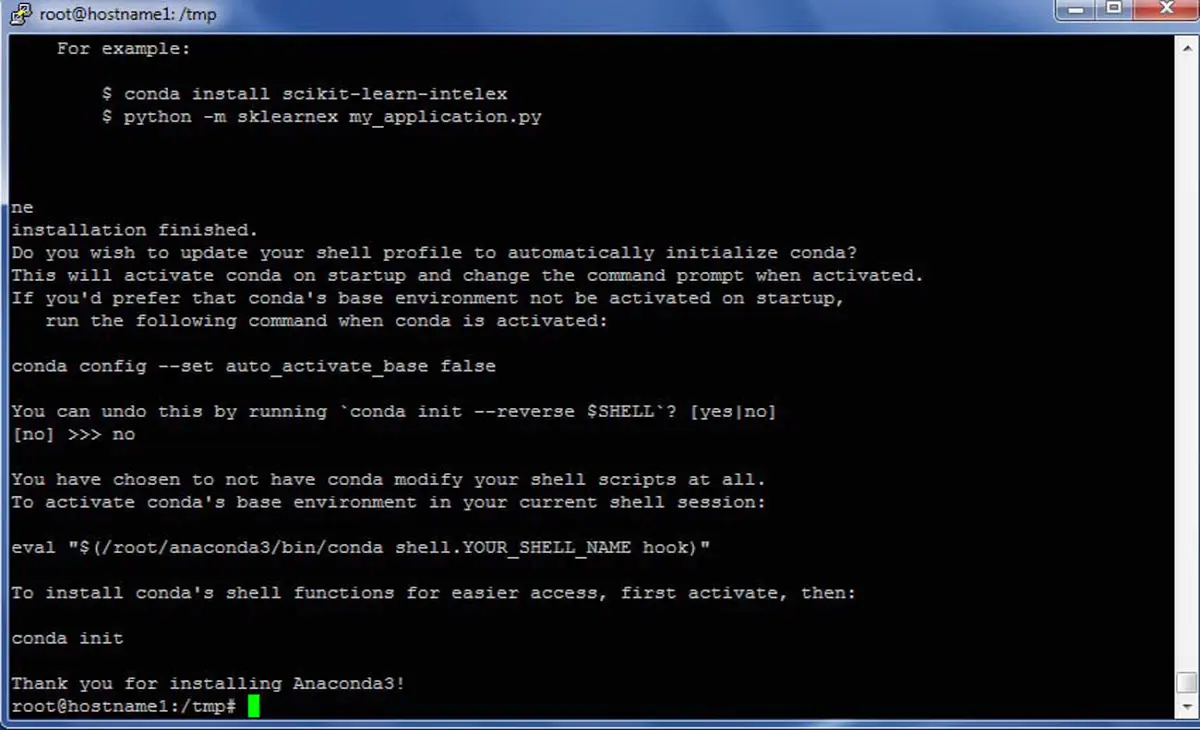
The installation process is declared complete if the message "Thank you for installing Anaconda3!" appears on your shell menu, as shown in the following image.
1. Activate Anaconda
After installing Anaconda, you cannot use it directly. We must activate the Anaconda environment to use it. Run this command to activate the Anaconda environment.
Activate Anacondaroot@hostname1:/tmp# source /root/anaconda3/bin/activate(base) root@hostname1:/tmp#
The command above is used to activate Anaconda. Try to pay attention to the blue writing above. After you activate Anaconda, the shell display will change to the blue color above, which means that you are now in the Anaconda virtual environment.
2. Verify Anaconda Installation
After installing Anaconda on Ubuntu, verify the installation by running this command in Terminal to check and get complete information about the installed Anaconda.
Anaconda Verification(base) root@hostname1:/tmp# conda info
active environment : baseactive env location : /root/anaconda3shell level : 1user config file : /root/.condarcpopulated config files :conda version : 24.1.2conda-build version : 24.1.2python version : 3.11.7.final.0solver : libmamba (default)virtual packages : __archspec=1=core2__conda=24.1.2=0__glibc=2.39=0__linux=6.8.0=0__unix=0=0base environment : /root/anaconda3 (writable)conda av data dir : /root/anaconda3/etc/condaconda av metadata url : Nonechannel URLs : https://repo.anaconda.com/pkgs/main/linux-64https://repo.anaconda.com/pkgs/main/noarchhttps://repo.anaconda.com/pkgs/r/linux-64https://repo.anaconda.com/pkgs/r/noarchpackage cache : /root/anaconda3/pkgs/root/.conda/pkgsenvs directories : /root/anaconda3/envs/root/.conda/envsplatform : linux-64user-agent : conda/24.1.2 requests/2.31.0 CPython/3.11.7 Linux/6.8.0-45-generic ubuntu/24.04.1 glibc/2.39 solver/libmamba conda-libmamba-solver/24.1.0 libmambapy/1.5.6 aau/0.4.3 c/TdA3lUHVCnMxhFfq_ro6Sw s/It8aSqeQwJs4alo4HwJvUw e/M7za-JgQwW6iP4nQvsFYbQUID:GID : 0:0netrc file : Noneoffline mode : False
(base) root@hostname1:/tmp#
To check Anaconda info, you must be in the Anaconda virtual environment, as in the example above (blue color).
3. Check Anaconda version
Still in the Anaconda virtual environment, if you want to know the version of Anaconda installed on your Ubuntu server, run the command below.
Check Anaconda version(base) root@hostname1:~# conda --versionconda 24.1.2
4. View List of Installed Anaconda Packages
You can view the list of installed packages in Ubuntu by running this command.
Exit from Anaconda(base) root@hostname1:~# conda list
5. Initialize Environment with conda init Command
Now you can run the conda init command to initialize your environment.
Exit from Anaconda(base) root@hostname1:~# conda init
6. Exit Anaconda
Because Anaconda runs in a virtual environment, to stop Anaconda you must exit the Anaconda virtual environment. Run the following command to exit the Anaconda virtual environment.
Exit from Anaconda(base) root@hostname1:~# source deactivateDeprecationWarning: 'source deactivate' is deprecated. Use 'conda deactivate'.root@hostname1:~#
7. Update Anaconda
Anaconda updates its installation packages very quickly, so you should update Anaconda as often as possible to get the latest installation packages. Run the command below to update the Anaconda package (Do not delete the Anaconda installation master file).
Update Anacondaroot@hostname1:/tmp# bash Anaconda3-2024.02-1-Linux-x86_64.sh -u
The "-u" option/flag above is used to update Anaconda.
C. How to use Anaconda
For those of you who are new to Anaconda, you must be confused about how to use Anaconda. How to use Anaconda is almost exactly the same as the pip package. To make it clearer, we will give an example of how to use Anaconda to install a Python package called "pandas"
Install pandas with Anaconda(base) root@hostname1:~# conda install pandas
D. How to Create a Python Virtual Environment with Anaconda
You can create and activate a python virtual environment in Anaconda by giving the virtual environment a name with the conda activate command, as we have shown below:
create a virtual environment with Anacondaroot@hostname1:~# cd /usr/local/etcroot@hostname1:/usr/local/etc# conda create --name condavirtualChannels:- defaultsPlatform: linux-64Collecting package metadata (repodata.json): doneSolving environment: done
## Package Plan ##
environment location: /root/anaconda3/envs/condavirtual1234567890
Proceed ([y]/n)? y
Preparing transaction: doneVerifying transaction: doneExecuting transaction: done## To activate this environment, use## $ conda activate condavirtual## To deactivate an active environment, use## $ conda deactivate
1. Activating Anaconda Virtual Environment
Once you have created a virtual environment named "condavirtual", you need to activate it. Here is how to activate the "condavirtual" virtual environment in Anaconda.
Enable Anaconda virtual environmentroot@hostname1:/usr/local/etc# conda activate condavirtual(condavirtual) root@hostname1:/usr/local/etc#
2. Disable Anaconda Virtual Environment
If the Anaconda virtual environment is no longer used, you can disable it with the following command.
Disable Anaconda(condavirtual) root@hostname1:/usr/local/etc# conda deactivateroot@hostname1:/usr/local/etc#
At this point, you learned to Setup Anaconda on Ubuntu server. In addition, you can also use conda, package, and environment manager to create environments to isolate our projects that use different Python versions and/or different package versions. and you can also use it to install, uninstall, and update packages in your project environment.
I think the content of this blog is enough here, hopefully what we have explained in this blog can make it easier and help you learn Anaconda.






