Introduction

In my first TryHackMe room walkthrough post, I am going to be reviewing the "Sudo Security Bypass" room. I will be covering CVE-2019-14287, a vulnerability found in the sudo program that was originally discovered by researcher Joe Vennix. I’ll touch on what PAM and Sudo is. In the demonstration, I'll show you how an attacker can exploit Sudo before version 1.8.28 to bypass policy blacklists and session PAM modules, which can lead to incorrect logging by invoking sudo with a crafted user ID. This vulnerability allows unauthorized access to Runas ALL sudoer accounts by manipulating the user ID parameter when invoking the sudo command. If you're interested in cybersecurity, please regularly check back on Cyb3r-S3c and check out my YouTube channel, Cyb3r_0verWatch for more informative content.
What is PAM?

PAM, short for Pluggable Authentication Modules. PAM is a framework used in Linux systems for authentication management. It provides a flexible and modular approach to handle authentication tasks, allowing administrators to configure various authentication methods and policies. The Linux PAM handles the authentication process so that programs don't have to. This enables programs such as Sudo to delegate the authentication process to the underlying PAM system. Linux PAM supports a wide range of authentication methods, including traditional password-based authentication, two-factor authentication, smart cards, biometric authentication, and more. Linux PAM loads shared libraries known as PAM modules. Each module is responsible for a specific authentication task, such as verifying passwords, checking account status, or performing additional security checks. These modules are configurable in a variety of ways to achieve a suitable authentication method.
What is SUDO?

Typically, users initiate a sudo command by entering "sudo" followed by the desired command in the CLI, for instance, "sudo nmap". When a user possesses the necessary permissions to use sudo, their information is usually listed in the sudoers file located at /etc/sudoers. This file serves as a means for administrators to assign system privileges to specific users, thereby allowing administrators to exercise control over user actions.
Whenever you attempt to execute a command that requires root privileges, Linux verifies your username against the entries in the sudoers file in a lot of cases through PAM. This authentication process occurs when you input the "sudo" command. If your username is not found in the list, you will be unable to execute the command or run the program while logged in under that user. Understanding the concept of the sudoers file is fundamental as it governs access rights and plays a vital role in ensuring system security. It is essential to comprehend this mechanism in order to navigate the Linux environment effectively.
Sudo Exploit (CVE-2019-14287)

The sudo vulnerability documented in CVE-2019-14287 hinges on the configuration of the sudoers file. Specifically, if the sudoers file is set up with the entry shown in the CLI "<user> ALL=(ALL:!root) NOPASSWD: ALL," it is intended to restrict the user from executing commands as the root account. However, a vulnerability was discovered in versions prior to 1.8.28 that allows an attacker to execute commands as root. The exploit involves utilizing the command "sudo -u#-1" followed by the desired command. When this sequence is executed, the operating system (OS) incorrectly interprets "-1" as "0," which represents the user ID (UID) of the root account. Consequently, the OS executes the command with root privileges. It is important to note that this exploit only functions if the user account being used already possesses non-root sudo permissions.
Walkthrough

1. In the Sudo Security Bypass room I started the vulnerable host. On the page you can start your attack box which is the browser based system. There is a help button that links to the THM KB. There is a gear icon that provides access to writeups on the room, as well as the ability to reset or leave the room. Check out the "Offensive-S3c: Sudo Security Bypass (TryHackMe Room)" video for more details.
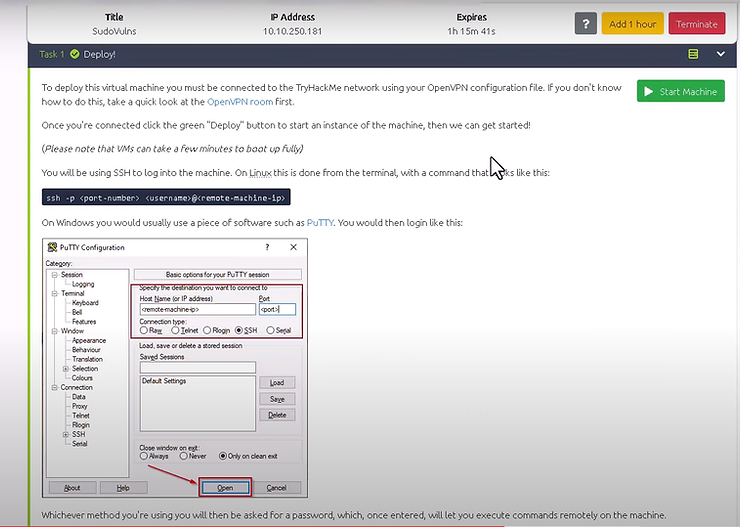
2. Reviewing Task 1 its pretty self-explanatory, provides some introductory information on how to deploy the target host, as well as connect to it via ssh.

3. In kali I connected via VPN to the TryHackMe network. You can see my interface tun0 showing my assigned tryhackme IP.

4. Target host is up and running and Kali updated. I connected to the target host via SSH from kali using the following command “ssh -p 2222 [email protected]" then authenticate with the provided password “tryhackme”.

5. I logged in to the vulnerable host and ran the sudo -l command. Sudo -l allows me to see what privileges granted to the account I am logged in as.
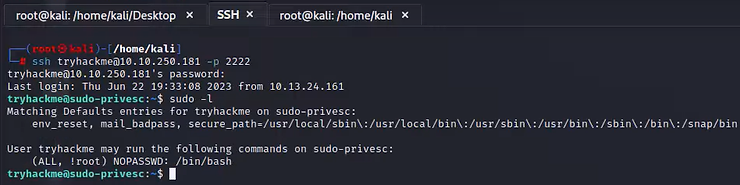
6. I ran sudo -l and I can see from the output in the CLI that the account does not have sudo permissions to run /bin/bash.

7. In order to exploit the sudo vulnerability I ran the following command “sudo -u#-1 /bin/bash”. When this command is executed, the operating system (OS) will incorrectly interpret "-1" as “UID 0," which represents the user ID (UID) for the root account.

8. As you can see after running the sudo command I was able to escalate to root as shown in the CLI prompt and when I run the whoami command.

9. Now that I am root I navigated to /root/ and read the flag in root.txt.
Conclusion
With that, I was able to exploit a vulnerability that gave me root privileges fairly easy. In this blog I provided an overview of the THM room. I discussed Sudo and what it does. I also covered the sudo vulnerability. Finally, I documented a walkthrough on how to exploit the vulnerability. Understanding the intricacies of this vulnerability and its implications underscores the significance of keeping the sudoers file properly configured and staying updated with the latest versions to mitigate security risks. And this goes pretty much for all software installed on a host.
Thank you for reading the Sudo Security Bypass TryHackMe room blog post. If you find this content informative and you are interested in cybersecurity, please check back regularly to the Cyb3r-S3c website for new content. Although this blog provided a quick walkthrough, I sincerely hope it provided you with valuable insights. If you have any questions, please feel free to send me a message from the Cyb3r-S3c website listed in the description. Until next time keep learning, only way to improve is to keep learning.
/Signing Off
Pragmat1c_0n3