
People are getting crazy with this new launch, why? cos is there a high % chance of getting a great drop. Hunters, Degens, and many more are entering as numbers not lie. Let me explain a bit and start the post.
If you know about & want to go directly on how to participate, okay, scroll down and check the 2nd half of this post
On February 23, Coinbase, celebrated the launch of Base, a layer-2 scaling network inside the Ethereum space developed in partnership with Optimism. Coinbase also released a free open-edition Ethereum NFT called “Base, Introduced,” which anyone can mint through the Zora NFT minting platform until the window closes on March 5. All started with this Twitter thread:
TechCrunch posted an article the same day that Coinbase released the Twitter thread, and we can read the following:
"The L2 is a “secure, low-cost, developer-friendly” chain that aims to help builders create dApps on-chain, the company stated. Base is built on the MIT-licensed OP Stack in collaboration with the layer-2 blockchain Optimism, which is also focused on the Ethereum chain." Techcrunch source
Jesse Pollak, lead for Base and head of protocols at Coinbase, told TechCrunch this solid sentence:
"Our goal is to bring about phase 4 of Coinbase's master plan: to bring a billion users into the crypto economy."
Coinbase's master plan? I need to dig a bit when I read something sentenced like this, and then... I visited Coinbase's blog to dig into it. Here is their Masterplan table explaining it in a short and simple way.
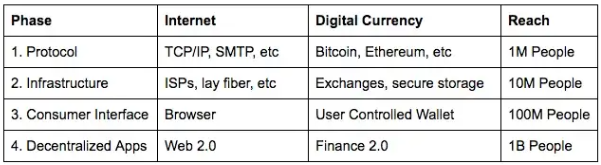
Coinbase's master plan phases
After this, let me start on how to make the task that is getting us here
Step 1 - How to connect to the Goerli Testnet Network (Setting up on our browser wallet)
BEFORE ANYTHING, we add the Goerli network, to do it in a safe way we open Metamask. And, in the place where we choose the network, click on add network, Metamask itself will open an interface to choose a network, in its search engine we write Goerli and add it.


If the network appears blocked on your Metamask, go thru the options and activate TEST NETWORKS; follow this route on your Metamask's interface:
SETTINGS > ADVANCED AND SELECT THE OPTION

Step 2 - Starting with the GHO Base/AAVE task on their dedicated website
Now, we can proceed to visit the AAVE's site related to this "task": https://gho.aave.com/faucet and log-in with the Metamask.

The interface itself will ask you to select the network.
We proceed to claim the free coins from the interface, respecting the waiting queue times, normally no more than 20 seconds each. From here, we can interact with the interface by adding our testnet coins to the repository. At this point, if the selected network is not the correct one, the interface itself will ask us to change to the Goerli network, which is not the same as Goerli Base.

The steps are the same as when interacting with any smart contract in order to move coins to the contract:
Approve, and add to the smart contract.

As a result, the newly added coins change from the area below to the area above (Your supplies). Notice that in the previous image, "Your supplies" was empty and now, has listed all the movements we made.

Step 3 - Verifying our participation by minting an NFT on Polygon's Mainnet
This last step is still free. However, you have to pay the transaction fee on Polygon's mainnet. This network is characterized by low fee prices, so it won't cost more than a few cents to pay on the native token, Matic. If you do not have Matic you will not be able to complete this step, although there are multiple ways to get enough. I will assume that you have enough to interact with the network, so we proceed to step 3.
We log into the website https://collect.gho.xyz/ with the same wallet that we have completed the previous steps. And this will appear on our screen.

Click on "COLLECT!" Button and proceed.

Wait for your wallet pop-up confirmation

And we finished, you can browse your wallet transactions on Polygon Scan to check if is minted correctly.

Thanks for reach this point of the post. And if you have reached this point, I must thank you for your patience and attention. If you wish to be kept up to date, you know that by following me you can reach me for other publications of your interest. Thank you very much and have a happy day. See you on next ones.


