
Intro
In this post I will show you how to get set up on Coinbase App and go through all the important features on Coinbase, including adding payment methods, buying and selling crypto and other cool features they offer. If you are completely new to Coinbase, click on the link below and once you have followed this tutorial and signed up. When you deposit $100 you will receive $10 instantly into your account as a deposit bonus.
Sign up link 👉 https://coinbase.com/join/gillon_j7
I will also be discussing a crypto currency called XYO. This is a coin that you can earn for FREE from a platform that pays you to Geomine. I use Coinbase as a payout option as you don’t pay any fees when you request a withdrawal. I will leave the link below for this platform so make sure you check this out as this is a great way to make some passive income.
Coin App 👉 https://www.youtube.com/watch?v=7VonPm_-v64&t
My name is Ryan, welcome to my channel “Crypto Earnings 101” where I help you make extra crypto online. So if you are interested in making crypto by playing games, watching videos, running apps, staking, DeFi and investing into different platforms then please hit that subscribe button so you won’t miss out on any videos I upload in the future.
How To Sign Up
Before I log into the app, there is a web based version for Coinbase, if you go to coinbase.com you will land on the desktop version. The app and the browser aren't too different and all the features are available on both, so you have the option to use the browser and the app, if you wish. For the purpose of this post, I am going to go over the app, as I believe this is what most people use, as you always have your mobile phone with you and it’s super quick to buy, trade and sell via the Coinbase app
The app is available for both iOS and Android devices. I will go through the requirements of what you need when you first sign up, because I am already signed up unfortunately i can’t show you this in pictures. When you first log in, you need to supply Coinbase with your full name, address and date of birth. After this you will need a document for KYC or “Know Your Customer”, in the UK this can be a driving license or a passport. Other countries will also be able to supply an ID card as well as a passport and driving license. Once you have given them all the correct details and documents, your account will be reviewed and then you will receive an email letting you know that your account has been verified and you can now access Coinbase app. This process can take anywhere between 30 minutes to 48 hours, so just be patient and your account will be verified.
Coinbase App Dashboard
When you first log into the app, you land on this screen( see pic below).

You can see your total portfolio balance displayed in the top left, just under this, there are buttons to buy, sell, convert and receive crypto. I personally don’t do a lot of buying and selling on this app, I only use Coinbase for a couple of reasons which I will go into later on in this post. If you scroll down a bit, you can see a watchlist (see pic below) for a bunch of different crypto currencies, you can add more crypto to the list if you want to.
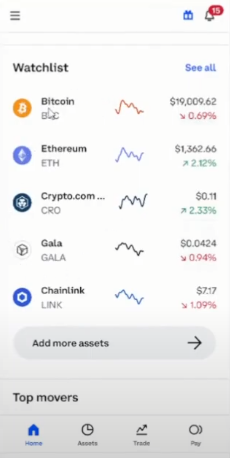
I use this feature on a daily basis as the app is quick to open, easy to use, the charts have all the info you need and I like the look of the user interface. If you scroll further down you can see the top movers on the market and interesting crypto articles that are worth reading every now and again. (See pic below)

Payment Methods
Now that you have signed up, I will now go over how to add payment methods so you can deposit Fiat and start buying crypto currency. If you aren’t already on the main screen, in the bottom left, click on “Home”. This will take you back to the main dashboard, in the top left, click on the 3 lines and it will slide across another menu. You want to click on “Profile & Settings” which takes you here. (See pic below)
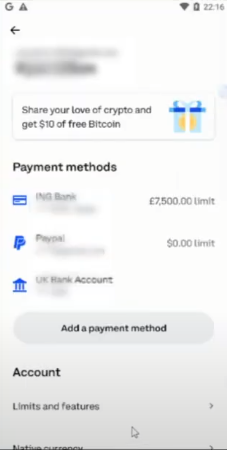
I already have my Paypal, debit card and UK bank account linked, so to link any of these you click on “Add a payment method” which brings up 4 different options. I highly recommend adding your paypal as this is used for withdrawals which I go into shortly.
Debit cards are easy to add, just type in your details. UK banks are a bit more complex, you link this by sending £2 via faster payments to the account number and sort code provided by Coinbase. Please make sure that the bank account is in your name and you include your unique reference number with the payment, so the system can identify your account. If this is done correctly, your account should be linked within 1-4 hours and you are then able to deposit and withdraw your assets from Coinbase.
How To Buy Crypto
Now that you have learned how to add a payment method, I will show you how to buy crypto. If you go back to the “Home” screen, click on “Buy” in the top left, you will then see a list of all the different crypto currencies. (See pic below)

These are all the major crypto currencies, unfortunately Coinbase doesn’t support as many coins as other exchanges but it still supports a wide range of coins. For the purpose of this tutorial, I will show you how to buy bitcoin. If you click on Bitcoin, it will take you to this screen (see pic below).
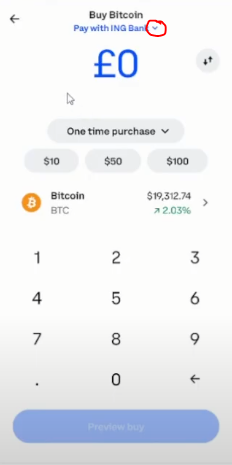
This is why it is important to add a payment method first, as you can see it automatically selects one of your payment methods which you can change by clicking the arrow next to it. My currency is set at Pounds but yours might be Euros or Dollars. Let’s say I want to buy £10 worth of Bitcoin, you can choose to type the price in or request a certain amount of Bitcoin by pressing the two arrows on the right. I am just going to type in £10 and then you press “Preview”. (See pic below)
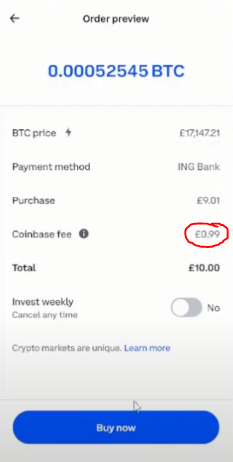
The preview screen tells you how much you will receive in Bitcoin, what price you get it at and how much you pay for a fee. All exchanges carry a fee when you pay with a debit card so this is important to note, the fee isn’t added on, it is just taken off from the total you are depositing. Once you are happy with everything click on “Buy Now” and your transaction will be processed and you should receive your Bitcoin within 30 seconds and also receive a notification via email saying your transaction has been successful.
Portfolio (Fiat and Crypto)
After you have bought crypto or deposited Fiat currency, you might wonder where to see this and how to access it. Head back to your “Home” screen and if you click on “Assets” at the bottom of the app, you’ll land on this screen (see pic below).

The assets page will show you your total balance of your portfolio, along with how much growth your account has made over a certain period of time. If you scroll down (see pic below) you can see all the assets you hold.

If you bought Bitcoin or deposited FIAT, this is where you will find it. You can click on any of the crypto currencies here to quickly get to the “Trade” section where you can buy, sell or convert. I will now show you how to Sell your coins.
How To Sell Your Crypto
If you head back to your assets screen, I will choose XYO for this example. Click on any of the crypto currencies you want to sell and then click on “Trade” and then “Sell”. It is the same kind of screen as the buy option, all you need to do is select a withdrawal method. If you have the option to use paypal, I recommend this as this is paid to your account instantly. There is a very small fee when using this service so it is best to withdraw when you have larger amounts compared to smaller amounts. Once you are happy with everything, click on “Preview” and just like the buying screen, you will be given all the info, such as price you are selling at, how much in crypto, where it is being withdrawn to and how much the fee is. After you have reviewed, click on “Sell” and you will receive an email notification and you should be paid instantly to your paypal account. This is a really easy way to sell coins to FIAT compared to other exchanges, another way is to use the convert option, which I go over now.
Coin App Payment Proof
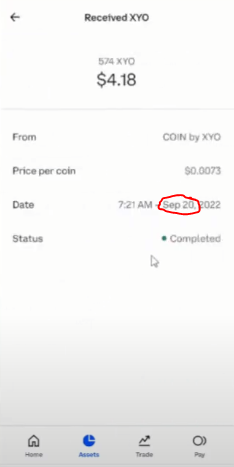
Just before I go over how to convert your crypto, since I am already in my XYO Wallet I will show you payment proof from Coin App, this is the Geomining platform I was talking about earlier. As you can see from my history (see pics below)

I have received XYO from COIN. If I click on this it shows the transaction in more detail. As you can see, I received 574 XYO on the 20th September (see pic below). If you are wanting to see how Coin App works, I have left a link for my YouTube video in the below. This will explain exactly how this platform works and how to use it to earn extra crypto currency.
Coin App 👉 https://www.youtube.com/watch?v=7VonPm_-v64&t
How To Convert
If you go back to the “Home” screen and click on “Convert” at the top, it will take you to the convert section on the app. What this does, it easily converts one crypto to another crypto with just a couple of clicks. This is a great section for people that don’t know how to trade, converting is really quick, easy and takes all of the hassle out of trading.
For the purpose of this tutorial, I will convert XYO to MATIC.
When you land on the convert screen (see pic below) you can see it has a coin on the left and a coin on the right. The coin on the left is the one you are converting from and the coin on the right is the one you are converting to.
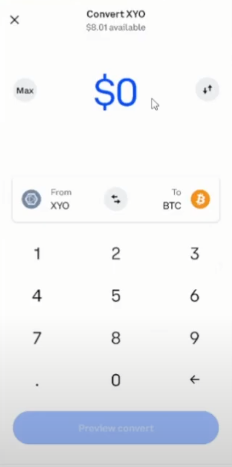
To change these, simply click on them and then choose from the list of available coins. Since XYO is already selected for me, I will choose MATIC to convert my coins from XYO. You can click on MAX or manually type in how much you want to convert and click “Preview”, it will then tell you the exchange rate and how much you will receive in total for this conversion. Click on “Convert”, this takes a few seconds to complete. After it has been processed, go back to your assets screen and refresh, you can now see your converted crypto in your wallet.
Learning Rewards
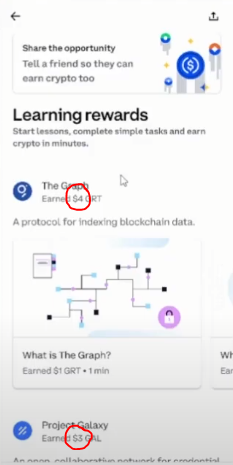
Another reason why I use Coinbase is for the Learning Rewards section (see pic below). To get to this section click on the 3 lines in the top left, this brings down a menu, click on “Learning Rewards”. Every now and again you are given free airdrops for certain coins, you complete a small quiz that usually takes around 1-2 minutes and after this you are paid into your wallet. You will receive an email telling you that you have been paid and you can find these in the assets section, it’s up to you what you do with them. You can hold, convert, or even withdraw them to your PayPal. Keep an eye on this section as the drops happen at random times and only a certain amount will be available to claim, this is an easy way to earn some FREE crypto.
$10 Deposit Bonus
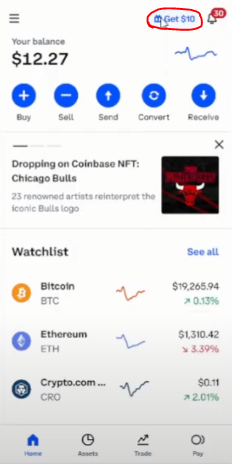
You can also make $10 from each referral, sign up your friends and family by getting them to click on your link, which you can find by clicking on the gift box in the top right (see pic below). If they buy or sell $100 worth of crypto, you and your referral will both earn $10 in Bitcoin, this is paid instantly and it is a good incentive to get people signed up to use the Coinbase App. If you haven't already signed up to Coinbase, I put my link at the start of the post, so feel free to use that to receive an extra $10 just for depositing into your account.
How To Send and Receive
I will now show you how to send and receive crypto from the Coinbase App. Head over to your assets screen, select the crypto you want to send, underneath the chart you will see your balance and the crypto ticker, click on this and it brings you to here. In the top right, click on the send icon (see pic below)
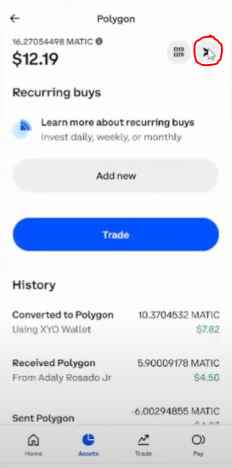
Select how much you want to send or click on MAX to send all of the available balance. Copy and paste the address you want to send into this box (see pic below).

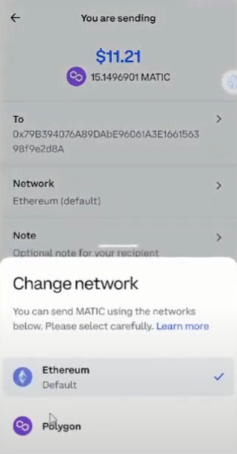
One great thing about Coinbase is that you are able to send crypto to other Coinbase users for FREE by typing in their phone number or email address, this is just something to note. So after you have put in the address click on “Preview”. This next bit is important as you need to make sure you are sending to the correct address and the correct network, so always double check this before sending (see pic below)
Coinbase charge a fee for sending, they are one of the cheaper exchanges for sending crypto, especially when it comes to sending Bitcoin or Ethereum. If you are happy with everything, click on “Send” and you will then have to authorise this with an SMS code or email code to prove that it is actually you that is requesting this withdrawal.
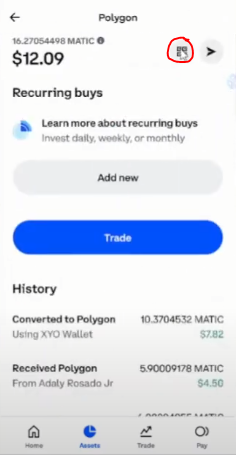
To receive crypto, go back to your assets screen and select the crypto you want to receive. Click on the ticker underneath the chart and in the top right, click on the QR code (see pic below).
Which takes you to this screen (see pic below).
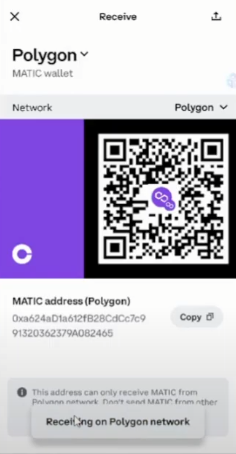
For this example I will use MATIC, you can get the address 2 ways, using the QR code or by clicking the “Copy” button. This just copies the address so you can easily paste it into the platform or wallet you are sending crypto from. Another thing to note is to make sure you have selected the correct network, as this can change the address for certain coins so this is always worth checking. If you send a coin to the wrong network you will not be able to recover this.
Summary
I hope this Coinbase App Tutorial has helped you work out how to get set up and also how to buy, sell and convert your crypto. If you can take one second to follow my channel, I really appreciate all the support and this will help get this post out to more people, which will help them understand Coinbase App a bit more. I have put my video to my YouTube channel below which shows you how to get set up and using Coinbase, so feel free to check that out too. If there is a certain topic or platform you would like me to cover then please comment below. As always, thanks for reading and I will see you in the next post.


